Anyone can appear in a store-bought costume on Halloween night, but nothing beats the uniqueness of clever DIY Halloween costumes. We have some simple outside-the-box ideas below to help you stand out from the crowd on your next candy run.
You don’t need to be a master crafter for these; you just need a little imagination. Read on for our DIY Halloween costumes and level up next time you hit the neighbourhood for a trick-or-treat.
Our favourite DIY Halloween costumes for kids (and how to make them)
We’ve put together a list of easy DIY Halloween costumes to suit those pressed for time and less handy with crafting duties. You don’t need to be Jim Henson for these creations; a totally unique outfit for your kid, or yourself, can be very straightforward.
Costume idea #1: The classic rag doll
Everyone can recognise the classic Raggedy Ann look, and there is nothing better than a combo costume for you and your child.
It’s super easy and only requires clothes from your own wardrobe and some yarn (red is the classic colour of Raggedy Ann’s hair, but feel free to change it up with something else).
You’ll also want some felt strips to match the colours of your yarn, scissors, thread and two simple hair combs.
Cut the yarn pieces to create any wild shape you like for the wig, tie it into pigtails with the felt strips, grab a dress and some fun mismatching accessories, and then finish with a little face paint to create a ragdoll look.
Costume idea #2: The mummy bump
This one is for pregnant women who may have difficulty finding an easy and comfortable selection of DIY Halloween costumes. All you need is a cosy white tee shirt, some toilet paper or gauze, and some drawn or printed spooky eyes. Place the eyes on your bump and wrap yourself up like a mummy, and it will look like you are hatching a hilarious baby mummy!
Costume idea #3: A cup of hot chocolate
This one is a little more involved but very unique! You’ll need the following supplies:
40×60” sheet of cardboard
Wrapping paper (in a plain colour of your choice)
Poster board (the same colour as the wrapping paper)
Spray adhesive
Hot glue gun
Brown felt
Three 4” x36” foam rollers
A box cutter
Brown elastic
Brown Dress or shirt
Step-by-step directions
Cut the foam rollers into four-inch pieces with the box cutter
Cut the cardboard sheet to an appropriate size for the body of your mug (curve it around your body before cutting to ensure a comfortable fit)
Spray the outside of the cardboard piece with spray adhesive, then cover it with wrapping paper
Cut a handle shape out of the poster board and fold over one inch on each end to glue it to the body of the mug
Hot glue the felt around the top of the mug unevenly and haphazardly so it looks like hot chocolate is spilling over the top of the mug
Glue the foam as “marshmallows” on top of the felt
Glue the elastic to the front and back of the mug as straps
Some easy and fun family costumes are Mario Kart cars! Pick your characters, then find some boxes, spray paint, vinyl, and ribbon. The cardboard boxes should be large enough to stand in, and you’ll also need:
Cardboard scissors
Spray paint (the colours will depend on what character you are recreating)
Hot glue and hot glue gun
Mario Kart car emblems (drawn or printed)
Permanent adhesive vinyl in colours that match your character
Ribbon
Painter’s tape
Step-by-step directions
Measure how tall you want the base of the car to be and cut three of the four sides of your box off, leaving five inches of the base around the box and one full side of the box.
Cut off the bottom of the box for your legs, then fold the front of the box back at a 45-degree angle. You can use the cardboard that you cut off for the tires.
Paint your “car”, but tape off where you want the white stripes on the front to be; painting them white makes them your racing stripes!
Cut out the Mario Kart symbols for your character and use hot glue to put them on the bonnet and sides of your car.
Glue the tires to the side with the larger tires on the back and smaller tires on the front
Create some straps to hold the car onto the wearer like suspenders.
Costume idea #5: Crayon on strike
Simple and cute, this costume takes inspiration from the book The Day The Crayons Quit. Make some crayon tip hats out of cardstock with a matching outfit in the colour you want your crayon to be.
Add little black cuffs around the ankles and small protest signs that say “we quit” and “on strike” to the story! Be sure to write your protest messages with a box of crayons.
Costume idea #6: Cardboard flower pot
We’ll end with a very easy DIY project for those who need a last-minute Halloween costume. You’ll only need a big piece of cardboard and an X-Acto knife or scissors that can make some small cuts. This can also be great for DIY baby Halloween costumes!
Simply cut the shape of a flowerpot and paint around the edges to create the pot look, then cut the individual flowers and glue them on to create your own look.
You can even leave a few non-glued flowers that can be stuck on with blu-tack or held to change the “flowerpot arrangement” throughout the night. Maybe even give some flowers to the houses that reward you with the best candy for your efforts!
How can I dress up for Halloween without a costume?
For those who don’t have the time or energy to come up with a costume, you can still get into the Halloween spirit with these ideas:
Let a favourite character inspire your outfit
Wear a festive headband
Add a pop of orange to your outfit to pay homage to the pumpkin!
Wear a DIY Halloween statement
Rock a pumpkin t-shirt
Opt for Halloween-style nail art
Go for some bold lipstick or eyeliner
What are some classic Halloween costumes?
The classic Halloween costumes below may help you find the perfect traditional look for your next round of trick-or-treating:
Witch costumes
A vintage Pierrot Clown
Funny DIY Halloween costumes like an adult Tamagotchi
Pirate costumes (with a skeleton flag, of course)
Vampires
Animals
Devil (complete with pitchforks)
Zombie costumes
What is the most popular Halloween costume ever?
The most popular Halloween costume is often a witch that sees roughly 4.6 million people wearing the look each Halloween. Next on the list? Princess costumes and superheroes like Spiderman!
Look your best with these DIY Halloween costume ideas and have the spookiest night ever!
We’ve given you a bunch of fun options above to help you be creative and have fun next Halloween. Remember, you can tweak as necessary or take some of the core ideas to make new ones of your own!
If you really want to be flashy next Halloween (and possibly win some costume competition), search the very talented seamstress and costume maker Taskers we have available. They can help you go all out with a costume that will help your impress the neighbourhood and fill those bags with candy!
We know that people like to go all out with Halloween making it a contender for the best-looking event of the year. Hopefully, the ideas above help you truly get into the spirit!
From the tree to the table, these awesome ideas will bring the holiday spirit.
You’ve put up the Christmas tree, right? Posted all your Christmas cards, organised thoughtful gifts for your nearest and dearest, and planned the perfect menu for a light Christmas lunch (which will follow festive brunch with the neighbours before festive dinner at your in-laws)?
Oh, not yet? Don’t worry – nor have we, so we’ve pulled together the best festive hacks and Christmas themed DIY ideas we could find to make silly season celebrations a cinch.
DIY Christmas trees
1. Scandi style Christmas tree
This minimal Christmas tree DIY is subtle but stylish. Image by The Merrythought for West Elm
Sometimes less is more! This chic Scandi style Christmas tree is perfect for adding the holiday spirit to any small space with minimal effort. All you need is a petite tree, a woven basket and a few fairy lights. Caitlin and Manda from The Merrythought put together this minimal Christmas tree DIY for West Elm. Check out the step by step tutorial here.
2. Modern Christmas tree
A mini forest of modern Christmas trees! Image by A Kailo Chic Life
Christmas needn’t be a traditional affair. Give your festive decorations a modern twist with a forest of mini Christmas trees in your favourite colours. To create this eye-catching DIY project, you’ll need paper mache cones. (You can find these at educational suppliers or craft stores like Spotlight). You’ll also need aerosol paint and metallic pens in copper or gold for painterly splashes to complete the look. Kara explains exactly what’s involved in her blog A Kailo Chic Life.
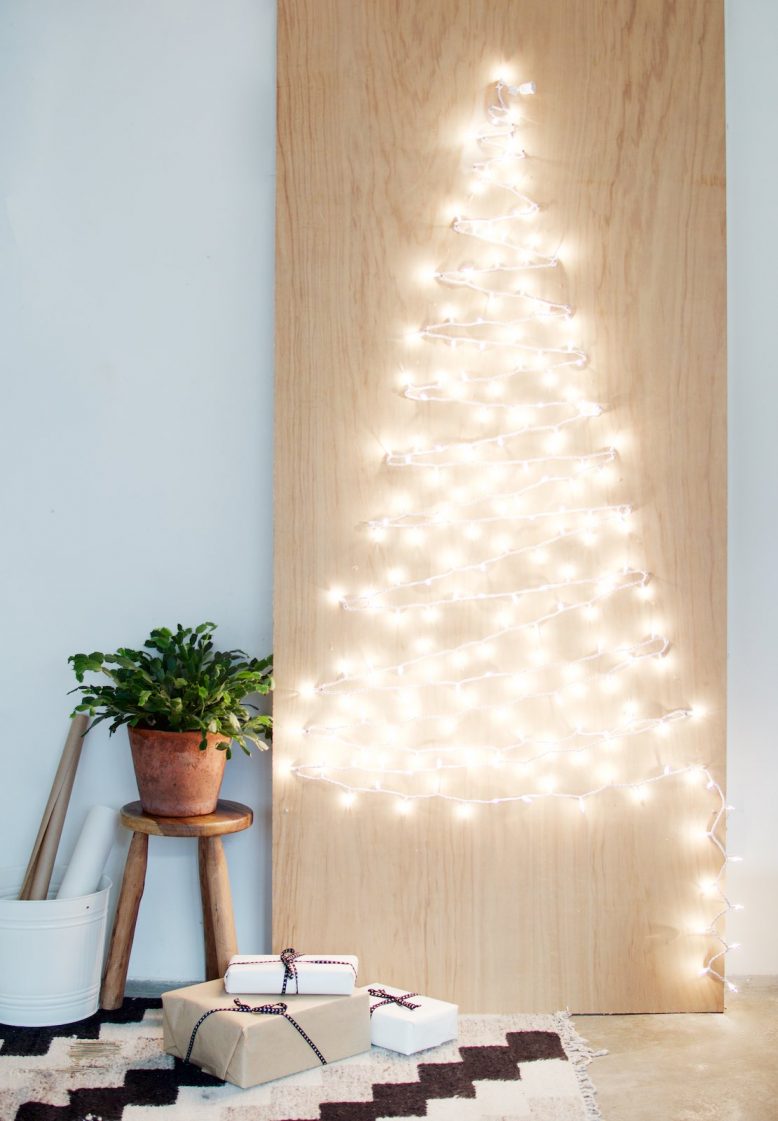
3. Fairy lights
Luminous lights for a glowing Christmas. Image by A Pair and a Spare
It might be too hot for a fire on Christmas day in the Southern Hemisphere, but you can add an inviting glow to your living room with a luminous fairy light tree. Visit A Pair & A Spare where Geneva gives super easy to follow step-by-step instructions on how to assemble a fairy light Christmas tree on pine wood backing. Can’t fit 3m of plywood in your house? You could also attach 3M hooks directly to your wall in the shape of a tree then thread through a string of fairy lights for instant ambience.
4. Hanging herbs
Festive and fragrant hanging herb tree. Image by Michael Wiltbank
An aromatic and rustic alternative to a traditional Christmas tree, this novel DIY is perfect for foodies. Bundle up your favourite herbs (make sure to pick varieties such as Rosemary or Sage that will dry well – no one wants droopy Parsley). Then, hang them with twine from a picture rail or wooden dowel. Bonus, this will come in handy if you run out of herbs while preparing Christmas dinner!
5. Cactus Christmas tree
Move aside pinetree! Image by Sugar & Cloth
Move aside, pinetree! You can transform any indoor plant into a Christmas tree with the addition of some pom poms, tinsel or other festive accoutrements. Sugar & Cloth prickles our fancy by transforming a humble cactus into a Christmas tree alternative with brightly coloured trim and super cute pom pom trim – check out their easy DIY instructions here! Can we keep our plants decorated all year? Get some inspo on which plant to choose with our tips on the best indoor plants for Aussie homes.
6. Geometric Balsa wood
Sleek and chic geometric wooden trees. Image by Fiddle and Spoon
Ensure Christmas is a classy affair with a modern minimalist balsa wood tree via Fiddle and Spoon. Chic and architectural, this DIY project promises a luxurious final product that wouldn’t look out of place in a high-end boutique. These tree-riffic designs also make great table decorations when created in miniature. Customise the colours to match your décor.
7. Party fringing
Bring the party with festive fringing. Image by A Bubbly Life
Have a penchant for pastels? Then yule love A Bubbly Life’s fringed Christmas trees in mint green and bubblegum pink. Laurel shows us how easy it is to start with cardboard or paper mache cones. Just cover with fringing created from cut-up tissue paper strips. This DIY also works great with metallic tinsel if you’re looking for something with more glitz and glam.
8. Mini vignette Christmas tree
A tiny-space tree. Image by Stone Gable
Apartment dwellers may not have halls to deck with holly, but they needn’t miss out on spreading Christmas cheer! Bring the fun of the silly season to a small space with this idea shared by Stone Gable. Check out the tutorial, complete with a list of all of the household items you could use to put together this fun-sized festive scene here.
DIY Christmas decorations
9. Bauble wreath
Go big or go home with this bold bauble wreath! Image by Sweet Pickins
Your front door is sure to become the talk of the neighbourhood if you recreate this fun idea from Sweet Pickins. Steal a few of your kids’ pool noodles, invest in an abundance of baubles (Kmart has a great range), fire up a hot glue gun then get glueing to create this show-stopping wonder. We love the rainbow effect Sweet Pickins has created, but this DIY would also look great in one block colour.
10. Minimalist wreath
Clean and elegant Christmas style. Image by These Four Walls
Between presents, decorations and social occasions, most of us tend to go a bit overboard on Christmas. Cut through the clutter and give your back pocket a break with a chic and minimal wreath that can be assembled in minutes, and with very few materials, thanks to this step-by-step guide from These Four Walls.
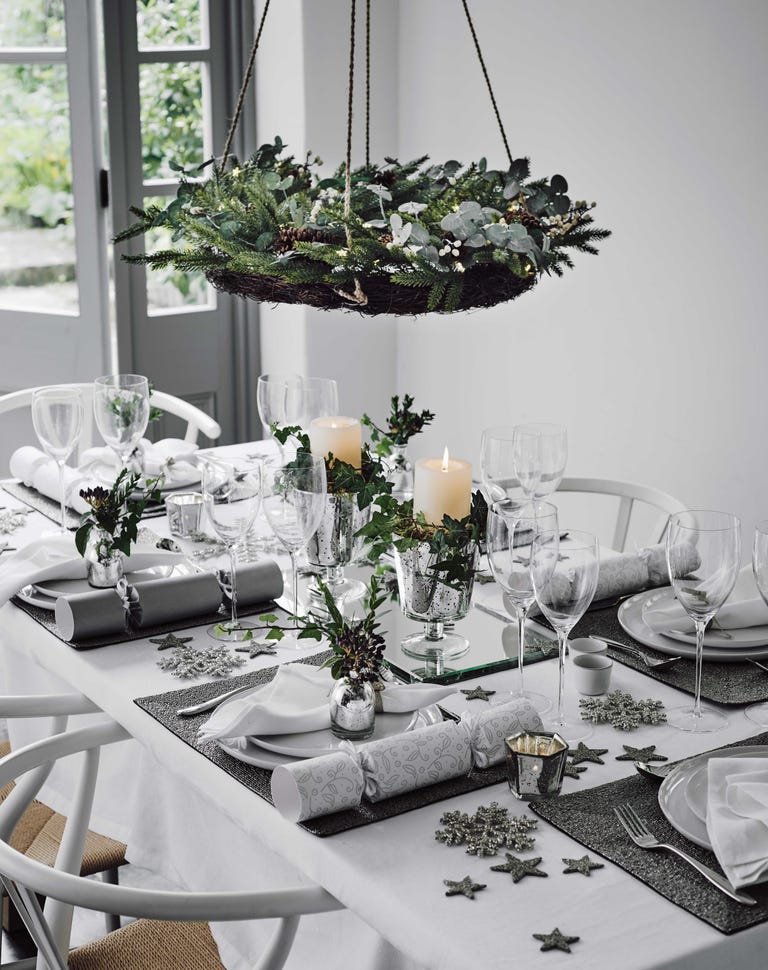
11. Horizontal wreath
Elevate your table setting by elevating the decorations. Image by The White Company
Love a pendant light? How about a pendant wreath? This clever idea by The White Company is a stylish twist on a traditional decoration. For this suspended showstopper, you’ll need a wreath, some rope and a strong ceiling hook (hire a handyman if you can’t hang one yourself). Check out these Christmas table decoration ideas for more inspo. And, bonus, more space on the table for Christmas dinner! No complaints here.
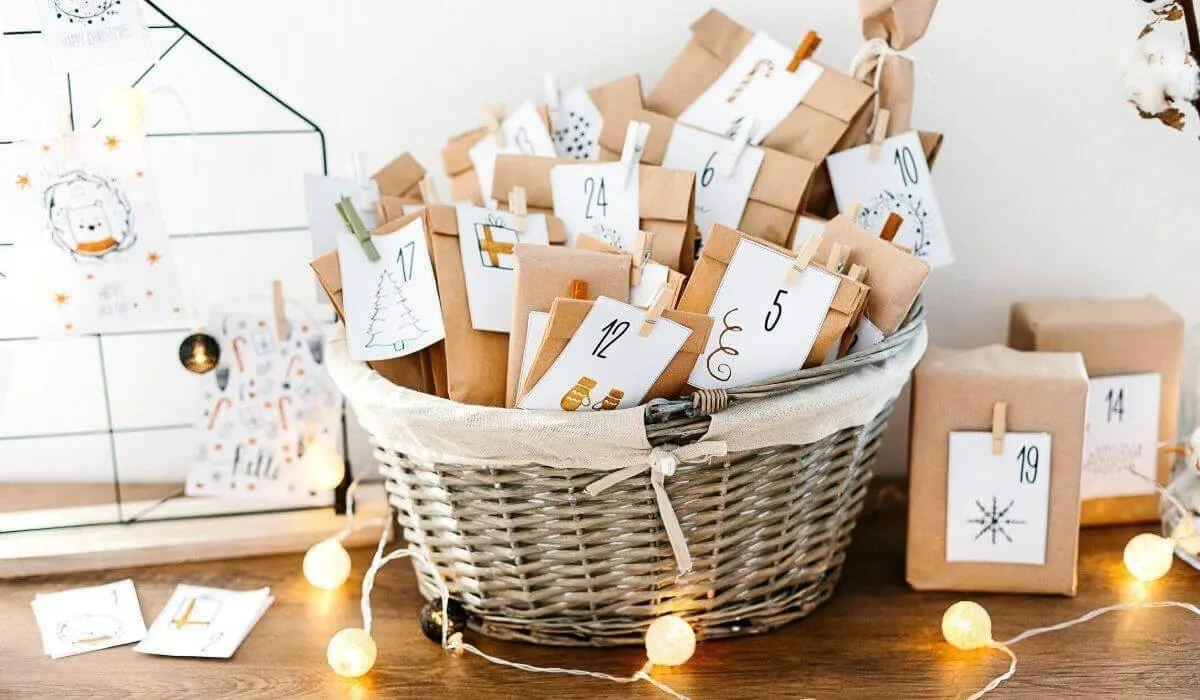
12. Advent calendar
An exciting way to count down the days until Christmas. Image by Simplify Create Inspire
An advent calendar can make every morning feel like Christmas morning. Design your advent calendar however you want – be it with brown paper bags or bottle caps. Simplify Create Inspire has loads of ideas worth checking out. Fill up your advent calendar with notes, chocolates, and trinkets for your child or partner. What better way to count down the days until Christmas?
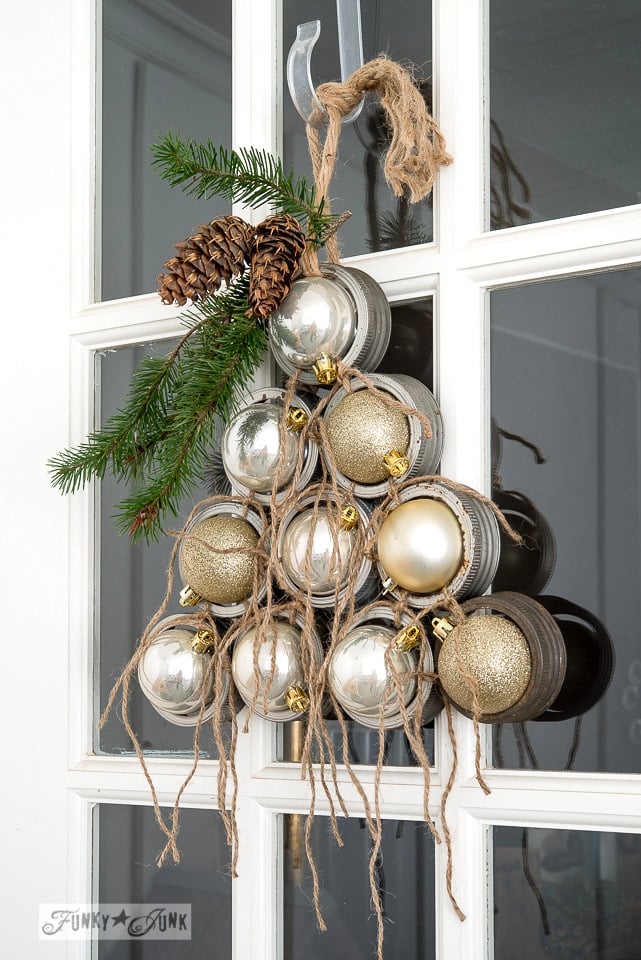
13. Mason jar lid and bauble wreath
A little rustic, a little sparkly. Image by Funky Junk Interiors
A fresh wreath will generally last around two-three weeks maximum depending on how well you take care of it, and how much Mother Nature decides to crank up the heat during December. For an option that lasts forever and is a fresh take on tradition, this DIY is for you. Check out the full tutorial by Donna at Funky Junk Interiors here.
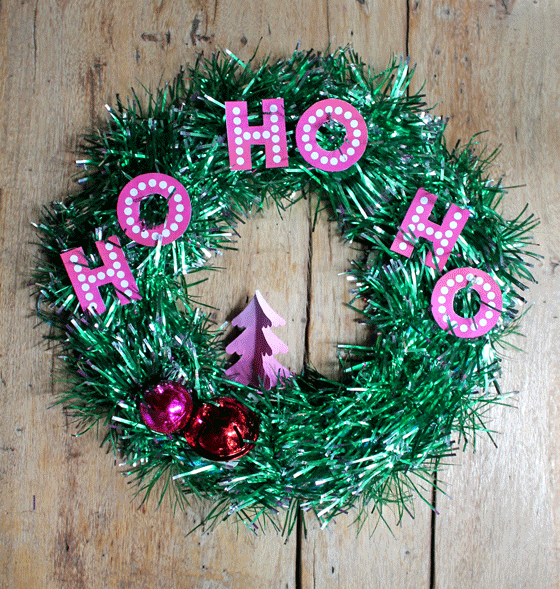
14. Tinsel wreath
A very merry Christmas wreath. Image by Happy Thought
Your days will be extra merry with a tinsel wreath positioned above your mantlepiece! A cheap and cheerful DIY project, a tinsel wreath can be assembled in under ten minutes (which leaves you extra time to shop for all of those last-minute gifts!). Visit Happy Thought for the full tutorial, plus ideas on customising your creation.
15. Marble baubles
Beautiful contemporary baubles. Image by Melissa Fenlon
According to DIY enthusiasts Alice and Lois, it only takes five minutes to make these stunning marble baubles! A must-do-DIY for anyone with a penchant for marble, these gorgeous baubles can be done in any colour to suit your festive decor. Visit Alice and Lois for the full DIY, plus plenty of other crafty Christmas ideas!
16. Clothespeg snowflakes
Sparkly snowflake stars. Image by Dream a Little Bigger
You can make Christmas ornaments from just about anything, as Allison from Dream a Little Bigger shows in this DIY project. Steal a few pegs from the washing line, and grab some glitter and glue to transform an everyday household item into a beautiful Christmas tree decoration! These stunning stars would also make great present toppers when attached to a gift with ribbon.
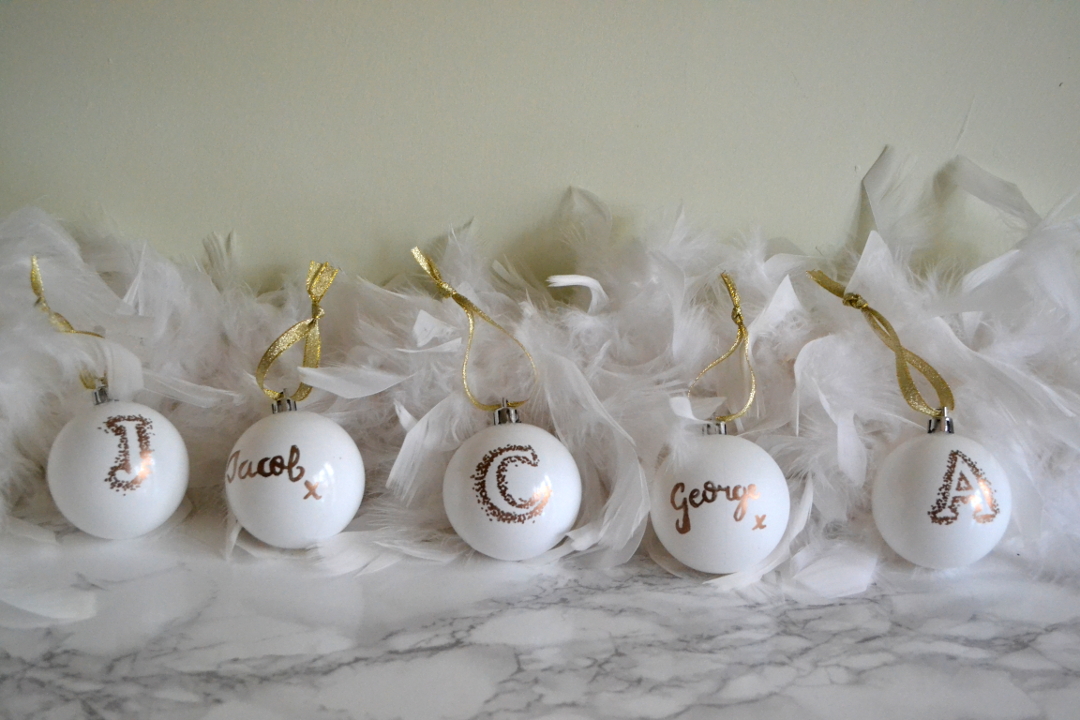
17. Personalised baubles
Easy-to-make personalised baubles. Image from Girl about townhouse
As you may know, we love a good #kmarthack, so we were impressed when we saw these lovely Christmas baubles! Caroline from Girl about townhouse says all you need is a bauble, sharpie, and some pretty ribbon. Spell out the name or initial of your loved one, and there you have it! A beautiful ornament you can also use as a fancy gift tag.
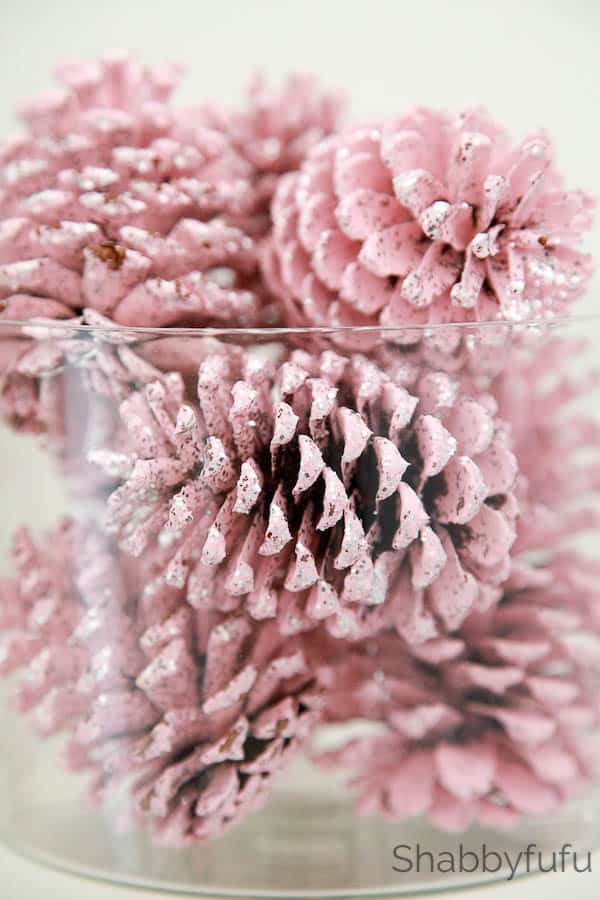
18. Painted pinecones
Pinecones with a pop of colour. Image by ShabbyFuFu
Hunting for the easiest Christmas DIY ever? Call off the search! Just forage for some pinecones (or twigs, or pampas grass, or palm leaves), pop down to Bunnings and grab some metallic spray paint then spray to your heart’s content! Instant luxe with natural charm and the possibilities are endless. Add them to a vase, arrange in a bowl or scatter over the table as a festive centerpiece. For tips on how to paint pinecones, visit ShabbyFufu.
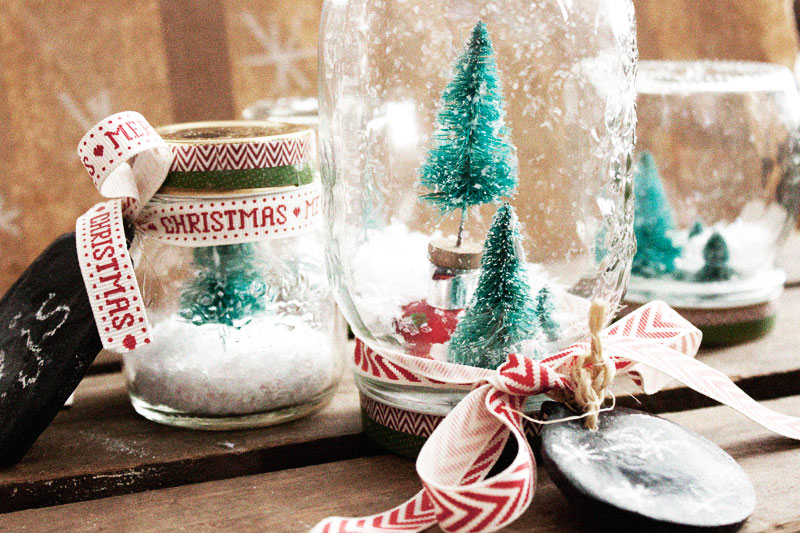
19. Snowglobe terrarium jars
Snowglobe terrariums the little ones will love. Image by Jamie Silver
Part snowglobe, part terrarium, this is a great use for all those jars you’ll have leftover from feastive-season nibbles. Jamie Silver shows her process in this simple step-by-step guide.
20. Luminaire centrepieces
DIY candle holders that are totally lit. Image by Today’s Creative Life
December days are guaranteed to be lit with these simple yet effective centrepieces. Round up some mason jars, tea lights, greenery and cranberries and voila, your table is ready for Christmas lunch! Kim from Today’s Creative Life explains how to make these 5-minute DIYs here.
21. Ice light candle holders
Fabulously frost candle holders. Image by Bo Bedre
While we’re not sure how long these would actually last on a hot Christmas night in Australia, we think these ice lights are super cool! Check out the tutorial from Bo Bedre here (just FYI it’s in Norwegian so you’ll have to translate!). For a longer lasting version of this fabulously frosty DIY, we recommend making the bases from resin with help from this tutorial.
22. Gold handlettering ornaments
Stylish gold hand lettered baubles. Image by Ting and Things
There is something so elegant about gold lettering. In addition to making your own tree look fab, these glittering ornaments also make a great gift for friends, family and colleagues. Lorita at Ting and Things shows how easy it is to make these stylish DIY ornaments. Find the full list of supplies and instructions here.
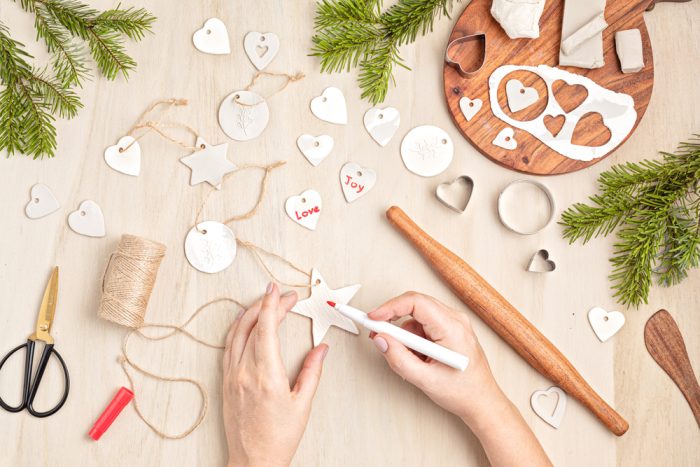
23. Clay Christmas ornaments
Simple and elegant. Image by A Pretty Fix
These clay ornaments have that perfect handmade look. Aren’t they pretty? And the best part is they’re easy to make! All you need are some air dry clay, letter stamps, and twine. You can also add watercolours to highlight your family members’ names. Jelica of A Pretty Fix shows five different ways to make air dry clay ornaments.
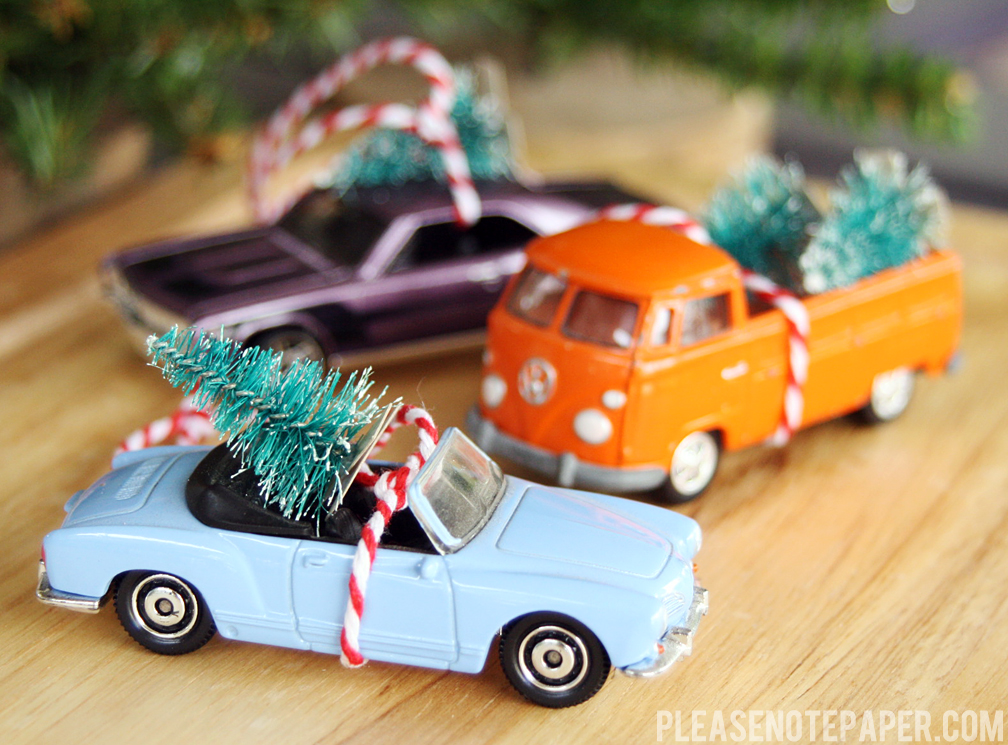
24. Car ornaments
Zoom into the festive season with these cool ornaments! Image by Please Note Paper
The motoring enthusiast in your household will get revved up over these wheely cool decorations. Rather than raiding your favourite little person’s prized Matchbox collection, we suggest purchasing some cheap car toys from your local $2 shop to complete this DIY. Visit Please Note Paper for the full list of materials plus a comprehensive how-to.
25. Giant baubles
Baubles, bar cart and beverages! Image by A Kailo Chic Life
Supersize your Christmas celebrations with XL baubles! Fabulous stacked up in a pile, or perched atop a Christmas tree, these oversized and over-the-top ornaments are easy to construct with foam balls and a few other materials. Love this idea? Kara from A Kailo Chic Life has you covered with her simple step-by-step guide.
26. Festive pillow
Turn your regular pillows into holiday pillows. Image by Jalynn Baker via HGTV
A quick DIY is all you need to turn your living room into a festive space. Simply wrap your pillows like a present; Perfect if you have Christmas-coloured ribbons lying around! You can even wrap your pillow with a festive flannel shirt you have on-hand. Here are some Christmas pillow ideas from HGTV.
DIY Christmas gifts
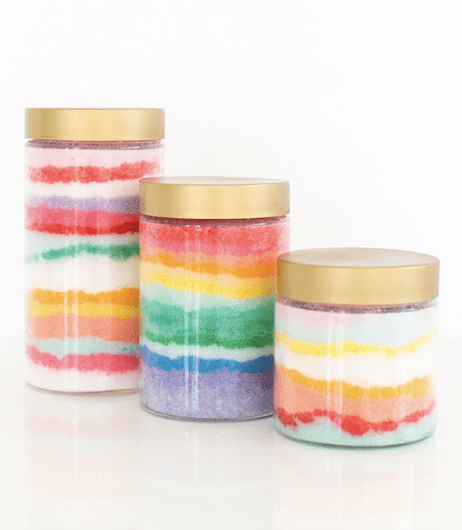
27. Bath salts
A gift to use all year round. Image by Sugar & Cloth
Handmade gifts remind your loved ones that you’re thinking about them. This ever-so-creative DIY from Sugar & Cloth combines homemade bath salts with sand art. If you don’t have any large jars laying around at home, you can buy some mini RAJTAN spice jars from Ikea.
28. Peppermint mason jar candles
Smells like candycane! Image by A Pumpkin and a Princess
Is it even Christmas if your house doesn’t smell like lollies, spice, or fruit? A lovely way to ignite Christmas cheer in your household, this DIY project doubles as a handmade present. Crafty blogger A Pumpkin And A Princess says you’ll need soy candle wax, peppermint oil, and your creative juices to complete this project.
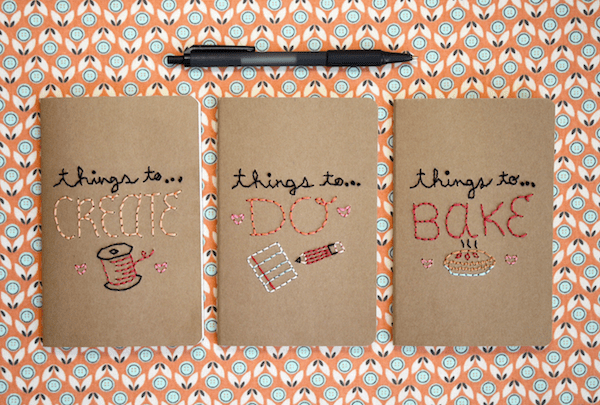
29. Embroidered notebooks
A personalised gift is always well received! Image by Mollie Makes
You’ll have sew much fun picking out a design then embroidering it onto a note book, thanks to Mollie Makes! This DIY project can be labour intensive if you’re not an experienced sewer so don’t leave it until the night before Christmas.
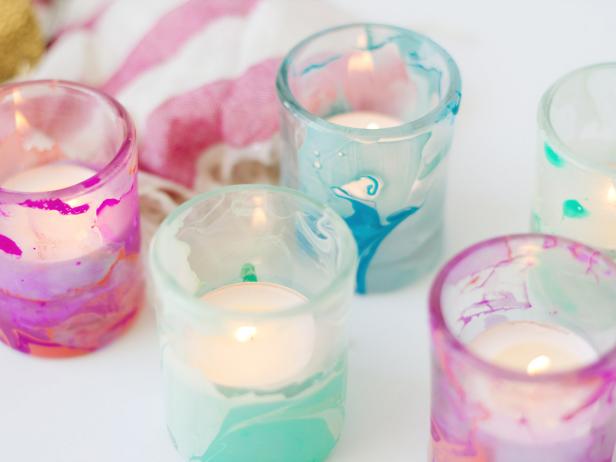
30. Marbled tea light cups
Pretty marbled tea light holders. Image by HGTV
If you’re tempted by the marbled baubles above, get some other items in on the action! These plain glass tealight holders are easily transformed into unique pieces with just a bit of nail polish. Great for a bulk gifting. Chelsea explains how here.
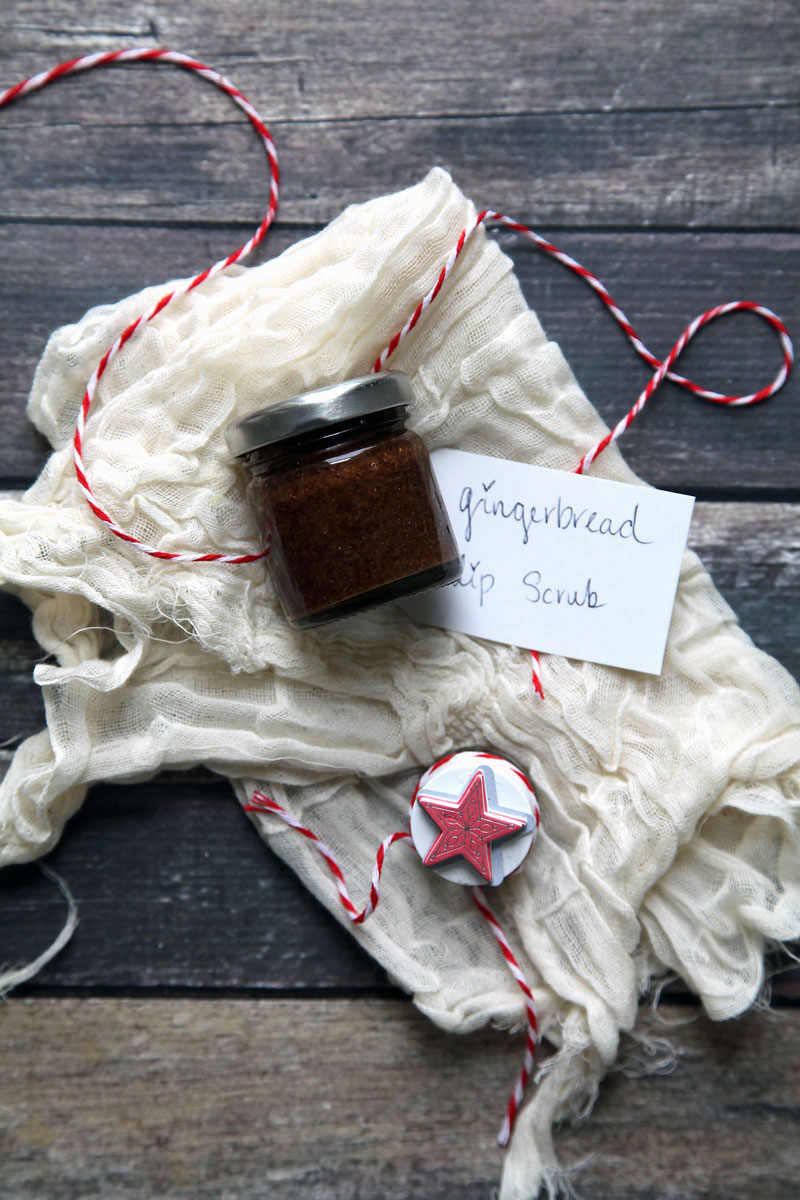
31. Gingerbread lip scrub
Get prepped for a kiss under the mistletoe. Image by Runway Chef
Between kissing grandparents and smiling for family photos, your lips need some love at Christmas time! Delicious and a skin care staple, this lip scrub is a fab stocking stuffer that you can make while you’re whipping up a gingerbread house. Alyssa shows us how on the Runway Chef.
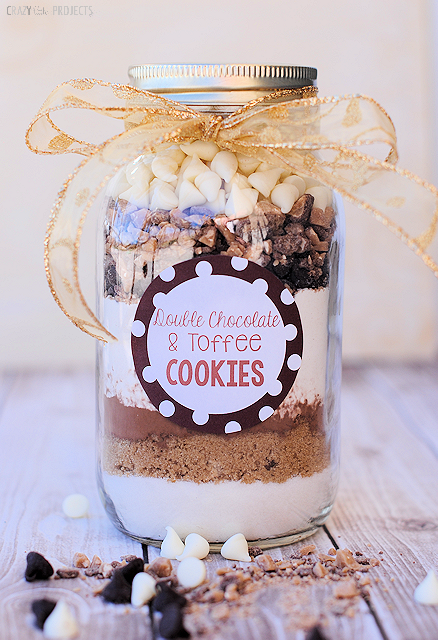
32. Cookies in a jar
Biscuits are always a good idea! Image by Crazy Little Projects
A ready-to-go recipe in a jar is a fabulous gift idea for your favourite time-poor food lover. Simply layer the ingredients and print out instructions so that it’s easy for the giftee to make, bake, and devour. Crazy Little Projects has an easy-to-follow cookie recipe plus printable tags to give your jar a professional touch.
33. Bath bombs
Maxo relaxo for the holiday season. Image by Inspired by Charm
Tis the season to be jolly and to relax in a bubblebath! Give the gift of pampering and relaxation this Christmas with a homemade bath bomb for anyone who appreciates a good soak. Customise the colour and scent with your favourite essential oils. You’ll find the full tutorial via Inspired by Charm.
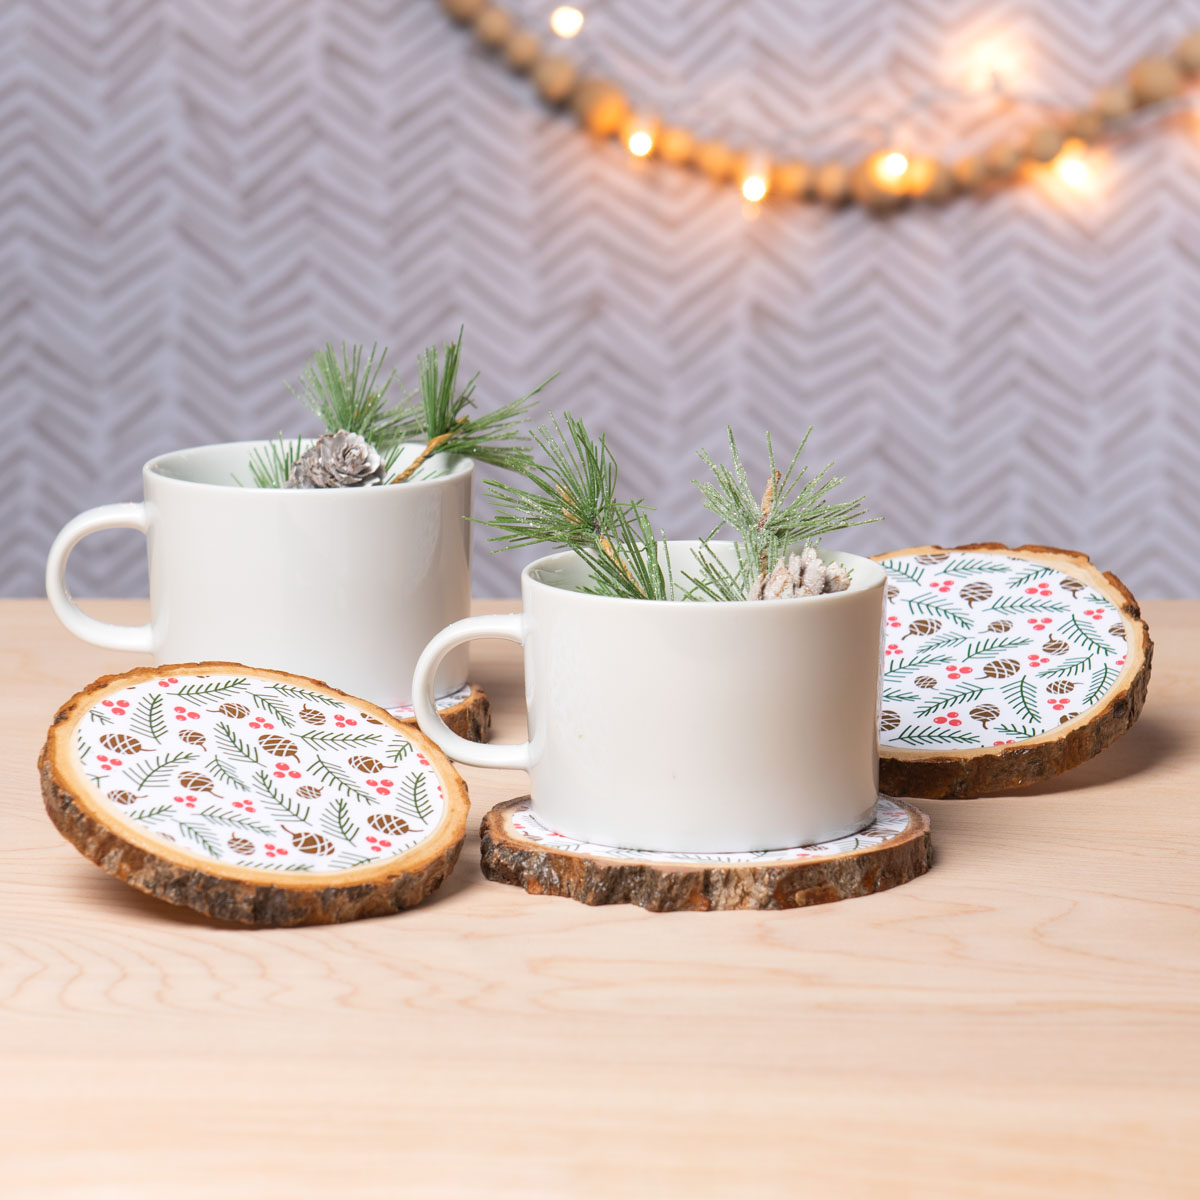
34. Hot Chocolate baubles
Hot chocolate in an ornament? Yum! Image by Aycan of Little White Socks
Even on a hot summer’s night there’s nothing quite like a cup of cocoa to get into the Christmas spirit. This delicious DIY from Little White Socks is sure to impress; All you need is some hot cocoa powder, mini marshmallows, crushed candy canes and clear ornaments. Just pour the contents into a mug, add milk, and you’re all set!
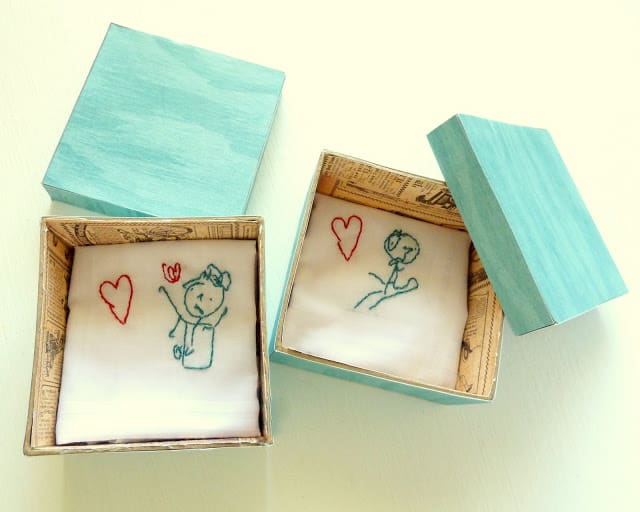
35. Embroidered hankies
Immortalise your kids’ drawings. Image by diys.com
You can’t go wrong with practical gifts with a personal touch. If you have kids, why not trace their drawings onto handkerchiefs and embroider them? Your spouse is going to love a piece of your kids’ artwork to carry around. Grandma and Grandpa would love them, too! Other than doodles, you can sew on names or witty one-liners onto the hankies. Here’s how to do a standard stem stitch.
If you’re not confident with your sewing skills, you can hire a local seamstress to do a bunch of hankies for you.
36. Christmas slippers care package
A Christmas basket with a twist. Image by Savvy Honey
Here’s a twist on your usual Christmas gift basket. Stuff a cosy pair of slippers with care package staples, such as lip balm, lotion, face masks, and chocolate. You’ll be giving your loved one everything they need for some pampering over the holidays. Check out these cute Christmas slippers basket ideas by Savvy Honey.
37. Framed handwritten recipes and letters
A thoughtful yet easy DIY gift. Image by Bless’er House
Your memorabilia don’t have to stay tucked away in your drawers. Take your most loved recipe or letter and display it in a beautiful frame. Here’s a quick guide on how to preserve ink on your framed handwritten recipes and letters.
38. Patterned coasters
From wrapping paper to statement piece. Image by Plaid
Mod podge is your best friend when it comes to DIY gifts. Just look at these patterned coasters you can easily make with mod podge. Now all your spare wrapping paper and Christmas paper napkins don’t have to go to waste!
39. Christmas tea tree
For tea lovers. Image by Thirsty for Tea
Tea lovers are going to adore this! Christmas tea trees are a clever way to display tea bags. Simply grab a styrofoam cone and glue gun, and construct your mini tree. Also, you can choose colour palettes and tea flavours fit for the holidays. Top it off with a large bow and star cutout, and you’ll have a gift your loved ones will be proud to display at home.
Festive food for Christmas gatherings
40. Antipasto Christmas tree
Move over grazing table, this is a grazing TOWER. Image by Cafe Delites
A feast for your eyes and your stomach, this delicious DIY is quite possibly the best Christmas catering idea ever! Find a step-by-step tutorial that explains how to recreate this mouth-watering masterpiece at home via the CafeDelites website.
41. Rosemary wreath platter
Pass this festive plate around! Image by Home is Where the Boat is.
Make the most of that lush rosemary bush in your backyard to create a rosemary wreath as the base for a festive antipasto platter. Trim a generous amount of rosemary, give it a rinse then assemble in a wreath shape on a circular plate. Garnish with olives, cheese, sundried tomatoes and any other finger foods that tickle your fancy. See more photos and HEAPS more festive food ideas at Home is Where the Boat is.
42. Sugar cone Christmas trees
Waffle cones just got even better. Image by Coupon Clipping Cook
An enchanted forest where all the trees are edible? Sign us up! These delicious treats are a fun and delicious kid-friendly DIY. Stock up on your favourite lollies and let your appetite be the guide. The hardest part is not eating all of the ingredients while you work! Nancy from Coupon Clipping Cook shows us how in this recipe.
43. Christmas tree cupcakes
No such thing as too much icing. Image by Manu’s Menu
Little bit of cake, little bit of green food colouring, whole lotta icing – these are just so cute! Manu’s Menu clearly has their cupcake piping technique down to a fine art, but if your baking skills aren’t quite there yet, just go heavy with the decorations. It’s all about the festive spirit, right?
44. Christmas tree meringues
The sweetest little forest ever. Image by Bargain Mums
The silly season just got sweeter thanks to these adorable Christmas tree meringues via Bargain Mums. Serve these cute, bite-sized trees as part of dessert, or use them as an edible table decoration or gift!
45. Strawberry Santa brownie bites
Christmas cuteness in bite-sized chunks. Image by I Heart Naps
You can give practically any food a Christmas-y makeover with the addition of a strawberry Santa hat, and brownie bites are no exception. Make brownies from scratch, or if you’re time-poor, opt for a brownie mix from the supermarket, cut them into small rounds, then perch a strawberry Santa hat on top, and you have the beginnings of a festive feast. Visit I Heart Nap Time for detailed instructions.
46. Cinnamon hard candy
A sweet present. Image by The Blond Cook
Spicy, sweet—cinnamon hard candy has all the fun and festive flavours you can ask for. By making your own cinnamon hard candy, you can put in as much or as little cinnamon oil as you want. Here’s a cinnamon hard candy recipe by Amy Brinkley of The Blond Cook.
47. Hot chocolate stirrers
Perfect for your coffee or hot cocoa. Image by Grace & Good Eats
These edible hot chocolate stirrers are genius. Just dip one of these into your hot cocoa or coffee, and you instantly get a holiday drink. To make the stirrers, dip the ends of peppermint sticks in melted chocolate. Then, sprinkle on some crushed candy canes or marshmallows misted with water. Here’s a 15-minute recipe by Grace and Good Eats.
Christmas gift wrapping ideas
48. Eco-friendly gift wrapping
A gift within a gift! Image by My Poppet Living
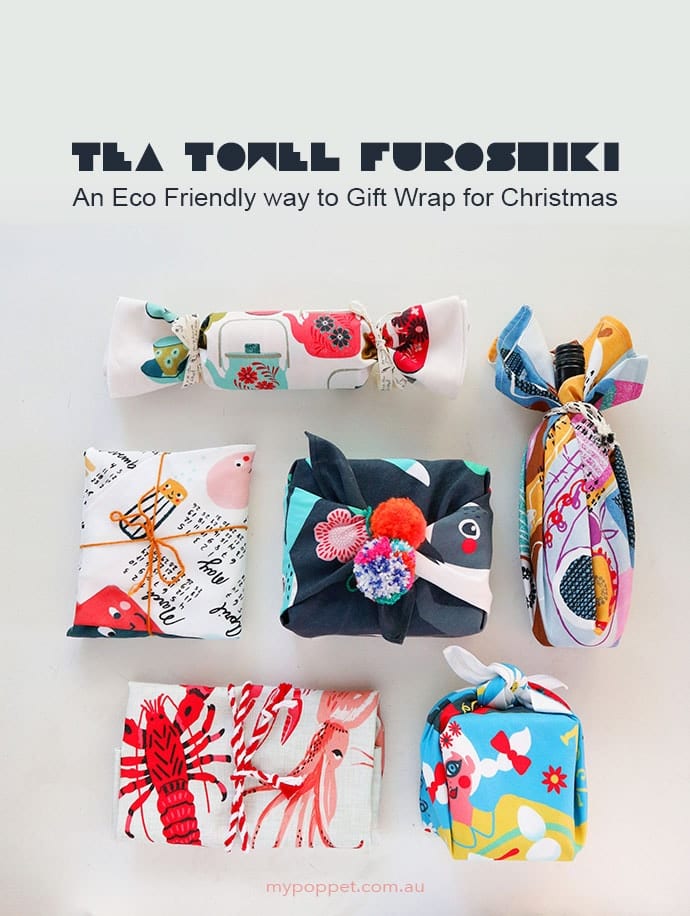
Furoshiki – the Japanese art of fabric wrapping – is a sophisticated change of pace to presents wrapped in paper. Use fabric in a pretty print or block colour, or purchase some cute teatowels, then wrap away! Get inspired about the possibilities of furoshiki in this tutorial by My Poppet Makes.
49. Calligraphy
Personalised paper for an extra special gift. Image by Boxwood Avenue
You don’t need to be a master calligrapher to create bespoke wrapping paper adorned with your favourite festive phrases (but it would certainly help!). Chloe from Boxwood Avenue says all you need to recreate this chic wrapping DIY is paper, a sharpie, and some silly season slogans. Finish with a striped ribbon and a sprig of your favourite herb.
50. Hand-painted gift wrapping
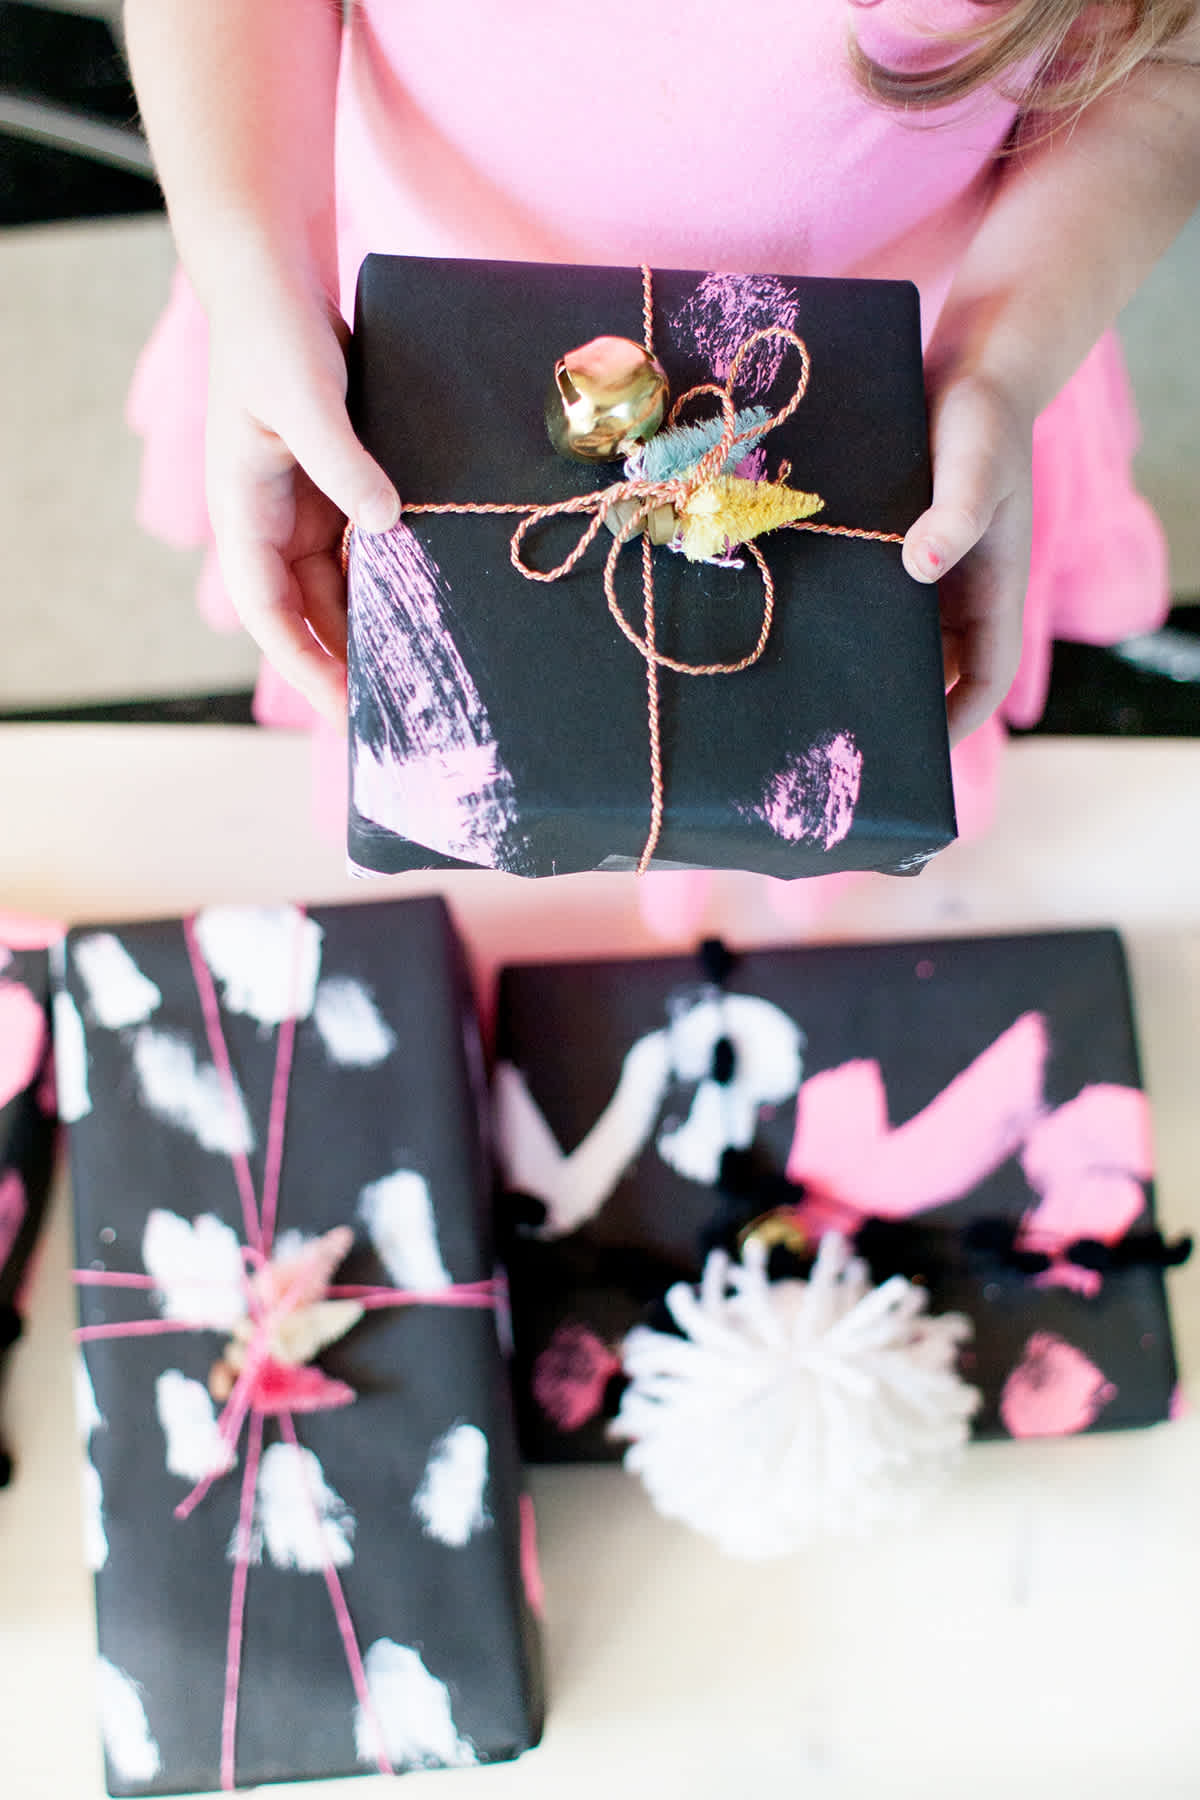
Add pizazz to your pressies with abstract painting. Image by Lay Baby Lay
Painterly brush strokes never looked so good! We love this DIY idea by Lay Baby Lay who transforms bland black paper into a work of abstract art with white and pink brushstrokes. She continues the artistic flair with an array of ribbons and fun finishing touches including mini trees and golden bells.
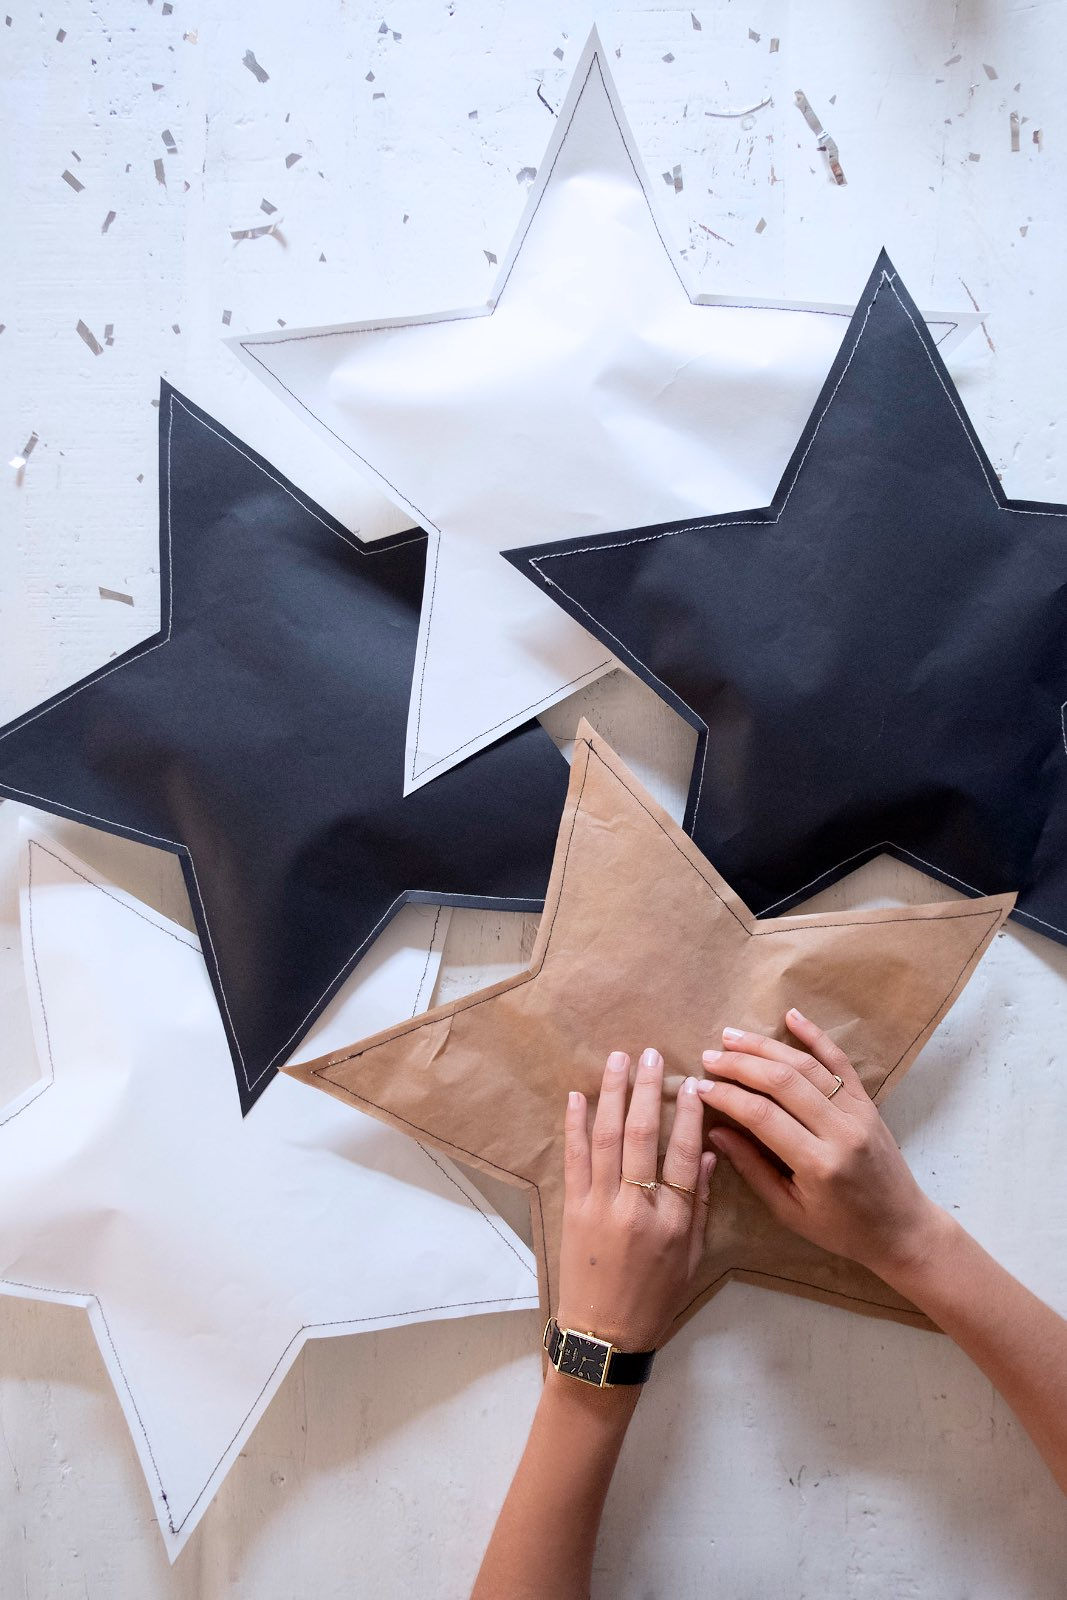
51. Star-shaped gift wrapping
For a star in your life. Image by A Pair and a Spare
Are you a star on the sewing machine? Then you’ll have no problem re-creating this stunning wrapping idea by A Pair and A Spare. Get going with a star template, then fire up the Singer to stitch together a star-shaped pouch. Fill with confetti or tinsel pieces for extra wow.
52. Animal gift wrapping
Almost too cute to unwrap? Image by Lia Griffith
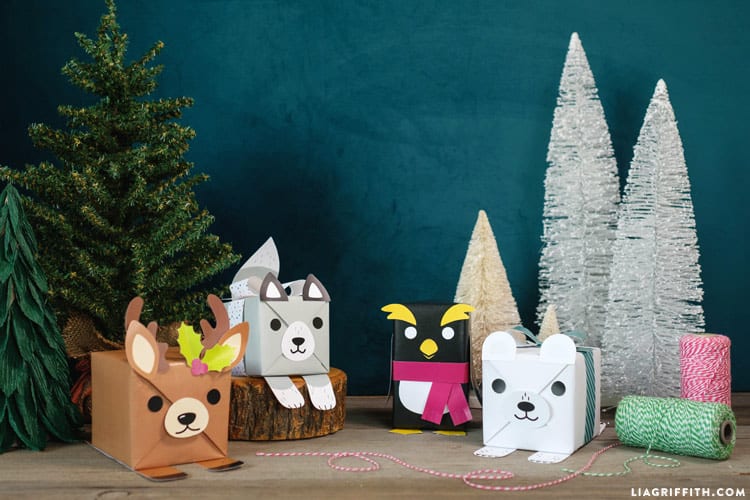
Whether you channel the North Pole with a penguin present, or prefer to keep things closer to home with a gift resembling your favourite four-legged friend, animal gift wrapping is an adorable idea. Handcraft heavyweight Lia Griffith has done the hard work for you and has created animal stencils that you can download from her website and print at home. Thanks Lia!
53. Roller stamp prints
Roll and go! Image by Handmade Charlotte
Did somebody say #IkeaHack?! Transform a humble Ikea lint roller into a stamp to decorate wrapping paper with this amazing tutorial by Handmade Charlotte. Once your stamp is assembled, apply paint and get rolling. It’s that easy!
54. Reindeer gift wrapping
This wrapping is a-deer-able. Image by Frog Prince Paperie
If Rudolph the Red-Nosed Reindeer is the most popular Christmas carol in your household, there’s simply no going past this wrapping idea from Frog Prince Paperie. It doesn’t matter what shape the present; Wrap it up in brown paper, add a red nose and some antlers and voila, Rudolph wrapping complete!
55. Simple gift wrapping
Simple and stylish gift wrapping. Image by These Four Walls
Brown paper packages tied up with string… if these are a few of your favourite things, you’ll love this simple wrapping idea via These Four Walls. Basic yet beautiful, the wrapping of these presents is elegant without detracting from the wow-factor of the gifts inside.
56. Sweater totes
Looking cosy. Image by That’s What Che Said
Have any stretched out or shrunken sweaters? Cut out the sweater sleeves and slip them onto some wine bottles. Then, add some nice ribbons. These cosy-looking wine bottle gift bags will surely make your friends smile.
Christmas drinks
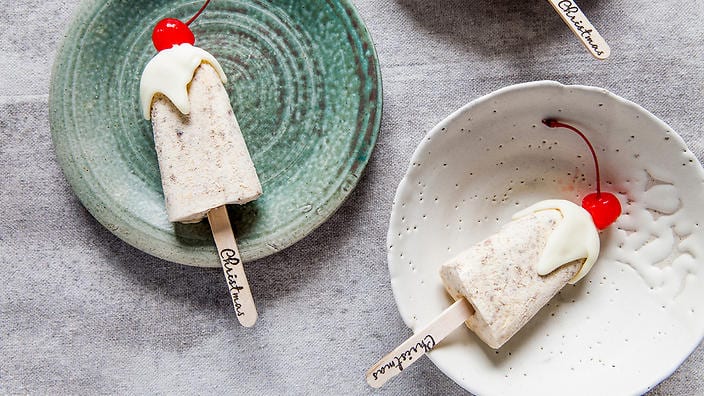
57. Boozy popsicles
The cherry on top of Christmas dinner. Image by China Squirrel
These not-for-kids Christmas pudding and brandy ice pops will go down a treat after dinner! China Squirrel shows us how to make them on SBS Food.
58. Christmas pudding vodka
Liquid Christmas pudding. Image by Jamie Oliver Magazine
Spice up Christmas drinks without overheating with this infused vodka recipe from Jamie Oliver. Perfect for a hot Aussie day with heaps of ice!
59. Cranberry mocktail
A bright and light beverage. Image by Say Yes
Let’s face it – for lots of us, Christmas involves lots of driving around, so a good mocktail is appreciated by one and all. Get refreshed with this cranberry concoction by Say Yes.
60. Beer Advent calendar
Cheers to that! Image by Chasin’ Mason
What’s better than a surprise present every day? A surprise beer every day! Chasin’ Mason brings the Christmas cheer with this beer advent calendar.
But wait—there’s myrrh!
When should you take your Christmas decorations down?
Tradition states that your Christmas tree and decorations should be taken down on Twelfth Night to avoid bad luck (apparently tree spirits live in the foliage so, yknow, they’re trying to enjoy the holiday season, too).
Whether you believe in the superstition or not, don’t let your brilliant DIY efforts go to waste and salvage your favourite pieces for next year. Box up your baubles, wreaths and trinkets with clear labels, so you can easily retrieve them from storage.
PS. Kmart’s Christmas range includes specialised storage solutions for all your decor, wrapping, and even your Christmas tree if you love being super organised.
Have yourself a merry little Christmas!
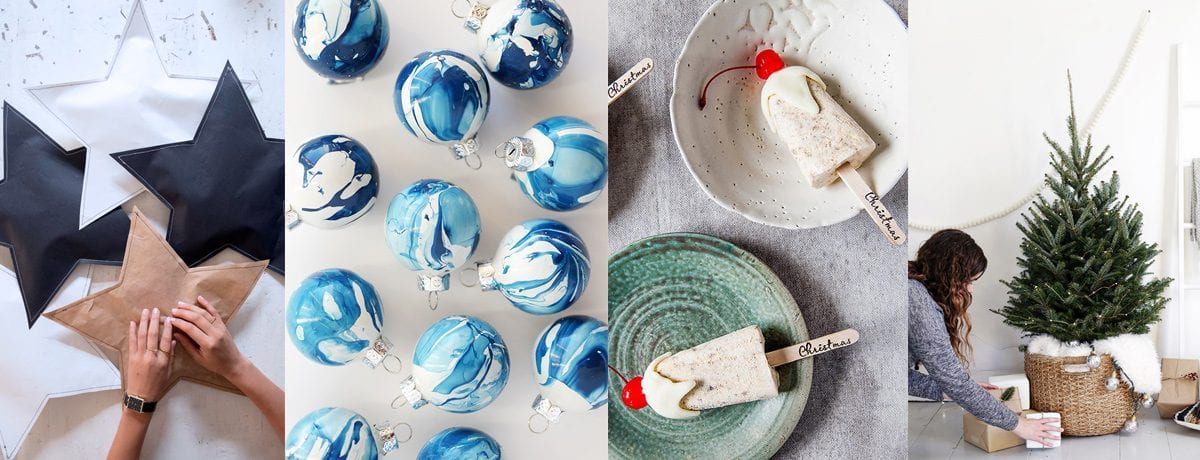
Header photos by: A Pair and a Spare / Alice & Lois / China Squirrel / The Merrythought
Need a little helper to deck the halls, or untangle all those Christmas lights? Find someone on Airtasker who can help out with any task you need done this holiday season.
Make your home look amazing this Christmas without breaking the bank. Here are some money-saving tips, from DIY to smart shopping.
As Christmas decorations fill department stores and Christmas carols play in every shop, Christmas season is well and truly here.
Right now you’re more money-focused than ever as Christmas day plans are made, present lists created, and party invitations start to arrive. While tis’ the season to be jolly, you can still be cash-savvy at the same time.
One of the easiest ways to save money is to cut back on the expense of Christmas decorations. Whether it’s DIY, smart shopping, or recycling, you can still make your home look amazing and it’s not as hard as you think.
1. Buy Christmas decorations early
Ever wondered what is the most reduced stock on Boxing Day? Christmas decorations. As with most themed holiday merchandise, decorations are drastically reduced the day after Christmas.
In fact, you’ll now find decoration discounting slowly starts a few days before Christmas day. So with a bit of planning and purchasing in advance, you’ll get some serious bargains for the next year.
Being prepared earlier means you won’t need to buy for convenience as the season nears, rather you can source great bargains a number of ways:
Look through online stores. You’ll often find the same item online, and can price match between sites to make sure you’re getting the best price for the merchandise.
Check discount department stores. Make sure you check out multiple stores when purchasing your decorations. For example, plain baubles are a Christmas staple, but you could be paying triple the price in a high-end department store compared to a discount department store.
Spending less on standard decorations will allow you to splash out on some show stopper decorations. What’s more, you’ll have plenty of money left for buying gifts for your loved ones.
3. Opt for DIY Christmas decorations
Let your inner crafter come out this year with do-it-yourself decorations. It’s an easy and creative alternative that will entertain you and the kids. Here’s a list of DIY Christmas ideas to get your creative juices flowing.
How to get started:
Create a Pinterest decoration board, and pin images you like. Pinterest is your new best friend for inspiration.
Find many helpful DIY tutorials via blogs and YouTube.
Involve the whole family and have a crafting night.
The DIY decorations also double as personalised gifts to give to friends and family – saving you even more.
4. Split the decoration costs with friends
You don’t have to bear the brunt of the decoration expenses if you live with friends. Agree on a budget and split the cost with your housemates. Or better yet, assign specific items to each person. For example, one person buys the ornaments while the other gets the Christmas tree skirt. This way, you’ll know who gets to keep what when you all no longer live together.
You’ll be surprised by what you can achieve by just recycling and reinventing the decoration wheel. Using decorations that are a little broken or for a different purpose is a great way to not only save money but also storage space.
All you need is a bit of glitter and some metallic paint, and you can come up with some holiday-themed decorations. Have some bottles or apothecary jars that show potential? Fill these containers with ornaments or string lights. Or create a wreath out of fallen branches from your garden.
6. Borrow or swap decorations with your friends and family
Gather your unused decorations, and trade them with your family and friends. Chances are they’ll be happy to have “new” decorations without spending on brand-new items. A holiday swap party can make things extra fun. You can even invite your loved ones over and create DIY décor together.
7. Use non-traditional décor
A fancy Christmas tree with all the lavish ornaments isn’t the only way to achieve that festive spirit. If you’re on a tight budget, these unique Christmas tree ideas are great alternatives to traditional Christmas trees. From book trees to ladder trees, there’s something for everyone on this list.
8. Own the minimalist style
Less is more. With creativity and intention, minimalist decorations can create that elegant and effortless touch. Scale back on decorations and focus on specific areas in your home. You can impress your guests with a stripped-down Christmas tree with simple white lights and golden ornaments.
If you have all the Christmas decorations but could use an expert touch, you can hire a local decorator to put everything together. Beautiful Christmas decorations don’t have to cost you a fortune.
Christmas is certainly not going anywhere; It’s guaranteed to come back the same time next year and make a dent in your bank account. By being creatively practical, you can reduce the cost of decorating for the holiday season and leave you with money to spend on your loved ones instead.
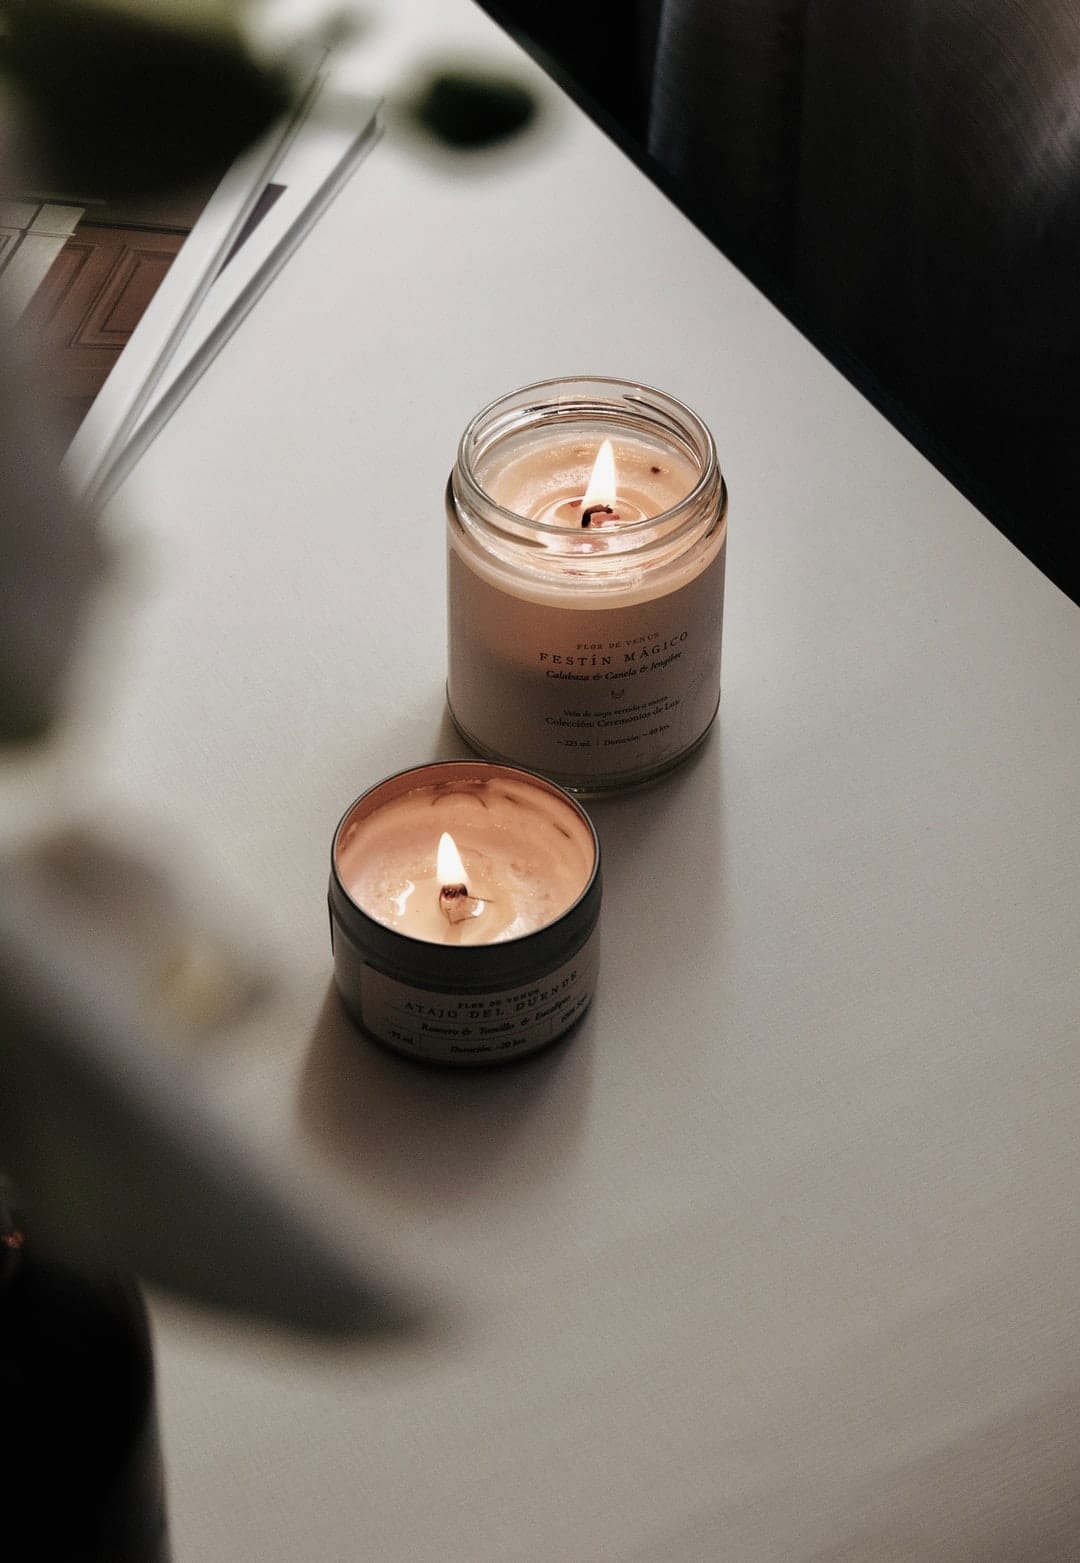
No stress; making your own candles can be fun and simple!
If you are a lover of candles, you’ll know two things; a) you can never have enough and b) they can get expensive. Learning to create your own DIY candle is a solution for both of these issues.
Endlessly customisable, making a classically beautiful candle is very easy. Whether keeping them for yourself, giving them as gifts, or even creating a little candle-selling side hustle, this is a fun hobby to learn. Read on for our simple tips to create some DIY candles you will love.
The materials you’ll need
Candle-making soy wax
Large candle wicks
A chosen bottle of fragrance oil
A spatula
One heat-proof container
A double boiler
Thermometer
An old pair of chopsticks or pencils
How to make a DIY candle: Step-by-step
As we’ve mentioned, this is a very simple DIY task for any candle enthusiast. So here are our eight simple steps to make your own:
Step 1: Measuring the wax for your DIY candle
Before you start the DIY candle-making process, you need to ensure you are working with a clean, flat surface. It’s also a great idea to protect the area with some newspaper or paper towels. This can be a messy process, so be sure to move anything you don’t want to get wax on.
Depending on the size of your container, measure the amount of wax you need to fill your container, and double it. This will be the amount of wax you need to melt.
Step 2: Melting the wax
Pour the wax into a double boiler to melt it. fThis will often take around 10 to 15 minutes, and you’ll need to stir it frequently during this time.
Step 3: Adding the fragrance
One of the great things about making your own DIY candles is you can choose whatever scent you like to suit your mood. When the candle wax has melted, add fragrance oil to the mix. Your wax package will provide some instructions on how much of the oil to add, so make sure you stick to this recommendation.
Simply pour the oil into your melted wax, then stir the mixture for a few seconds. You can also skip this step altogether if you like, but we definitely recommend adding it to make your candles exude a lovely smell.
It is vitally important that you attach the wick to the bottom of your container before pouring in the wax. Do this by attaching the wick by dipping it in the melting wax. This will make it easy to stick it to the bottom of the container.
Allow this to sit for five minutes, at which point it will harden and stick. Alternatively, you can also use superglue to attach your wick (be sure to allow this to dry for the recommended drying time).
Step 5: Pouring the wax
Before pouring the wax into your container of choice, let it cool for a few minutes. The temperature on your thermometer should read 140 degrees which lets you know it’s time to pour.
Slowly pour the wax while holding the wick in place and refraining from pulling on it. Make a note to leave a small amount of wax in the boiler that you will use for topping off your candle later on.
Step 6: Securing the wick
You need to prevent your wick from moving around in the melting wax by securing it in place. You can do this with two old chopsticks! Lay them across the top of the container and sandwich the wick in between them, so it remains centred while the wax hardens.
The wax will need about four hours to set at room temperature. Always make sure you check that this is the case before moving the candle.
Step 7: Adding a touch more wax
In many cases, the candle will have hardened with a top that has cracks or holes in it. For those who want a cleaner finish, simply reheat the remaining wax, pour it on the top of the candle, and allow it to harden.
Step 8: Cutting the wick
Your remaining candle wick should be less than half an inch long. You’ll know that you need to trim the wick if, when lit, the candle has a very tall flame or some excessive flickers. If this happens, cut a little off the top.
Popular candle variations
Floral candles
A nice touch that can be added to a candle, especially those with a floral scent, is flower petals. Use an old paintbrush, gather some of the wax and use it to adhere the dried petals to the side of the container. Make sure you do this before you pour the wax in the container (so just after step four if you are following the steps above). You can create a more colourful candle by mixing petals and leaves of different types. If you have a floral fragrance oil that matches the petals, you’ve just created a very impressive candle!
Colourful candles
Another great way to create a unique candle look is by adding chopped-up crayons into the melting wax (this would happen during step two above). Grab around 12 to 15 crayons per candle that are preferably in the same colour family. Throw them into the wax mix and see what stunning visuals you can create!
Buried treasure candles
This can be a fun option for candles that you are giving as a gift. Find a small, inexpensive “treasure” like a small toy or piece of jewellery and place it in the container before pouring in the wax (step five). Pour the wax on top to bury the treasure and create a little surprise when the candle burns down.
If you don’t want the treasure to be a surprise, you can make it a visual feature by using a gel wax that will show the item and the progress of the burn until it can be accessed!
Once you are set up with the initial equipment required for candle making, you can bring the cost per candle down with each one you make. Be aware that there can be a significant upfront cost, but this will become much cheaper than buying pre-made options over time.
Why don’t my homemade candles smell?
If your candles are not producing a strong enough scent, lower the temperature during the step when you add the fragrance oil. The reason why the scent may be weak is possibly due to burning off by heat in the melted wax.
How can I make my candles smell stronger?
If you want a stronger smell from your candles, try the following:
Always use the recommended percentage of fragrance oil per the instructions on your wax
Weigh your fragrance oils on a scale to get the right amount
Gently and thoroughly stir the melted wax when adding the fragrance
Is DIY candle-making profitable?
Candle-making can be a profitable home business with high-profit margins due to a low cost per unit. This is also not a time or labour-intensive task, so it is relatively low-impact on your schedule. Time is money, after all!
Fill your home with candles! (A fire-safe amount at least)
Now you know how to make your own DIY candle, you can make as many as you like! We always recommend the safe use of candles – keep a fire safety kit as part of your DIY candle kit at home and never leave candles burning when you head out or fall asleep.
Once you have mastered the art of DIY soy candles, you’ll always have a great gift idea or creative outlet for how to spend your time. So flex that artistic muscle, experiment with some unique creations, and hone those candle-making skills!
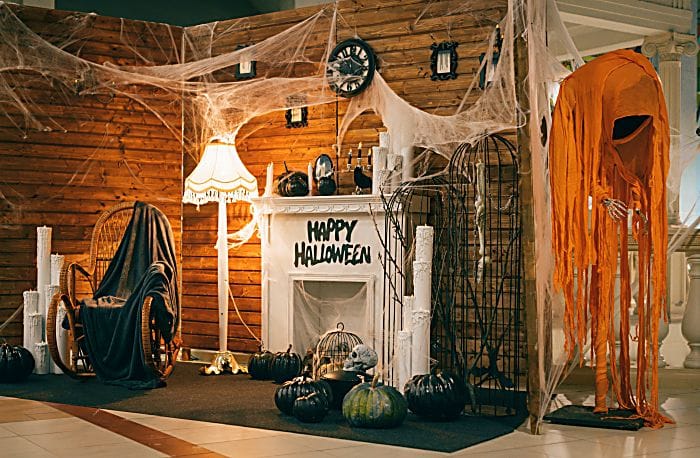
October 31st is upon us, you know what that means! Expect little vampires, Frankensteins, ghosts, zombies, and all sorts of costumed characters come a-knocking to your door yelling “trick or treat!”
In keeping with the spirit of the season (pun intended), make sure your home looks wickedly welcoming for your trick-or-treaters. While you could put up store-bought decor, why not make your home uniquely spooky with DIY Halloween decorations?
You don’t need to be a master crafter; all you need is a few materials, scissors, glue and a dash of creativity. Read on for easy decorating tips that might come in handy!
1. Realistic cobwebs
Your neighbours will likely use some form of fake cobwebs to decorate their homes for Halloween, like stretched-out cotton. There’s another way to make realistic-looking cobwebs with little effort.
Materials
Hot glue gun
Hairdryer or vacuum cleaner you can set to blow
Rubber gloves
Safety goggles
Table
Old newspapers or paper towels
Step-by-step directions
1. Plug in your hot glue gun and vacuum or hairdryer. Let the glue gun heat the glue for a bit.
2. Once the glue gun is ready, aim your hairdryer or vacuum cleaner at what you want to coat with cobwebs. Don’t forget to set the vacuum cleaner to “blow” and expose its nozzle!
3. Turn on your hairdryer or vacuum cleaner and point the glue gun’s nozzle towards the blast of your dryer or vacuum. Release the glue gun and direct the spray of hot glue on the area or object you want to cover with “cobwebs.”
If you’re going to cover an object like a fake skull or candelabra, place the object on a table covered with old newspaper or paper towels first.
4. Repeat as necessary on objects or areas you want to cover in cobwebs. You can even make several passes to create a thicker layer. You can also use glue sticks in different colours to make the cobwebs look even ickier.
Red sticks give the impression of blood-drenched cobwebs, while green can give them a more otherworldly effect – it’s as if alien spiders made them!
Pro-tip: Take the appropriate safety precautions, like wearing goggles and gloves. You’re using hot glue so take extra care. Keep any pets and kids at a safe distance. As this technique is a good idea for DIY outdoor Halloween decorations, this is also an excellent way to apply DIY Halloween decorations to your bedroom.
You can spray these cobwebs to the windows, corners of your ceilings, and on outdoor spots like your porch. To keep your DIY Halloween decorations kid-friendly and safe, choose areas that are visible but away from the reach of pets, trick-or-treaters and candle flames.
Nothing screams “Halloween” more than pumpkins! These will bring your porch to life with its vibrant orange hue and enhance a spooky atmosphere. If you don’t want to go through the trouble of buying, gutting, carving out pumpkins, this is a more accessible and much less messy alternative.
This DIY Halloween decoration idea will also work well without pumpkins.
Materials
Scissors
Wire cutters
Flexible aluminium dryer vent hose, four inches in diameter
Glue
Spray paint
Coloured paper
Wine corks
Safety mask and goggles
Step-by-step directions
1. Take the dryer vent hose. Then, using a pair of scissors, cut a length of about 24 inches. Use the wire cutters as necessary.
2. Fold the ends into each other to form a “pumpkin,” then glue the ends together.
3. Once the glue is dry, take your dryer vent pumpkin to a well-ventilated area. Spray-paint the pumpkin in your desired colour. Start with the top, let it dry, then flip the pumpkin over and spray the bottom, then let it dry.
You can paint them a bright orange or try other exotic colours like black or beige for variety.
4. Make the pumpkin stem by gluing a wine cork on top. Cut the coloured paper in the shape of leaves and glue them onto the stem. You can also use real dried leaves if you find some in your backyard.
To make it stand out even more, glue on a bow made from coloured string or paper. You can also make eyes and a mouth from black paper.
As this is easy and inexpensive to do, you can make as many of these pumpkins as you want. Display them on your porch, hallway, table setting or any other spot you want to decorate.
3. Balloon spiders
They’re fun, easy, and highly customisable! Make this easy DIY Halloween decoration of a giant black spider. Here’s what you’ll need:
Materials
Two black balloons, one larger than the other
Black crepe paper
Cellphone tape
Black twine
Step-by-step directions
1. Inflate both black balloons and tie off their bases securely with black twine.
2. Attach the two balloons to make the spider’s head and body.
3. Cut eight long strips of black crepe paper of equal length and width.
4. Tape four strips on either side of the larger balloon.
5. Tape the finished spider to a high corner of your living room, dining room or porch.
You can get more creative by adding googly eyes or drawing fangs and eyes with a white or red marker. Why not draw a tell-tale red hourglass shape on the spider’s rump to make it into a black widow? Or add pink glitter and make them look elegant yet spooky?
Don’t forget to warn anyone with arachnophobia!
4. Witches’ cauldron
Another simple but effective DIY scary Halloween decoration is the witches’ cauldron. This is one of the more popular DIY Halloween witch decorations you can do, and your decor would be less without it!
Materials
Dry ice
Metal bucket painted black
Glass bowl
Rubber gloves or tongs
Step-by-step directions
1. Paint your metal bucket black, then set it aside to dry.
2. Once set, place some dry ice on the bottom of the bucket. Don’t hesitate to use a lot of dry ice to create the desired amount of mist.
3. Place a bowl large enough to fit on top of the container.
4. Fill the bowl with candies for trick-or-treaters or other goodies. Place the smokey cauldron on a table close to your doorway or make it part of your table setting.
This is a scary but otherwise cute DIY Halloween decoration that may make trick-or-treaters, guests, and delivery persons chuckle before knocking on your front door.
Materials
Cardboard boxes
Black paint or permanent marker
Red spray paint
White permanent marker
Tape
Fake spiderwebs
Plastic chains and other spooky accessories
Step-by-step directions
1. Cut or tear long strips of cardboard from boxes. They should be thick and long enough to mimic wood slats that have boarded up your front door.
2. With the white and black markers, draw fake nails on the corners of each cardboard slat.
3. To make your door fit DIY asylum Halloween decorations, get creative with red spray paint and write frightening messages like “HELP US” or “STAY AWAY – INSANE ASYLUM!”.
3. Attach the fake wood slats on your front door with tape or any adhesive that won’t damage your door’s paint.
4. Appy fake cobwebs (see tips above) on the door and slats.
5. Feel free to combine your door with other decorative touches like plastic chains, tiny toy spiders, googly eyes. To complete the experience, get the kids in cute DIY Halloween costumes to greet visitors. Or answer the door with a resting witch face (creepy make-up artists and face painting pros are easily available on Airtasker).
Remember that these are only some of the many possible DIY ideas for your Halloween decorations. While you’re at it, explore more Halloween decor ideas on the blog.
Pull out the stops on making your house look haunted without breaking the bank! And don’t fret if you may not have the time to make and put up these decorations for trick or treat, you can always book an expert to help you realise your vile vision for your decorations. Have a Haunted Halloween!
Store-bought fabric masks simply don’t always fit right.
Face masks have become a part of our daily lives, and masks are not going away any time soon. Mask mandates may be loosening in some places, but face masks are still required in some establishments. There’s also no telling if or when Covid-19 cases go up again.
That said, we might as well opt for economical and environment-friendly face masks for everyday use. You don’t want to keep spending money on disposable face masks. Disposable masks are also not great for the environment. National Geographic says 129 billion face masks are used every month globally. That’s around 3 million face masks per minute! Imagine tons of extra waste going to landfills and finding their way into the ocean.
The benefits of using a DIY fabric facemask
Fabric face masks not only save you money but also limit plastic waste. DIY face masks are also customizable to your fit and style. Store-bought fabric masks simply don’t always fit right. And ill-fitting masks are less effective in preventing the spread of viruses.
Here’s everything you need to know about face masks. Follow along and scroll through our step-by-step guide to making a DIY face mask. We listed down several methods, so you can pick one based on your skill level and preference.
This guide is not for medical-grade face masks. If you’re a health worker or in need of a medical-grade mask, don’t try to make your own PPE. DIY fabric face masks are ideal for low-risk everyday settings.
3 ways to DIY easy face masks
You’re probably wondering, “What kind of DIY face mask should I use?” It depends on your sewing skills, so we’re giving you three methods for making a DIY fabric face mask. The first method is the easiest and fastest way to make a face mask—no sewing required! But if you’re looking to make a sturdier face mask, method #2 or #3 is the way to go.
Whether you have zero sewing skills or are a seasoned sewer, you’ll find some useful tips and ideas in this guide. Choose the method that works best for you, and have fun making your DIY face mask.
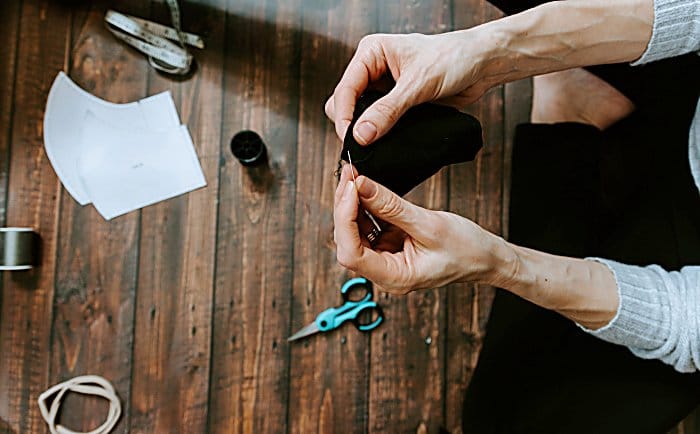
A t-shirt is all you need to quickly and easily make a face mask. If you have some old t-shirts in your closet, you can cut these up and repurpose them as face masks.
Just make sure not to use a shirt with holes or worn fabric. Ideally, you should choose a shirt with 100% cotton. The more opaque the fabric, the better.
Materials
A t-shirt
Scissors
Optional: Coffee filter or paper towel
How to make a no-sew face mask with a t-shirt
Measure – Measure your face from the top of your nose to underneath your chin. The usual length would be around 7-8 inches.
Cut out the bottom of the shirt – Cut out the bottom part of your shirt to your measurement. You can cut more than you need and just trim the fabric later.
Cut out a square into one side – Cut out a 6-inch square or elongated c-shape from one side. Then, cut the top and bottom strips in half to make ties for the mask.
Try on the cloth – Put the cloth over your face and tie it around your head. Adjust the fit until it’s snug around your nose and chin. At this point, you can cut out any excess fabric.
Optional – Place a coffee filter or paper towel inside the mask. Secure with a safety pin.
Alternative: Bandana face mask
If you prefer a no-sew, no-cut method, the bandana face mask is a great alternative. And you can make this face-covering in under 60 seconds!
Do keep in mind that this method won’t work on all types of bandanas or scarves. If it’s too thick, it won’t be breathable. If it’s too thin, it won’t provide enough protection. The best material to use is 100 percent, tightly woven fabric. Again, the more opaque, the better.
Materials
A bandana or scarf
Hair ties or rubber bands (2 pieces)
Optional: A coffee filter or paper towel
How to make a bandana face mask
Fold – Fold the bandana in half. Then, fold the top and bottom, so each side meets the middle.
Insert the ties – Slide a hair tie onto each end of the bandana (i.e. left and right side). Then, fold the sides toward the middle. Tuck each side into each other if you can.
Optional – Insert a coffee filter or paper towel into the cloth and secure it with a safety pin. Make sure to change the coffee filter or paper towel regularly.
This pattern is for a slightly rounded mask. If you prefer the rectangular-type mask, you can skip right over to method #3.
Materials
Cotton fabric (10-11 inches)
Needle and thread
Rubber bands or hair ties (2 pieces)
A plate or something round for the template (10-12 inches in diameter)
Scissors
Pins
How to hand-sew a rounded mask
1. Make the base pattern.
Place the plate on top of the fabric and draw around the plate.
Cut out the fabric to get a circle.
Fold the circle in half, then fold it again. You’ll end up with 4 rounded triangles, like a pizza with 4 slices.
Cut out each shape, so you get 4 pieces of cloth.
2. Assemble the pieces.
Place two shapes on top of each other. One shape should be facing up, while the other one is facing down (i.e. the correct sides are facing each other). Repeat for the other two shapes. After this step, you’ll have two pieces.
Sew along the curved edges of each piece.
Unfold your two triangles to get two dome-like pieces.
Stack the two domes on top of each other.
Pin your mask in place and sew around the edges. Leave a small gap on one end.
4. Turn the mask right side out.
Pull the cloth through the small gap. Careful not to tear your fabric!
Stitch up the small gap.
5. Insert the elastics
Make a hem on both sides by folding each pointy edge over itself. Sew in place.
Insert one elastic through each hem. Use a needle or safety pin to thread the elastic through the hem.
Tie up the ends of the elastic. And there you have it!
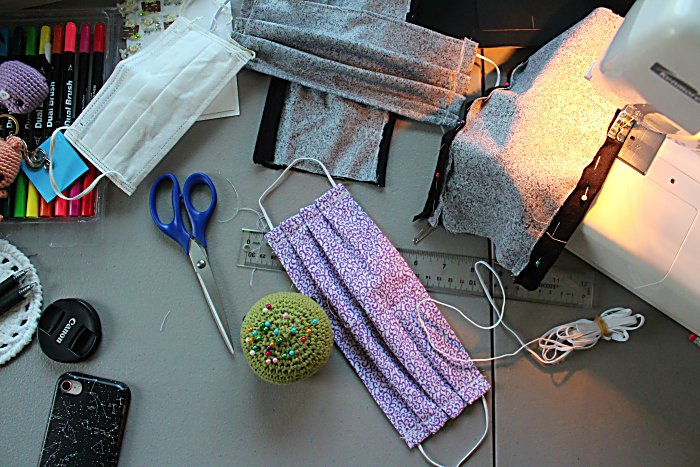
Easy DIY face masks method #3: Using a sewing machine
This method might seem a little daunting, but it’s actually easy if you take it one step at a time. If you don’t have a sewing machine, go ahead and sew this mask by hand. Now’s your chance to practice your running stitch!
Choose a fun pattern and sew to your heart’s content. These face masks also make great gifts you can give out to friends and family.
Materials
Cotton fabric (around 15 x 8 inches)
Elastic (2 pieces, 7 inches each)
Sewing machine
Needle and thread
Scissors
Pins
How to make a rectangular face mask using a sewing machine
Make the base pattern.
Cut your fabric to 15 inches by 8 inches.
Fold the cloth in half.
Draw 3-inch lines on the top and bottom edges of your fabric. Then, sew along these lines. The space between your marks will make a pocket for an optional filter.
Insert the elastics.
Move the seam to the center.
Insert an elastic into each side (top and bottom) of the cloth.
Pin each corner on each side of the mask to hold the elastic in place.
Sew along the edges to close up the sides and secure the elastic.
Make the pleats.
Press the fabric to turn it right side out.
Mark each side by placing pins 1 inch from the bottom. Keep placing pins all the way across. Space out the pins, following these measurements (bottom to top): 1″ – 1″ – 1/2″ – 1″ – 1/2″ – 1″
Fold the fabric, lining up the pins on both sides.
Sew along the edge on both sides to keep the pleats in place
If you want to master your sewing skills, you can book some online sewing lessons. But if you need several face masks made or want a professional touch, you can hire a seamstress instead.
Does your face mask fog up your glasses? A properly fitted mask can prevent this problem. To keep air from escaping through the sides, create a seal on the upper part of your mask. A foldable item like a paper clip, twist tie, or folded piece of aluminium foil should do the trick!
How to make your face mask more effective
According to the World Health Organization, fabric masks should ideally have three layers of material. Three-layer fabric masks provide better filter efficiency than cotton masks with only one layer.
The WHO recommends this combination of materials for fabric face masks:
Inner layer – Absorbent material, such as cotton, a cotton-polyester blend. Since the inner layer comes in direct contact with your face, this fabric should easily absorb droplets that you exhale. Choose a light color like white, so it’s easy for you to tell when your mask is soiled or wet. You can use a woven or knit cotton t-shirt. Make sure the fabric is breathable and comfortable.
Middle layer – Non-absorbent material like polypropylene or other non-woven fabric. This fabric will act as the filter and go into a pocket between the inner and outer layers of your mask.
Outer layer – Non-absorbent material like polyester, polyester blend, or polypropylene. The outer layer should be hydrophobic to repel droplets.
You can incorporate these materials into the DIY face masks we’ve listed above.
Frequently asked questions
How do I clean my reusable face mask?
Wash your reusable face mask every day or whenever it gets dirty. You can wash your face mask with a washing machine or by hand. When using a washing machine, you can include your mask with your regular laundry. Check the fabric label for the appropriate washing machine settings. When handwashing, use tap water, and laundry detergent or soap. Dry your mask in a warm or hot dryer. Otherwise, you can hang your mask under direct sunlight or lay it flat to let it dry.
How do I check if my face mask fits properly?
Make sure your face mask covers your nose, mouth, and chin. There should be no gaps above, below, or on the sides of your mask. Also, your mask should stay in place and not shift when you speak or move. Air shouldn’t pass through the edges of your mask to prevent the virus from getting in or out.
When should I wear a face mask?
Wear a face mask in areas where Covid-19 may be circulating. These areas include crowded places like malls, restaurants, schools, and public transport. If it’s impossible to stay 1 meter away from people, it’s best to wear a mask. You should also wear a mask in rooms with poor or unknown ventilation. The same goes for your home if you’re having visitors. When in doubt, wear a mask.
How do I properly wear and remove my mask?
Clean your hands before you have to touch your mask at any time. Wash or sanitize your hands before you put on or adjust your mask. You should also clean your hands after your touch your mask. When not wearing your mask, don’t wear it on your chin or around your wrist. Instead, keep your mask in a clean ziplock bag or plastic bag. Practice social distancing at all times even when wearing a mask.
Should I wear a mask while exercising?
No. You shouldn’t wear a mask while doing intense exercise. A face mask will limit your breathing capacity during such physical activities. Instead, stay at least 1 meter away from people while you exercise. Indoor areas should have enough ventilation. Better yet, limit your outdoor workouts and exercise in a spacious area in your home. You can hire a personal trainer who can coach you via Zoom and keep you on track with your fitness program.
The best DIY face masks are the ones you’ll use properly to protect yourself
Imperfect is better than nothing. It’s better to wear an imperfect mask than not wear a mask at all. So if your DIY face mask turns out less than perfect, wearing it when you go outside could still make a difference. For added protection, you can pair your DIY cloth mask with a disposable surgical mask underneath – note that you can’t really DIY medical face masks. (Here’s how to layer masks for additional protection!)
Should you need extra help or a volume of customized face masks for your company or loved ones, consider hiring an expert seamstress on our platform.
Additionally, your face mask will be most effective through proper use, storage, and cleaning. Don’t forget to practice social distancing and regularly disinfect your home, too! You can even hire a professional to deep-clean your sofa or carpet every once in a while.
Many things may feel out of our control nowadays, but practical solutions can alleviate your worries and keep you safe. With simple habits like wearing homemade masks, we can slow the spread of the coronavirus and get through this pandemic together.
The school holidays are upon us! Here's how you can keep the kids (and kids at heart) entertained.
The school holidays are here again, and you’re running out of ideas to keep the kiddos preoccupied.
Don’t fret! Whether you’re looking for something they can enjoy doing indoors or outdoors, we’ve got you covered!
Check out our list of fun and educational activities the kids can do by themselves, with their siblings, friends, and even the entire family!
1. Read a book as a family
Enter the magical worlds of Harry Potter, Willy Wonka, and Aslan! Now that they’re on break, they have all the time in the world to read their favourite adventure books or fantasy novels.
Make it a family affair for the younger ones and set aside storytime sessions to tickle their imaginations.
There’s nothing like a free school holiday activity to keep everyone entertained, and this one involves dressing up! Who says you have to wait for Halloween?
Let your kids channel their favourite movie actors or cartoon characters and turn it into an amusing game of guess who!
Bust out a couple of old costumes or formal wear, or even some of your own clothes and accessories they can mix and match. Have them choose and watch them transform before your very eyes!
3. Brush up on school lessons
Now that school has taken a break, your kids can also use the extra time to brush up on subjects they struggle with.
You can make your own worksheets for them to work on or hire an online tutor who can help with various lessons so they’ll be ready once classes resume.
Has your child ever expressed interest in ballet? Or maybe they love doing dance challenges on TikTok? Whatever the case may be, why not take their talent to the next level and sign them up for dance lessons?
Not only do they get to express themselves through their favourite steps or routines, but they also get to stay active. If you’re looking for something remote, you can find dance instructors who can take the sessions online.
5. Schedule an online party with friends
If your kids are looking for fun interaction with their friends during the school holidays, why not set up an online party? It’s quick and easy, and you have plenty of options as well.
You can organise a virtual movie marathon and have them watch the latest Disney films or maybe even arrange a few online games like charades, Pictionary, or Heads Up!
6. Start a diary
Settling into a routine is important even during school holidays. Set a time every day for your kids to write down all the things they did during the day and what they think was most memorable for them.
They can also start a bullet journal to jot down their thoughts, favourites, goals, or whatever they feel like writing. Doing this can help improve their language skills, and they can even have something to read back on when they’re all grown up!
7. Go on an indoor scavenger hunt
Who doesn’t love a good scavenger hunt? Leave a trail of clues or riddles all over the house and have everyone hunt for hidden treasure, which could be anything, really!
A mini treasure chest filled with your kids’ favourite treats, the newest video game for the whole family to enjoy – it’s all up to you!
8. Make your own in-house gym
Roll out the yoga mats and bring out the jump ropes! Regular exercise can do wonders for our immune system, so get everyone involved in fun fitness activities.
If you’re not sure where to start, you can get a professional fitness trainer to develop indoor-friendly fitness routines that require little to no equipment. For extra safety, ask if they can offer their sessions online so you won’t have to worry about going out.
Transform your kids’ play areas into their own art studios this school holiday! Art tutors can hold virtual painting or drawing lessons that can be perfect for beginners or budding artists.
School holidays can mean more time for your kids to indulge in their favourite video games! Give them a specific time during the day to play fun games like The Legend of Zelda, Super Mario Odyssey, or Animal Crossing.
Keen to join in on the fun? You can opt for multiplayer games like Overcooked! 2 or Mario Kart and make it family game night!
Another way to keep active is to cycle through parks and bike trails in your city! If you’re on the lookout for Queensland and Western Australia biking spots, you can easily go around Jim Soorley Bikeway or Burns Beach for a scenic ride.
Make sure to have all your bikes assembled and safety gear ready to go before anything else.
12. Spark creativity with writing prompts
There’s no better time to let their imagination run free than during the school holidays. If your kids have always been the writing type, you can prepare writing prompts and activity books to encourage writing as a talent!
13. Start a scrapbook
Get the washi tapes, coloured markers, and glitters out for this one. Scrapbooking is another fun way to bring out their creative side! Show them a few decorating tips and tricks to preserve their favourite memories with friends and families in an artistic way.
Doing science experiments can be a unique learning school holiday activity as well. Museums Victoria created an entire playlist of crafts and activities based on different scientific concepts if you’re looking for ideas. These experiments are great for both kids and grown-ups, which can make for great bonding experiences!
15. Get crafty with DIY
Aside from science experiments, you can also have the entire family try their hand with DIY crafts. ClassBento offers various virtual classes for all ages, and they even deliver craft kits that have everything you need for your project straight to your home!
The possibilities are endless, from watercolour painting for beginners and crafting polymer clay earrings to making a DIY Turkish mosaic lamp!
16. Set play dates
We bet your kids would want nothing more but to run around parks and fields with their friends. If you live around Brisbane, you can take your kids to South Bank to explore their many play and water park areas.
If you’d rather stay indoors, a virtual meet-up is always a good idea. Hire a child entertainer to do a few magic tricks or a puppet show for a fun twist!
You can never go wrong with activity books to keep the little ones preoccupied. Get them a colour-by-numbers book and watch them use every crayon in the box!
Animal sticker books are also a great option as your kids can delight in learning fun facts while meeting each cute, cuddly, or strong creature in their natural habitat.
19. Learn a new language
Younger kids are at the perfect learning age to develop fluency in various languages. Aside from improving their cognitive skills, learning a new language can also make them feel more connected with different cultures.
If they’re up to trying something totally new, why not encourage them to sign up for language lessons? They can take their pick, whether it’s French, Spanish, or Korean!
Nothing says school holiday like a good, old-fashioned movie marathon! Set up your home theatre, bring out the popcorn, and cuddle up in blankets for this one. You can even come up with a theme (superhero movie night, perhaps?) or let the kids call the shots!
21. Immerse in performance arts
This year, Parramatta’s Riverside Theatres has prepared an exciting school holiday lineup. Go on a little field trip with the whole family and introduce the kids to the wonders of interactive shows and performance arts!
Whether it be piano, guitar, or violin, learning a new instrument is a classic holiday activity that can carry over to the next school year. Enrolling them in music lessons doesn’t just keep them busy, but it also hones your child’s fine motor skills and work habits.
Going on a power walk around the neighbourhood can also be a great way to stay fit and active during the school holiday. While it can be tempting to just lay on the couch all day, nothing beats stepping outside and getting some fresh air. Go ahead and let the kids tag along, too!
24. Host theme nights at home
Give your family something to look forward to by coming up with theme nights at home! Prepare a full Mexican spread for Taco Tuesdays, or get everyone to dress up and recreate silly family photos from 10 years ago for Flashback Fridays.
You can also surprise the kids with a “Yes Day” where you just say yes to whatever they ask for. Sugary cereal for breakfast? Sure! Maccas for dinner? Say no more!
25. Join a baking or cooking class
If your kids love helping around the kitchen, why not consider booking an online cooking class? Guide them as they learn the basics, discover new recipes, and even meet new friends virtually. Soon enough, you’ll have your very own little sous chefs cooking dinner alongside you!
26. Explore the wonders of marine life
SEA LIFE Melbourne offers a plethora of activities for kids who have a profound fascination with marine life.
They can choose to explore any of the 12 interactive zones, which include a Penguin Playground where they can meet King and Gentoo penguins.
They might also enjoy SEA LIFE Melbourne’s Interactive Wonder Wall exhibit where they can draw and colour their own jellyfish and watch it float on the interactive screen!
If you have a swimming pool at home, take advantage of sunny days during the school holiday and go for a swim! The kids will surely love playing around with water guns and inflatables while making a splash.
If knitting and crocheting are too difficult for your kid’s little hands, you can introduce them to macramé! It’s basically tying knots and forming patterns out of them, making it an easy crafts project for children.
ClassBento has plenty of online macrame workshops perfect for kids and beginners – start with something simple like a keyring, then maybe they can try their hand at wall hanging pieces.
29. Nurture little green thumbs
Adding garden chores to your kid’s daily routine can be beneficial to their overall well-being. Not only does gardening increase their physical activity, but it also exposes them to nature and the joys of growing plants and fresh food.
You can have them water the plants, pick out flowers, or even take out the weeds. If there’s ample space, you can even give them their own gardening area where they can plant their own seeds.
30. Bring out the bling
Crafting jewellery also be a fun and productive school holiday activity, so take out the bead kits for your little divas at home!
Help them experiment with different styles, colours, and patterns for all sorts of accessories.
They can make friendship bracelets for their BFFs, handmade earrings for themselves, or even dainty necklaces that can make for lovely gifts.
31. Playtime in the playground
If you live near your local playground, you can bring the kids over for some fun afternoon playtime. Being cooped up indoors for days can take a toll on anyone, so it’s always good to have some time outdoors to break the monotony brought by the lockdown.
Just make sure to wear a mask, sanitise, and follow your LGA’s safety guidelines when going out.
32. Organise a themed photoshoot
Your kids will definitely go crazy over this one! Set up a makeshift photo studio at home and transform them into models for the day. You can also hire photographers if you don’t have the equipment at home.
Get inspiration from their favourite Marvel characters, or you can also dress them up for a Spring-themed photoshoot!
Want to take things up a notch? Take a cue from actual shoots and do craft services! Get their favourite desserts delivered for snacks in case they need a break from posing for the camera.
Keen to introduce your kids to theatre and musicals during the school holiday? Disney+ lets you watch the remarkable story of Alexander Hamilton, while Threshold offers an audio-led experience that allows you to bring the theatre to your living room.
34. Take a trip to the museum
Depending on where you are in Australia, visiting museums can be done either virtually or in person. The Art Gallery of NSW’s Together in Art features artist-led projects where kids can submit artworks based on a particular theme.
They even have art-making videos and free downloadable activities on their website so your child can keep the creative juices flowing.
Meanwhile, if you’re within Queensland, take the trip to Queensland Museum’s SparkLab where your kids can geek out on live science experiments and out-of-this-world exhibitions.
35. Go camping
Camping with the whole family will surely make this school holiday a memorable one. Pitch a tent in your backyard, roast some s’mores, and just enjoy each other’s company.
If you don’t have the space, set it up in your living room! You can even use twinkly LED lights to give the illusion of stars once you turn off the lights.
36. Book a pottery-making class
Local studios like Clay Sydney offer classes and courses who want to try their hand at pottery! They also have a “Clay at Home” option where they deliver pottery kits to your doorstep, so you won’t have to worry about gathering materials.
Even zoos have found a way for kids to see their favourite animals from home! Taronga Zoo launched a live stream platform so that your kids can see what the kangaroos, koalas, and meerkats are up to!
38. Train like Karate Kid
Introduce your kids to martial arts so they can channel their inner Karate Kid while on holiday. Find a martial arts class online where they can learn the fundamentals. This school holiday activity can even become part of their routine once school is back in session.
Take time to smell the roses during the school holiday! It can get incredibly dull to be around the same four walls of your home, and your kids might be feeling it, too.
Drop by the Royal Botanic Garden Sydney for stunning views of the Sydney Opera House or glimpse wildflowers at Kings Park Perth.
Whether you’re laying out your picnic blankets in a nearby park or just in your backyard, you’re sure to have a wonderful time! You can even pack up a picnic basket with your kids’ favourite snacks and juice boxes as you enjoy a laidback afternoon with the family.
These are just some of the many fun school holiday activities that kids (and kids at heart!) can enjoy without having to go far.
With a bit of inspiration and creativity, you can keep the whole family entertained and make quality time more meaningful than ever. Have fun!
Yes, they'll keep you warm, but they are also a mesmerising way to spend an evening! Yay for fire pits!
Before we kick into things, we need to stress the importance of fire safety, especially in high-risk areas. A DIY fire pit in the backyard is a lot of fun, but please exercise caution and responsible fire use for everyone’s safety.
Now to the fun stuff; making a DIY fire pit is quite simple and can be done with basic tools and materials. Our simple step-by-step guide below will help with your DIY fire pit creation so you can warm up the vocal cords, grab the acoustic guitar for a bit of “kumbaya,” and gather your friends around your very own fire whenever you like!
Before you begin – Make a plan
Any successful DIY firepit project starts with some careful planning – this is crucial.
First, you need to decide where you are going to make your fire pit. Assess the area and find the best location, preferably in a spot with ground that you can dig easily. Avoid spaces with trees, overhanging branches, or anything too close to a fence, shed, or house to protect from potential hazards.
Next, you’ll need to plan the shape of your fire pit? Do this before buying materials by drawing a rough sketch which will help you work out the design and style you want to build. This should also give you a rough idea of the amounts for the materials you need to gather.
The materials you need
Your local hardware store should have everything you need. We’ve chosen our amounts based on an average-sized DIY fire pit. Treat this list as a guide and tweak as needed:
Now that you have your area ready, a design, materials and tools, you can follow these simple steps to create a DIY fire pit:
Step #1: Prepare the area
Mark the shape and the size on the ground of your fire pit. Lay down blocks and use a shovel to mark the perimeter of your fire pit. If you are building a circular fire pit, hammer one stake into the ground, then attach a string, using it as a compass to draw the perimeter circle.
Step #2: Dig and level the base
The key to a great DIY fire pit is a solid base to ensure stability and longevity. Use your shovel to dig your marked area to the point where it is 5cm or 2″ deep.
Take a hand-tamper to tamp the soil making sure the entire surface is compressed and level. Check this with a spirit level when done to ensure an even surface.
Step #3: Lay the foundation
Strengthen the foundation by adding a 2.5cm or 1″ layer of gravel throughout the base and distribute it evenly with a rake. Dampen the first layer of gravel slightly and tamp down the gravel again.
Add a second 1.5cm or 1/2″ gravel layer and tamp down to form a strong and stable foundation.
Step #4: Constructing the fire pit walls
Lay the first row of bricks along the inside of the base perimeter using a level to make sure they are even. Then, add the next layer on top, staggered like a ‘brick wall’ and make sure you are happy with how they look before applying adhesive.
Remove each block individually and apply a concrete adhesive, replacing the brick for a permanent fixture. Repeat all of this until you have three or four layers around the fire pit. You can tweak this based on how high you would like your DIY fire pit to be.
Step #5: Placing the fire bricks
Allow the concrete adhesive to dry, then add the fire bricks. These are clay bricks that will help to distribute heat evenly, preventing your blocks from cracking.
Place the fire bricks in an upright position, lined inside of the walls and add more gravel if you need to raise their height (you can also use extra bricks).
Once everything is in position, fill the pit with lava rocks about halfway up the fire bricks. This not only helps to hold the bricks in position while also creating a good base to burn your wood on.
Your DIY fire pit is ready to go!
Now that your DIY fire pit is ready, chuck some firewood in there kick back and relax! If this is your first time building a DIY fire pit, keep it simple with a basic shape to achieve a great result. For those who are a little more experienced, you can try a more challenging design with irregular shapes and decorations.
The benefits of an outdoor fire pit
With an outdoor DIY fire pit, you can enjoy your patio or garden areas at all times throughout the year. This multi-season space maker will warm you up on cool nights. Just place some chairs around the edges, invite your friends around and enjoy these benefits:
Fire pits add ambience
Much like candles indoors, the glow of a fire pit offers visual warmth along with actual warmth to your space. You’ll enjoy a sense of closeness with those who gather around it.
Fire pits provide entertainment
Wood burning fire pits are particularly entertaining. From stoking the fire to simply watching logs burn, this can be one of the most calming sources of entertainment around.
You can use them as a cooking tool
Get a little primal by cooking over an open flame. Wrap some potatoes in foil and chuck them at the bottom of your pit for a delicious meal that you’ve prepared outdoors!
The range of materials suitable for the bottom of a fire pit includes:
Sand
Dirt
Lava rocks
Fire pit glass
Gravel
Can you DIY a fire pit?
Yes, all it takes is a few basic skills with a little bit of creativity to design and build your very own DIY fire pit. Use retaining wall blocks or bricks, and design based on the specification allowances of your space.
Is it cheaper to build a DIY fire pit than buying one pre-fab?
This does come down to how extravagant your fire pit will be; however, only basic materials are required to build a DIY pit. You may even already have most of the things you need around the home.
How do you prepare a ground for a fire pit?
Preparing the ground for your fire pit is one of the most important steps to ensuring a stable base. To do this, follow these steps:
Measure where your fire pit will go
Dig out the space, 5cm deep, keeping the ground level
Organise the boundary of your fire pit and place the bricks in position
Add a layer of gravel, dampened slightly and levelled out
Enjoy those fun nights by the fire
Now that you can build and customise your perfect DIY fire pit, the only thing left to do is enjoy it! Your home will become the go-to hang out spot as everyone enjoys some relaxing fire time.
If you are looking to bring the atmosphere of a fire inside of your home as well, we strongly recommend having a read of our fireplace ideas blog which can help you with a bit of design inspiration. Enjoy your fire responsibly, and have fun!
Is it magic? Good floating shelves look like they defy physics!
Built-in shelving isn’t always a practical option, and it can look cluttered and over-bearing at times. With some easy-to-create DIY floating shelves, however, you can install your own storage whenever and wherever you like while also achieving a stunning display method for books, photos, and more.
DIY floating shelves look good and don’t require much space. With our simple steps below, they are a great option for rooms that are short on square footage. These shelves allow you to utilise vertical space while adding a touch of your personality to the room. We love to load our DIY floating shelves up with draping plants to really give the room some life!
DIY floating shelves can be an easy woodworking project for those comfortable with power tools. The practical tips below will help you achieve an affordable, custom décor piece that you’ll be able to build in any sized space.
Easy DIY floating wall shelves: The materials you’ll need
You may be sitting there asking, “why don’t I just buy some floating shelves from IKEA?” This certainly is an easier option (although they will still require some DIY set-up), but the biggest issue here is the less custom look. When you pre-buy your floating shelves, you are restricted to certain colours, sizes, and shapes.
For the same price or less, in some cases, you can create your own DIY floating shelves that are tailored to your home’s aesthetic. To do this, you’ll need to gather these materials:
2” x 10” pine board
Mitre or circular saw
Pencil
Drill
Hand or bench router with a dado router bit
½” paddle bit
Sandpaper (medium grit)
Old cloths
Stain or paint
Paintbrush
Adjustable Floating Support Invisible Brackets
Level
Drill press (optional)
Polyurethane (optional)
How to build simple floating shelves DIY: Step-by-step
We have tried to make the steps below as simple as possible! We recommend putting aside about half a day to build these DIY floating alcove shelves (not including any drying time). You’ll have a custom, high-quality storage solution that looks great in no time at all!
Step #1: Prepare materials and cut boards down to size
If you aim to make this process as cost-effective as possible, we recommend buying a larger piece of wood that can be cut into smaller sections. Do this using a mitre or circular saw and customise the size based on the space you plan to hang them in.
Larger shelves will need to consider extra support, as it is important you don’t put more weight on your shelves than they can handle. This will lead to some serious drooping (and will look terrible/be dangerous).
Step #2: Notch the back of the shelf to allow for the hardware
Use a hand router to create a notch on the back of your freshly cut planks so the hardware can be installed. In most cases, the notch should be 1/2” deep; however, this may vary with different pieces. Check the instructions on whichever hardware you purchase before creating your notch.
Do not skip this step! The notch is important as it will prevent a gap when you hang the shelves between the wall and the shelf due to the hardware. We’re aiming for a professional, clean look after all!
Step #3: Drill the hardware holes
You have some options when it comes to drilling your holes. If you’re using a hand drill, opt for a paddle bit to drill holes in which your hardware should just slide into place. Aim to make these holes about 4” deep, and always follow the instructions that come with your hardware to note any required exceptions.
If you are less than confident when it comes to straight holes, start with the paddle bit, then finish with a drill press. The reason why we recommend this is the paddle bit makes it easier to start each hole accurately.
Step #4: Sanding and staining
We’ll mention that staining can also be painting; it just depends on the final look you are going for. Find a well-ventilated area and give your shelves a sanding to get rid of any rough edges. Wipe them down to get rid of any extra sawdust, then apply your stain or paint of choice.
Your home’s aesthetic is the deciding factor here, but you can paint your shelves white to have them blend in with white walls or opt for a more rustic look leaving the wood as is and bringing it out with a subtle stain or gloss. The choice is yours, but this is one of the primary advantages of DIY floating shelves; you get a more customised look!
Get creative and think about this when choosing your initial materials as well. You can use reclaimed wood or create DIY pallet floating shelves for a more weathered look. Just ensure that when applying stain, you wipe off the excess and let each coat dry to reach the desired finish. Cover the shelves with a coat of polyurethane lacquer if you are going for a glossy look with your staining. Be sure to let all of the pieces dry completely before hanging.
Step #5: Hanging the shelves
Once everything is dry, you are ready to install the hardware. Some hardware requires wood-framed supports, but we prefer to buy the type that avoids this. It makes things a little easier while providing the bonus of the floating shelves being able to handle more weight.
Decide where you want to place your DIY shelves, then mark and measure the hardware spots on the wall. Floating shelves under TVs is a popular choice. Use a level to ensure the shelf is straight and attach the hardware to the wall with the supplied instructions. From there, you simply slip your shelves over the hardware via the drilled holes, and you are good to go!
To be safe, let your shelves sit on the wall empty for a few hours to make sure there are no issues before you load them up with display items.
The sizes and specifics of DIY floating shelves vary; this is one of their benefits as you can customise them to suit your needs or wants. Generally, you’ll use 2″ x 3″ wood, cut into your chosen lengths. The specific type of wood comes down to the look you are hoping to achieve and what will best match your home’s aesthetic.
Do floating shelves need studs?
It is always best to attach floating shelves to a wall stud, as this provides the most support. You can use a stud finder to locate these in your walls. This is a hand-held device that detects metal with a magnet. This is the optimal spot for hanging anything in your home, not just floating shelves.
Are floating shelves strong enough for books?
Yes, however, the size of your shelving will dictate how many books it can hold. Usually, the hardware you purchase for your shelving will identify a weight limit, and we strongly recommend you stick to it, so you avoid any accidental collapses!
What screw should I use for floating shelves?
If possible, your screws or fittings should be 50mm screws with plastic Rawlplugs when fixing your shelves to concrete or brick. You can use 40mm screws when fixing to wooden joists, and for plasterboard, 65mm metal plasterboard anchors.
Adding floating shelves as storage can make your place look stylish!
DIY floating shelves are a great way to add some storage in spaces that may seem unusable or bare. They also double as visual improvements to the aesthetics of your home, and you can sit ornaments and art on them to create a 3D feature wall of sorts.
If you are a little fresh when it comes to DIY projects, there are plenty of Taskers who can help achieve the same outcome as the steps above. Search the shelf hanging experts and wall-mounting professionals that can come and get the job down properly, giving you the peace of mind that everything will stay up where it should!
By learning some simple DIY skills, you can make your home a more functional and enjoyable space, just as it should be! Get creative, good luck, and we hope you love the results!
We'll never really know why cats love scratching and climbing up trees so much, but we can cater for it!
Some of us may be convinced that our cats actually hate us, despite how much we love them. Unlike dogs, cats are somewhat unenthused by humans, walking around with their cat-vibe of superiority. Maybe it’s just our cats, and yours is all about positivity and high-fives, but either way, cats need to be kept engaged, active, and happy, and a DIY cat tree can tick all of these boxes.
No matter how pampered they may be, Cats still have a wild side, which is why they love climbing and perching somewhere that feels safe with a good view of the surroundings. A cat tree provides all of this, along with a scratching surface that will save your furniture from being the next claw-marks victim.
An enriched and engaged cat is happy and healthy, and with our tips below, you can build your own DIY cat tree that your furry friend will love!
Why kitty needs a cat tree
Never forget, your sweet purring ball of fluff is a wild animal that we’ve only domesticated for the past 10,000 years (dogs have been chilling with us for 30,000 years by comparison). This means that cats have innate wild behaviours that require habitats to climb, scratch, perch, and hide.
If you have an indoor-only cat, this is even more important! A cat tree that offers a safe, high perch keeps them off the top of your bookcase. A cat tree is literally a pseudo tree for your cat and a necessity to ensure they do not climb the walls, drapes or your furniture.
The best places for your DIY cat tree
The location of your DIY cat tree is vital and can be the difference between a happy cat and one with a huge behaviour problem. This is because cats want to be up high to observe their surroundings safely. In the wild, this is so they can search for prey while staying away from predators themselves.
If your cat lives with small kids or other animals, this is even more crucial. Place your DIY cat tree in a spot that your cat will be drawn to by ensuring it is nice and sunny. The optimal spot is near a window, and your cat will love to perch in those warm sunbeams. If your cat is particularly spoiled, you’ll also want to have them in view of the television so they can watch ‘cat TV’ on YouTube, which is a real thing that really exists (and cats love it).
How to make a cat tree DIY: Step-by-step
Step #1: Designing your cat tower
You can have fun with your design and essentially make it look however you like (maybe consult your cat?). Usually, DIY cat tree parts include pillars coming up from a base and different levels of platforms. It can be basic or elaborate; the choice is yours; just sketch your ideas before cutting any materials.
Step #2 Create the base
Aim for a base that’s at least 24-inches square to prevent the tower from tipping over. Essentially, your overall design will determine the base size, but we recommend using thick enough wood that it is sturdy. You can achieve this by glueing two pieces together to strengthen it.
Source: Petrebels via Unsplash
Step #3: Cutting the pieces
Cut your chosen materials to match your design. For example, use a circular or table saw for plywood and a hack saw for PVC if these are your chosen materials.
Step #4: Assemble
Temporarily assemble the cat tree with small nails or screws to check that you are happy with the design and it’s stable. Next, attach the posts to the base and secure them with screws coming up from the bottom of the base.
If you’re using PVC, you can cut a circle of thick wood slightly smaller than the inside diameter of the pipe. Screw this circle to the base, then slide the pipe over it and secure it with wood screws.
Step #5: Wrap with carpet
To make your tree a good place to scratch, wrap some random sections in carpet. Be sure to use a carpet knife to cut the pieces, then staple them in place in sections on your tree.
Step #6: Finishing steps
When you are done, inspect the cat tree for sharp corners, nails, screws, or anything else that might injure your little buddy! You can make it a bit more enticing and encouraging play by dangling a few cat toys from the tower, or add a hammock if your kitty likes to achieve Garfield levels of relaxation!
Other ways to keep your cat calm indoors
Cats can become stressed indoors, which can affect their interactions with you and overall health. Understanding the nature and behaviour of your cat can help you keep it calm and happy.
Cats are comfortable with the familiar so often just require time to adjust to things. Cats, like us, perceive the world through their senses, and here is how you can keep your cat calm for each of the four categories:
Smell
Your cat’s sense of smell is much better than yours. It is a big part of their communication, social behaviour, and food appreciation. They mark their scent by rubbing themselves on things to release natural pheromones that establish boundaries to help them feel safe and secure. To keep your cat calm:
Avoid cleaning their scent off certain areas and items that are theirs
Use a synthetic facial pheromone that mimics their natural pheromones
Hearing
Cat’s hearing is four times better (and more sensitive) than yours, so to help keep your cat calm from an audible point of view:
Keep the noises low around your cat where possible
Dampen noise when they are in a carrier by using a towel
Play soothing music around the home
Always use a low, soothing voice when talking to your cat
Touch
Cats are very sensitive, and their whiskers help them to feel their environment. They love gentle petting or stroking, and you can also:
Be aware of your cat’s body language – if they walk away from you, don’t chase
Cats love head and neck rubs in particular.
Cats can suffer from “whisker stress,” so use wide, shallow bowls for water and food
Sight
Cats can see well in dim light, and rapid movements, especially when unanticipated, can make them be more reactive. You can lower stress in this area by:
Making movements slow or creating distractions such as treats when that isn’t an option
Never loom over your cat, as it makes you appear larger and more threatening
Leave your cat be if they are not interested
When in the carrier, cover everything with a towel to create a visual barrier
Ensure your cat has a place in the home they can retreat to for some visual privacy
Making your own DIY cat tree is always a lot cheaper than a pre-bought option; it’s also more fun! You can customise the tree to look, and more importantly, fit, in any way or anywhere you want.
How hard is it to build a cat tree?
Building a basic cat tree isn’t hard and also doesn’t have to be expensive. There are other easy and cheap ways to keep your cat happy as well; they love cardboard and cardboard boxes. For your DIY cat tree, ensure you have a sturdy base that won’t tip over by designing it to be larger than the platform. You can create a heavier and more stable base by cutting two sheets of plywood and glueing them together.
What can I use instead of a cat tree?
Another option that your cat will love is a hammock. These allow your cat to jump, relax and swing. Just be aware, this is a better option for youngers kitties who are still good with their balance.
Keep your cat happy and comfy!
The DIY cat tree is a great way to help your beloved cat feel more comfortable at home. A happy kitty also means less potential damage to other things around the home that are definitely not cat toys (like your expensive couch).
If you need a little help with your feline friend, especially in the realm of grooming, save yourself from some unwanted claw marks and check out the Taskers that are experts in cat care.
Remember, owning a pet is a huge responsibility and takes some work! You are their whole world so make sure you create a good one and give them all the love they deserve (as they will return it to you tenfold!).
Turn the volume up to eleven in your new soundproof room!
Despite popular belief, sticking foam and egg cartons on your walls in an attempt to perform your own DIY soundproofing is a pointless exercise. It doesn’t look great, and they do very little to soundproof a room. However, if you want to lower your noise pollution, we have some easy and more effective DIY soundproofing solutions below.
You may be a musician looking to set up a home studio, or you could be a homeowner looking to cut out pollution from traffic or noisy neighbours. Unfortunately, professional soundproofing can become very expensive when you factor in installation costs and materials, but there are some DIY options that are not only effective but inexpensive and easy to install yourself!
What is soundproofing?
When understanding soundproofing, the key is not to confuse it with sound absorption. Sound absorption reduces the amount of sound that travels in an area, lessening the echo. Soundproofing, on the other hand, is about blocking sound from entering or leaving a room.
There are four main soundproofing elements to consider:
Mass: as the more mass a structure has, the less sound is able to enter the space.
Decoupling: which is the process of separating two sides of a wall, making it harder for sound to pass-through
Absorption: which is about reducing echo and the distance a sound can travel (not blocking sound completely)
Damping: which is about reducing resonance with materials that convert the kinetic energy of sound waves to heat
Understanding how to achieve effective soundproofing
Absorption and diffusion help with echoes, but as we’ve mentioned, soundproofing is how you block outside noise. Soft materials absorb sound waves more effectively than hard materials, and surfaces with lots of angles are a great way to diffuse sound waves. This is why lots of recording studios are covered in soft angled foam.
To soundproof effectively, you have to stop the sound waves from entering the room. This requires dense materials, and if possible, should be considered during construction. It is much easier to reinforce a room at this point rather than after it’s finished.
Six inexpensive DIY soundproofing methods
An inexpensive way to soundproof a room is by adding mass, like heavy household items (far more effective than egg crates). Let’s dive into six ways to DIY soundproof your room on a budget, starting from the cheapest to the more expensive.
Method #1: Adding furniture in the room
This is the easiest method as you’ll probably need some furniture in the room anyway! The heavier the piece, the more mass in the space, which in turn improves soundproofing.
Just as when you empty a room, you hear sounds echo more, and things get louder; the reverse happens when you fill a room up. Lightweight, flat-pack furniture made of inexpensive materials are no good here; instead, opt for things like:
Sofas and armchairs
Wardrobes, armoires, and dressers
Bookcases full of books (a great sound-absorbing mass)
Tables
Furniture adds mass to a room and will dampen and absorb sound, stopping echoes and reverberations. So basically, leave your minimalist designs for another room!
Method #2: Carpets and rugs
Soundproofing the floor should be a consideration as it is just as important as the walls (especially in apartments or if your floors are made of concrete). Noise that travels through the floor is known as impact noise; people walking around or building work are examples.
Combat this with heavy carpets or rugs, which improve the heat insulation of a room as a bonus! This easy-to-install option will reduce impact noise as carpets and rugs have excellent sound absorption qualities.
If you want to take this one step further, adding underlay can improve an already effective solution. While underlay is designed to improve heat insulation, it also adds mass and improves soundproofing.
Loads of sound leaks under doors, especially when they don’t fit properly into their frames. DIY soundproofing a door just requires some acoustic sealant tape which is a roll of tape with a rubber seal that can be stuck onto a door.
Perfect for blocking small gaps, you can use the tape on the door’s bottom, sides, and top. You can also install a mounted seal that attaches directly to the door with a drop-down seal made out of metal and rubber. Another option for door soundproofing is switching to a heavier door to reduce noise pollution.
Method #4: Acoustic sealant
Windows are another source of noise pollution, specifically because of the seals (much like doors). Acoustic sealant is a great way to make your own DIY soundproof window inserts as it is specifically designed to soundproof a room, offering a more effective barrier than standard caulk as it remains flexible, moves with the building, and keeps a tight seal.
Simply apply it anywhere there’s a gap to make things more soundproof. You can also apply the sealant around electric fixtures and lighting, which have small gaps that can be a source of noise pollution.
Method #5: Weather stripping
Weather stripping was originally designed to stop drafts and air leaks, but it also blocks noise pollution. Air is a carrier of sound, so reducing the amount of air also helps to provide a soundproof barrier.
Weather stripping is available in various forms; the choice depends on how permanent you want it to be and what it is made from. Most external doors already feature weather stripping, but adding it to interior doors will help soundproof a room.
The most common weather stripping material is EPDM rubber, a thermoplastic mix that is very effective at blocking sound as it is very dense. These strips sit between the door and the frame to stop air from escaping.
Method #6: Soundproof Curtains
There are many soundproof curtains options that help to shield windows (a weak spot for soundproofing). Unlike walls, windows don’t have a lot of mass, meaning there isn’t much that you can do about them apart from sealing the joins as mentioned above.
Enter soundproof curtains, which much like the furniture; the heavier, the better. Aim for options that have several layers of material, which will also be good at insulating the room.
Some easy ways to achieve DIY soundproofing are as follows:
Add more furniture to the room
Put down carpets and rugs
Add door seals
Use acoustic sealant for windows
Add weather stripping
Add soundproof curtains
What is the cheapest way to soundproof a room quickly?
Three cheap and efficient ways to soundproof a room involve using furniture and decor:
Use curtains which serve as a great barrier thanks to their sound dampening abilities
Add area rugs to reduce noise generated by the floor
Add thick upholstered furniture
How can I make a DIY soundproof wall?
An inexpensive way to soundproof a wall yourself can include any of the following:
Fit bookshelves to the walls and fill them with books which are great sound absorbers
Fill empty spaces to prevent echoes
Hang drapes along the walls (the thicker, the better)
Hang heavy drapes over the windows
Fit an extra layer of drywall
Add acoustic foam around the room
Be as loud as you like with these cheap DIY soundproofing methods
The methods provided above all put emphasis on sealing gaps or blocking possible air leakages. They are inexpensive and effective ways of soundproofing a room on a budget. Just remember the rule that good soundproofing means adding mass to the space, and you should be fine!
If, however, you want to take things to another level, you can find a range of very skilled Taskers who can offer some professional soundproofing services. If you really want to turn those amps up, or you live in a particularly noisy part of town, this may be the best option for you.
Once you are all set with a soundproofed room, it’s time to make some noise! Check out our blog on how to tune a ukulele, then plug it into an amp and turn it up a lot because ukuleles aren’t very loud to begin with. Rock on, young uke player, rock on.
When you have more places to put it, you can buy more stuff! It makes sense.
A little extra storage space is always a good thing, no matter how big or small your home is. If you learn how to create your own DIY shelves, this becomes easy to achieve all over the home!
We have three different yet simple shelving options you can create yourself, all of which are wall-mounted, so they won’t take up any floor space. This makes them all perfect for even the smallest rooms! Your blank walls can become usable storage or a place to get a little decorative, displaying a certain collection. Basically, we’re giving you an excuse to buy more fun stuff! Read on for our favourite DIY wall shelves.
The three easiest DIY shelves you can make
Shadowbox shelves
Shadowbox shelves offer a contemporary style that consists of rectangular boxes, usually made of ¾-inch-thick hardwood like birch or red oak plywood. You can build them to any dimension, but we recommend aiming for 6 inches deep x 24 to 36 inches long x 8 inches tall.
You can install a single shelf or in groups of two or more, which leads to a shadowbox pattern. To create them, follow these steps:
Cut the four parts that make up each box (top, bottom and two ends)
Double-up on the ¾-inch plywood so your box is 1½ inches thick
Cut the plywood parts to the desired width
Crosscut them roughly three inches longer than needed
Glue together the two plywood pieces for the four parts
Tack-nail each section with a pneumatic pin nailer until the glue dries
Cut each shelf part to the required length with a 45-degree bevel on each end
Glue and nail together to form a rectangular-shaped box
Conceal the exposed plywood edges with 1½-inch-wide iron-on veneer
Cut a ¾-inch-thick x 2-inch-wide mounting cleat to screw the shelf to the wall
Place the cleat in between the ends of the box
Slide the cleat up tight against the underside of the top section, flush with the rear of the box
It’s always nice to give the shelf a light sanding with 120-grit sandpaper and apply a finish of your choice. To install the shelf, mark the stud spots on the wall, then drill a screw-shank clearance hole through the mounting cleat into the wall at each stud location. Make sure your shelf is level, then drive 3-inch screws through the cleat and into the studs. Make sure you include some finishing washers as well.
The most popular home shelf option are those that defy gravity! Floating shelves look like they come straight off the wall with no visible support. They essentially look like a thick wooden board, but they are really a hollow box that houses a wooden cleat securely screwed into the wall.
The standard size for the hollow shelf is about 3 inches thick x 6 inches deep x 22 to 24 inches long, but once again, you can technically make them any size you want (just be wary of putting too much weight on them).
Here’s how to make floating shelves DIY:
Cut your sides and front for the shelf from ¾-inch-thick hardwood
Cut a 45-degree bevel onto both ends of the front and one end of each side
Glue and nail the parts together
Cut two pieces of ¼-inch plywood as the top and bottom
Secure the plywood to the hardwood frame with glue and nails
Lightly sand, paint or stain as desired
Create the mounting cleat to fit snugly within the opening at the back of the shelf
Screw the cleat into two (or more) wall studs
Ensure everything is perfectly level
Slip the shelf over the cleat
Fasten in place with finishing nails
Shelf standards
Shelf standards are a type of manufactured shelving that have vertical slotted metal bars and flat metal brackets. These brackets clip into slots in the standards. This is all then mounted to the wall with shelves placed across the brackets.
While technically, you don’t “build” these from scratch, they are an affordable shelving solution that is easy to install and surprisingly strong. You can clip the brackets pretty much anywhere, and it’s easy to adjust the spacing to change the shelving size whenever you want.
Two shelf standards have the ability to support shelves up to about 24 inches long. You can have longer shelves if you install three or more standards.
Shelf standards are easy to install; the key is aligning, so the shelves are perfectly level. It is also important to screw the standards into wall studs to ensure maximum strength. This is the best way to ensure quality standards that you can rely on:
Screw one standard to the wall first
Make sure it is perfectly vertical
Clip a bracket onto the standard
Take a second bracket and clip it onto the uninstalled standard
Position the two brackets in the same slot on both standards (very important)
Hold the second standard against the wall in front of a stud
Lay a level across the two brackets (raise or lower the loose standard as needed until perfectly level)
Mark the wall with the screw-mounting holes on the second bracket
Screw the second standard to the wall
Repeat these steps for all of the remaining standards. After this is done and you are confident your brackets are level and secure, clip the brackets in and lay the shelves across them.
There are many pros of DIY shelving, predominantly their lower cost. In most cases, buying the materials for DIY shelves is much cheaper than purchasing ready-made shelving. You just need to account for your time to build them and ensure you do everything right the first time! The other major benefit of building your own shelving is customising the sizing to meet your exact needs.
How do you hang shelves without nails or screws?
If you want to avoid nails or screws (essentially any permanent marks on your walls), opt for adhesive strips. Command picture hanging strips, reclosable fasteners, and velcro removable mounting strips are some popular options. You can find these at supermarkets, hardware stores, craft and office supply outlets.
How do you hang floating shelves without studs?
There are several different options when it comes to finding support for a shelf. The most common is a drywall anchor, a plastic screw that plugs into the drywall. A molly bolt is also a good option if you have plaster walls or need to handle a little more weight. Finally, for really heavy shelves, opt for toggle bolts. All of these should be available at your local hardware store.
What is the cheapest wood for shelves?
These are some of the cheapest and most popular wood options for shelves:
Pine (one of the most affordable softwoods)
Plywood
Cherry (a hardwood that is lightweight and easy to use)
Koa
Red Oak
Paduak
Mahogany
Shelves all over the place
Now that you have three relatively easy-to-create shelving options, you can go nuts with shelves all over your home! As mentioned above, the beauty of these methods is that they avoid taking up any floor space. So you can still keep a semi-minimal look while creating storage and display room in your home.
Now, we are aware that the steps above do require a little bit of DIY knowledge, and this isn’t always easy for everybody. This is why another great option is finding skilled Taskers who can do it for you! Check out our custom shelving experts who can make the exact shelves you need for you, and our wall hanging and mounting Taskers who will make sure you have complete peace of mind in everything that goes up on the wall.
If you are comfortable with your DIY skills and ready to get creative, we have some more handy reading for you! Check out our wall shelving ideas guide for a little inspiration. Once you know how to create your own DIY shelving, it’s just a little imagination needed to come up with some cool, unique storage ideas that will be as aesthetically pleasing as they are functional. Stay tuned for more DIY projects!
Want to make your handheld router even more effective? Read on.
As those who use them know, a handheld router is a versatile and useful tool. Turning it upside down and mounting it to your own DIY router table, however, opens up the possibilities and tasks your humble router is capable of.
We’ll assume that if you are reading an article about making stuff for your tools, you have some tools. So gather them up and read on to learn how to build a simple DIY router table that can also provide some handy bench and storage space in your work area.
Just note, building a high-quality DIY router table can be complicated for beginners, it is best suited to those who know their way around a workshop (you know, the type of people who own routers that need tables). Here are the things you’ll need for your router table DIY.
Required tools:
Clamps
Corded drill
Countersink drill bit
Drill bit set
Dust mask
Router
Shop vacuum
Table saw
Tape measure
Glue
Hearing and sight protection
Jigsaw
One-handed bar clamps
Required materials:
1-5/8-in. screws
2″ washer-head screws
Polyurethane finish
Safety power tool switch
Wood glue
Contact cement
Nail-on furniture glides
Step 1: Building the cabinet
Choose the dimensions to suit your space and assemble the cabinet box first. Next, cut the sides and back and band them with hardwood edging. Glue on the edging, using clamps for a bit of support. The edging protects the edges of the MDF and provides a professional finish.
Use washer-head screws to put the frame together as this provides strength and eliminates the need to drill countersink recesses. If you want to include a middle shelf in your design, be sure to measure the height of your router first. Your shelf location should allow you to remove the router motor with ease.
Hang the doors using “full overlay wrap” hinges so the doors can completely cover the front edges of the sides. Nail on some furniture glides and mount an external switch.
Cut three holes in your cabinet for:
The power cord
A vacuum hose
A hole in the top for the router (in the next step)
The tabletop will sit over your cabinet top. Glue one layer of hardboard to some MDF core. Weight or clamp it down to dry, then trim the hardboard and cut a hole (as mentioned in the above point) for your router. It makes sense to centre the hole from the back of the tabletop for the most support.
Centre the tabletop on the cabinet, then trace the hole onto the cabinet top. Cut the second hole 1/2 in. larger than the tabletop hole, and add a second layer of hardboard to the tabletop. This layer won’t have a hole in it as it forms the work surface, which provides support for the router.
Add some hardwood edging and plastic laminate and ease the edge with a chamfer bit to prevent chipping. Install the router by drilling a router-bit hole to the size of your largest router bit. Fasten the router base to the tabletop, and the main section is done.
Step 3: Making the DIY router table fence
Take a plank of MDF the length of your table, cut a hole in it, and then cut the plank in half to create matching parts. These will act as the base and the rail. The idea is that the fence forms cutouts that act as an opening for the router bit.
Interestingly enough, you can use your new DIY router table to cut the slots of your fence rail. Attach the two fence halves with glue and screws, and your table is good to go.
Why a router table is useful
Why even mount a router on a table? The primary benefit is stability. When compared to a handheld router, using a DIY router table can be faster as it is easier to push wood across a router than pushing the router across the wood. A sturdy table and supportive fence provide greater control and accuracy.
For larger jobs, a router table is a must-have. For example, creating raised-panel doors is a task that requires big router bits that a handheld router is not capable of (or safe to use). Some specific router bits, like those that cut interlocking door or drawer joints, need a level of precision that cannot be achieved by hand.
Finally, the router table can be helpful when shaping parts that are too small for handheld routing. The added bonus of a router table is the space for a shop vacuum which ensures dust control, something that is not possible with a handheld router.
Additional touches you can include on your table
If you want to take your DIY router table to another level, include a drawer box. Make sure you do this last so you can use your new router table to cut 1/4-in.-deep rabbets in the drawer sides.
(If you want to skip the rabbets, make the front and back of the drawer 1/2 in. shorter).
Mount the drawer on full-extension slides and give everything a polyurethane finish, inside and out. Add some door pulls and magnetic catches, and you’ll have a fine DIY router table indeed.
Yes – router tables are a very useful addition to any workspace, especially if you cut your own mouldings. A router table essentially makes things easier and faster when compared to using the router alone. No more clamping the boards or struggling with narrow boards that are hard to shape. Just remember to use a push stick when necessary to protect your fingers.
Can any router be mounted to a table?
Within reason, any fixed base or plunge router should be able to be mounted to a router table. This becomes easier if you are creating your own DIY router table from scratch, as you can custom design its size to fit your router.
What can you make a router tabletop out of?
For a budget option, opt for MDF or particleboard when creating your DIY router table. If you want something slightly higher in quality, hard plastic sheets such as phenolic or UHMW will make an excellent tabletop. These materials are durable, so they will last longer and provide better performance (however may be hard to cut). UHMW is another option that offers ultra-low friction so parts can slide effortlessly across the table.
Can you attach a plunge router to a router table?
Yes, a plunge router can be used in a router table. Some will work better than others, and you will need to consider different safety practices depending on the type of mechanism in your setup for the router lift. In general terms, however, a plunge router is just as safe as a fixed-base router.
Adding a simple router table to your woodworking shop
If you have read the above steps and your head is in a tizz, we don’t blame you. These instructions are certainly best suited to those who know their way around a workshop and have an intermediate level of woodworking skills. The type of people who are likely looking to level up their work area with a router table in fact.
If your skills aren’t quite there yet, or perhaps you want a cool router table to give someone who knows how to use it as a gift, we have the solution. A range of talented Taskers can help with building unique furniture or wooden items, so you can find the best option for you, give them your ideas or specs, and get a unique table for future use.
Those who are handy in the workshed and are looking for fun new projects like the DIY router table, feel free to check out some of our other how-to blogs. There is never a reason to be bored, so keep yourself busy, get creative and build some pieces that look great and will be useful as you expand your skills.
Make no mistake, out-of-tune ukuleles sound as bad as all other out-of-tune instruments.
There are many key elements of becoming a great uke player, but the most important first step is learning how to tune a ukulele. Let’s be honest; it’s pretty much a musical dealbreaker if your instrument is out-of-tune!
Your family, neighbours, and audience will thank you for learning this crucial first step, and you’ll be well on your way to creating the beautiful sounds the ukulele is capable of.
The ukulele needs to be tuned frequently to offer its best sound, roughly every 15 minutes. Cheaper ukuleles require more frequent tuning when compared to the higher-end models. Read on to learn everything you need to know about how to tune a ukulele, and you’ll be on your way to becoming a master!
Standard ukulele tuning
Tuning is a matter of preference and also dependent on the other instruments you are playing with, the type of songs you are playing, and a host of different possible variations. To start with, however, the standard tuning of a ukulele sees the open strings most commonly tuned to the notes G, C, E, and A.
Some prefer to string their ukulele with a different option of a low G string (Linear Tuning) for a more rounded sound rather than a high G (Reentant Tuning).
If you’re used to playing the guitar, the high g-string may seem odd. In standard reentrant tuning, the strings do not go from lowest to highest. This gives a bright and charming sound with an even tone because the strings are in a smaller range.
The variance of tuning the g-string down an octave, linear tuning, arranges the stings from lowest to highest for a broader range that is fuller and resonant. To do this, you will need a special set of low G strings based relevant to your ukulele size. It would be best if you did not tune down High-g ukulele strings an octave.
How to tune a ukulele the quickest way
There are various versions of the ukulele, including soprano, concert, and tenor, but the tuning process’s essentials remain the same. The fastest and easiest way for how to tune a ukulele is with a chromatic tuner.
A chromatic tuner detects a note’s pitch and lets you know if it is sharp or flat relative to the note you are aiming for. You can find many variations of this tuning device, including pedals, units that clip on to the headstock of your ukulele, apps for your smartphone and more.
If you are playing live, a pedal tuner will likely be your best option. You can have this hooked up to your ukulele at all times and turn it on via a footswitch which makes for quick tuning – even while playing. Many musicians have a pedal tuner as one of the key pieces of equipment in their pedalboard. It works alongside a range of other effect pedals that can alter the sound of your instrument like delays, distortions and more.
This form of tuning takes a lot of time and practice, and you train your mind to understand where a note should sit naturally. To learn this method, listen to the various notes’ pitches as a point of reference and hum along to get the note in your head. You’ll need to do this before plucking the strings.
Once you’re confident you have the pitch in your head, pluck the string you are trying to tune. If the string’s pitch is higher than the correct sound, your string is sharp. If the pitch is lower, your string is flat. Turn your tuning pegs until the pitches line up.
How to tune a ukulele if you’re a lefty
If you are a dominant left-hander, you will need to re-string your strings in the opposite order and then tune them accordingly. Avoid flipping the ukulele or play it upside down, as you will likely find it easier to play “left-handed” if by re-stringing the ukulele in the inverse.
You’ll need to push through a little awkwardness at the beginning while you are learning to play like this, but it will make things much easier later on.
How to tune a ukulele to alternate tunings
While we have mentioned the standard tuning option, there are many others. Above all when it comes to music, there are no rules so long as what you are doing sounds good!
Tuning is a matter of preference above all else, but along with standard tuning, here are some of the other popular ukulele tunings that you can try out.
Baritone tuning (D, G, B, E)
Baritone ukuleles and even tenor ukuleles can use this tuning which is the equivalent to the tuning of the last four strings on a guitar. Also known as “G tuning”, this option will give a full warm sound.
Slack-key tuning (G, C, E, G)
You can’t play the ukulele without wanting to attempt some Hawaiian music! When doing this, slack-key tuning is the go. This will allow you to strum the open strings and create a C major chord. This form of open tuning has the top g-string in either reentrant or linear tuning, so you can tune it to the “G” note above middle C on a piano or opt also to go down the octave.
English tuning (A, D, F#, B)
This is also known as “D tuning” and has the same intervals as standard ukulele tuning. The difference is that every string is tuned up a whole step higher. To use this tuning, you’ll also need an English tuning string set. This is often most popular for soprano ukuleles or banjoleles as it offers a slightly sweeter tone.
Canadian tuning (low A, D, F#, B)
A slight variation on English tuning, Canadian tuning sees the top a-string tuned down an octave. You’ll usually see this option used for concert and tenor ukuleles.
How to know when to change your strings
If you regularly play your ukulele (daily, for example), the general rule of thumb is to change the strings every three months.
It would be best if you changed your strings because as they get older, strings begin to sound duller. All strings will inevitably wear out, so if you want the best sound possible, it’s a good idea to change them.
Despite the many debates on the internet, there is no one “best set” of ukulele string. Sound is subjective, you’ll need to vary your stings based on your tuning preference, and every ukulele responds differently to different strings. The best bet is to experiment and see not only which strings sound best on your ukulele but also which ones you simply prefer the sound of!
While tuning is a matter of preference in most cases, the standard tuning of a ukulele sees the open strings most commonly tuned to the notes G, C, E, and A. A popular variation is using a low G string (Linear Tuning) for a more rounded sound than a high G (Reentant Tuning).
In standard reentrant tuning, the strings do not go from lowest to highest. This gives a bright and charming sound with an even tone because the strings are in a smaller range.
What notes to tune a ukulele to?
The most commonly tuned notes for a ukulele is G, C, E, and A, working from top string to bottom. Along with standard tuning, there are some other popular ukulele tunings that include:
Baritone tuning (D, G, B, E)
Slack-key tuning (G, C, E, G)
English tuning (A, D, F#, B)
Canadian tuning (low A, D, F#, B)
You can experiment with these to find a sound that you like and are comfortable playing. Be aware, in most cases; you will need to use the right strings for each tuning as they will vary in thickness.
You are now on your way to becoming a ukulele master!
Learning how to tune your instrument correctly is a key step in creating some beautiful sounds. You can always experiment with tuning, especially if you plan to make your own music and find a unique sound to make your own.
If you are looking for some ways to improve your skills even further, check out the many taskers who can teach you! You’ll be able to find guitar lessons and various instrument tutoring, not only for the ukulele but a range of other instruments. While you can learn on the ukulele on your own, music lessons are a great way to improve your ukulele skills much quicker.
Learning a musical instrument is one of the best skills you can work on. Whether you are playing for yourself or hoping to perform in front of people, the process of learning and creating music is exceptionally fulfilling. Always remember to have fun and never stress about your rate of progress. Practice truly does make perfect, so be patient, and you’ll be a pro-uke player in no time at all!
Your splashback can be like a mini-feature wall for your kitchen!
Learning how to tile a kitchen splashback by yourself is one of the easiest DIY ways to improve the look of your home. This simple and affordable upgrade can be a lot of fun as there is no shortage of kitchen splashback options available when it comes to tiles. You get to flex your creative muscle while upgrading a functional area of your kitchen!
You have a lot of options when it comes to materials for your splashback, but glass, mirrored splashbacks, and stone splashbacks can be much more expensive and very difficult to keep clean. On the other hand, a tiled splashback is easy, affordable, robust, and simple to clean, all while looking amazing. It also allows for patterns and colours to suit the look of your kitchen.
Read on for all the steps for how to tile a kitchen splashback and take this fun DIY project on today!
Removing the existing splashback
If you are getting rid of an old splashback or renovating, you will first need to remove whatever it was that formed your existing splashback. You can tile over it, sure, but the finish simply will not be as good. Go the extra mile with the effort of removing the existing splashback. Once you have, you can reinstall some new plasterboard and start with a clear flat surface.
Alright – now that you’re ready for new tiles, here’s a helpful infographic summarising all the steps to DIY tiling in general:
Source: Airtasker
Read on below as we dive deeper into tiling kitchen splashbacks, specifically.
How to tile a kitchen splashback onto new plasterboard
Prep the surface and make sure your plasterboard is free from lumps or bumps. These will interfere with your tiling. Also, always put protective sheets over your benchtops so they stay free from damage that can be caused by tile adhesive and grout.
Include something to support your new tiles. If you have a benchtop, perfect, but if you are tiling between two cupboards, temporarily attach a block of wood to support the tiles and ensure a clean line.
Get some tile adhesive from your local hardware store. It often comes in a powder that you will mix until it looks like toothpaste.
Choose a starting point and use a 6 or 8mm notch trowel to apply a line of adhesive that covers the area that will make up one row of tiles. It’s always a good idea to start at the bottom, pushing the trowel upwards to apply the adhesive. If you are creating a mosaic pattern with your tiles, use a 6mm notch trowel. If you are laying in lines, use an 8mm notch trowel.
Put the first row of tiles in place; this will form the foundation for the following rows. Place spacers along the line. This will ensure the tiles are lined up correctly and evenly spaced. Use a spirit level to make sure everything is straight.
The hardest part will come at the end of the row. Unless you are unbelievably lucky, you will likely need to cut your tiles to create the perfect fit. You can do this by placing the tile upside down on a tile cutter, running a cutting blade along the line where it will need to be re-sized and either cutting it with the cutter or applying pressure to break it.
Place the cut tile at the end and butt it into the corner or architraves.
Repeat all of the above steps to the completion of your full splashback area and leave the spacers in their positions for at least 12 hours.
At this point, the adhesive should be set, and you can remove the spacers.
Adding grouting to your splashback
Once you have laid the tiles and the adhesive is set, you will need to add some grout. Grout is often available in a wide range of colours, so you can plan ahead with your tile look in mind, making the grout part of the feature. Just make sure that you find a grout that is suitable for 3-6mm tile joints.
Prepare the grout as per the instructions from the manufacture on the packet, then follow these steps:
Use a rubber trowel to apply the grout in a massage-like motion. You should be adding grout into the joints in a 45-degree circular motion. Fill all of the joints and remove any excess grout as you go.
Wait for roughly 30 minutes allowing the grout time to set, and use a clean sponge to wipe away any excess grout.
Choosing the design for your splashback tiles
As there are literally thousands of tile choices for splashbacks, how do you choose the right option for your home before learning how to tile a kitchen splashback? While it partly depends on your budget, you should first decide if you want your splashback to be a feature or to blend in with the existing look.
If you opt for a feature, feel free to get colourful or even choose a pattern. Approach it like you would a feature wall in the living or bedroom. If you want a more minimalist look, choose a white or single colour that matches your walls and cupboards.
Should you DIY your splashback at all?
Refreshing your kitchen splashback is an affordable way to do a mini-makeover. Upgrading your kitchen splashback to a tiled option is easy to do and a great DIY project, even for those who do not consider themselves to be super handy.
Tiling a kitchen splashback should be somewhat simple, providing you follow the above steps. As a reminder, here is an overview of the process:
Start by preparing the surface by clearing the old splashback and creating a level area
Make sure your tiles have a benchtop to support them
Prepare some tile adhesive
Apply it to the required position on the wall, one row at a time from the bottom
Place the tiles on the adhesive with spacers to ensure they are spaced evenly
Repeat this process row by row
Wait 12 hours
Remove the spacers
Apply some grout liberally, wiping away the excess as you go
You can install a splashback over existing tiles as long as they are securely attached to the wall. There should be no cracks or broken tiles as this may impact the adhesion of the panel. The existing tiles will also need to be level, so it is best to remove any uneven tiles as they can distort the final look of your new surface.
Should you tile a splashback?
The goal of a splashback is to protect your kitchen walls from water and oil splashes. Therefore, a practical approach is to use tiling with the bonus of it being a great decorating scheme.
When tiling a wall, do you start at the top or bottom?
Always start tiling roughly 3/4 of the height of your tiles. Start with the bottom row of the tile and work your way up from there.
Can you start tiling in a corner?
It is likely that your tiles will need to be cut, so they perfectly fit the perimeter of your room. If you begin in a corner, you can start your pattern with full tiles on a straight line moving evenly into the room. It can be more difficult to get the pattern right if you start in the centre. Starting in the corner also means that is one less tile corner you need to cut.
Not-so confident in your DIY skills?
While we say this is a simple DIY task, learning how to tile a kitchen wall splashback may still be above some fresh DIYers abilities. How long to tile a kitchen splashback depends on your skills – you simply may not have enough time!
If that is the case, we have a range of expert Taskers who can help handle the project for you. Ensure a professional finish and save yourself the hassle!
Protect you, your family and guests from sudden weather changes or periods of increased wind activity with ease!
An awning, also known as an overhang or sun shade. It is traditionally a structure on the exterior of a building above a window or door to offer additional protection from the sun and natural elements. Sudden weather events can ruin the roughest and tumble of outdoor events, like camping, and a DIY awning is a great way to keep the party pumping.
Read on to learn some handy hints and tips on how you can make an effective and robust DIY awning that will shelter you from the elements.
It may be fair to say that most people have been in a position while on a night out, camping, hiking, at a special event or a family gathering, that proceedings have been derailed by the weather suddenly taking a turn for the worse.
This could involve unforeseen weather events such as:
Heavy winds
Light rain and heavy downpours
Hail
Light dust storms
Snowfall
Sand storms at the beach and more
Have you ever experienced such events? Were you able to find cover? Or did you have to improvise with what was lying around?
Awnings such as custom camp awnings, shade sails, retractable 4WD awnings, backyard awnings, and other custom protective shelters can cost a small fortune. However, have you considered making a DIY awning? It may be cheaper and a lot easier than you think.
The best part is that most, if not all, of the parts you will need for any type of awning can be bought from your local hardware store or online.
Different types of DIY awnings
An awning is a generic term for any permanent or retractable cover that is attached to another structure, like a building or vehicle. So how your awning is shaped and constructed is more or less open to creative interpretation.
The only thing that all DIY awnings must do is provide protection and shelter from the sun and other outdoor elements.
A DIY awning’s frame can be made out of any material, as can the awning’s canopy. However, these fabrication materials should be able to withstand or repel UV light, water, wind and other aggressive natural occurrences.
Many types of awning are used around the world for a range of different reasons, including:
Patio awnings
Deck awnings
Pergola awnings
DIY free-standing awnings
Conservatory awnings
Vertical awnings
Retractable awnings and more
As you can see, the different types of DIY awnings you can fabricate are prolific and open to creative interpretation.
What are DIY awnings made of?
The fabrication materials used to make a DIY awning can be as diverse as the many types of awning you can construct. The main rule of thumb when it comes to making an awning is to ensure your framework is strong enough to support the awning and rigid or flexible material for the canopy that provides shelter and protection.
DIY awning framework
Although some awnings can be constructed from all solid materials like glass, plastic or steel sheeting, most awnings are made to be collapsible or retractable. This means the main protective segments of an awning are made from textiles, plastic, or other flexible and malleable materials.
These materials known as the “canopy” need to be attached to a framework to provide rigidity to optimise the shade and shelter the awning is designed to provide.
Some of the most common materials used for a DIY awnings framework include:
Aluminium
Steel
Wood
Hard plastics
PVC piping and more
The type of material you select to make your DIY awning will depend on the type of awning you are constructing. Whether that be a free-standing collapsible awning, a retractable awning on, say, a 4WD vehicle, or permanent “shade sails” that are attached to a patio or pergola.
One of the common materials used to make a collapsible, emergency or retractable DIY awning is PVC piping.
PVC piping is robust, easy to cut, and often has prefabricated angled joinery that can be easily slotted or glued together with minimal fuss or effort. PVC is also UV and weather resistant and can withstand high and low temperatures.
In emergency and survival situations, you may have to get creative and utilise things that are lying around.
This could include things such as:
Fallen branches and sticks on the ground
Bamboo
Hard refuge, like old timber and steel piping
Tent poles
Concrete mesh and more
To fasten your frames together, you may have to find some old string or rope, box or gaffer tape, or use something like long strips of twisted tree bark or long grass.
There are many ideas and examples you can find from a quick search online that can spark your ingenuity and creativity.
DIY awning canopy
The type of material you use to create your DIY awning’s protective canopy is limited only by imagination. However, this material should be strong enough to withstand the impact of wind and moisture from rain, hail or snow.
The type of material may also vary depending on whether the DIY awning is meant to be temporary or permanent.
Some standard products people have used to create DIY awnings include, but are not limited to:
Canvas
Plastic tarpaulins
Plastic garden sheeting
Vinyl sheets
Wooden slats
Hard plastics
Shade cloth and more
Some DIY awning canopies can even be made from tempered glass or corrugated iron sheets. Unlike a collapsible or retractable awning, these materials are better suited to fixed awnings that remain permanently open.
In circumstances where you need to create an emergency or survival awning, then you could consider utilising things like:
Large beach towels
Picnic rugs
Old blankets
Sleeping bags
Foil emergency blankets and more
Sometimes the best way to solve a problem is to think outside the box. But, again, a quick search online can provide you with an abundance of tried and tested creative solutions.
Tools of the trade
Tools are essential when fabricating any utility or structure. Having the right tools for the job is critical to a successful construction; it can also help improve safety and help you avoid personal injury.
Although the types of tools required will vary depending on your design, some standard tools for consideration may include:
Hammers
Cordless or powered drills
Phillips head or flat head screwdrivers
Hand saws
Hacksaw
Jigsaw
Adjustable drop saw
Tape measures and set squares
Pens, pencils or texters
Vices and clamps
Drill bits
As previously mentioned, the internet has a limitless amount of ideas and countless examples of other people successful DIY awning projects.
What tools and construction materials do I need to build an awning?
Unless you are a quiet genius like 80s TV superhero Macgyver, who seems to be able to do just about anything with a basic swiss army knife and whatever is lying around, you will need some additional tools and materials besides just your frame and canopy to complete your DIY awning.
These will vary depending on what kind of awning you are fabricating. However, it is a licence to get creative and unlock your inner genius.
These materials may include things like:
Fasteners like screws and nails
Self-tapping screws
Angled brackets or joiners
Wall plugs
Chords or ropes for retractable awnings and slides
Eyelets for your canopy
Timber or metal uprights for support
Masonry fasteners like Dynabolts for walls or concrete floors
Some items like caribenas or other fastening components may also be needed when constructing, say, a retractable awning for a patio.
Can you build your own awning?
Yes! In fact, they can be easy to construct and the only rule required is that your awning provides protection! Feel free to get creative and match the materials of your awning to the aesthetics of your home.
Just go for it!
When it comes to DIY awnings, the sky’s the limit, and the best part about making your own awnings is the creative journey of problem-solving and the pride you receive after standing back and relishing in a job well done.
So get online, get some ideas, and just go for it! As with many DIY projects, don’t fall into the trap of analysis paralysis. The best way forward is just to get started and enjoy the process.
If there's one thing that definitely needs cleaning, it’s coins. Read on to learn how to clean coins the right way and maintain the quality of your coin collection.
We’ve all heard about dirty money. While the saying isn’t always meant literally, there are situations where it most certainly could and should be. Learning how to clean coins is a handy skill for collectors who happen upon rare pieces that, when cleaned, can be worth a lot more than the number etched into them!
In this article, we’ll explore different ways how to clean old pennies without devaluing them. You’ll learn how to keep the unique colour of your coin collection, learn about homemade cleaning solutions, and explore the do’s and don’ts of coin cleaning.
But first, let’s address a question that may be on your mind: Do you really need to clean your coins?
Generally speaking, an antique metal currency should be left alone to preserve it, but if there is an unbearable amount of grime and grit on the coins, and you planning on displaying them, give them a clean. The same goes for cleaning your precious silver.
Just keep in mind that cleaning or polishing rare coins will often devalue them. If you’re planning on selling them, we recommend that you get an appraisal before attempting a clean. Or book an expert to clean your rare coins and jewellery collections.
But, if you happen to be in possession of some coins that have sentimental value to you and you do not have any plans to sell them, then there’s no harm in cleaning the coins and make them a little nicer to look at.
Another reason why you may need to clean your coins is if you have normal everyday coins that are simply extremely dirty. These days, in particular, cleanliness is very important. Coins get passed around and can collect all kinds of bacteria.
So, if you are planning on keeping your coins for a while, possibly in the piggy bank or jar, give them a clean first. It’s always better to be safe than sorry by keeping everything nice and clean! Follow the steps below and make those coins shine to look their best.
How to clean coins without damaging them: A step-by-step guide
Coins can get very dirty and easily corroded. There are a number of ways to clean change using different cleaning solutions and homemade methods that will return excellent results.
Step 1: Determine your coin’s value
When it comes to cleaning old coins to preserve the coins’ patina, it is essential to determine the coin’s value. If you are worried about ruining the coin, speak to a coin dealer first for a cleaning recommendation.
Step 2: Prepare your homemade cleaning solution
Before you clean your coins, make sure to prepare first your cleaning agents. A simple homemade solution for older coins is as follows:
4 cups of divided distilled water
1 tablespoon of mild hand soap
2 plastic containers
A clean, soft cloth
An old, soft-bristled toothbrush
Step 3: Soak the coins in the soapy mixture
Fill a plastic container with two cups of the distilled water and stir in the mild hand soap. This will create a soapy mixture that will work wonders on your dirty coins.
Once the soapy mixture is ready, carefully place the coins into the container, ensuring they are fully submerged. Allow them to soak in the solution for about 10 to 15 minutes. This gentle soaking will help loosen any grime or dirt clinging to the surface of the coins.
Step 4: Gently scrub and rinse the coins
Take the coins out and lay them on a clean, soft cloth. From here, use the old, soft toothbrush to gently scrub each coin, then place them in the second container with the other two cups of clean distilled water.
Step 5: Dry your coins
Let your coins sit for five to ten minutes, then allow them to dry naturally on a clean cloth.
If you want to clean your everyday change, you can opt for a more abrasive technique. Ensure that you are dealing with coins that have no collectible value first as there is a chance that this method will damage the patina, and as a result, the value of the coin (over and above its standard value).
Here’s how to clean corroded coins for everyday use:
Prepare a solution of warm, soapy water in a watertight jar and add a small amount of sand.
Seal the coins in the jar with a tight lid and shake it as if you were making James Bond a cocktail.
Remove the coins and rinse them under warm water, then use a clean, soft cloth to dry them.
Refrain from rubbing the coins as the remaining sand may damage their surface.
How to clean coins with a soaking method
Another great way on how to clean coins without damaging them is by soaking them in isopropyl alcohol and salt. These two ingredients are coarse and acidic, which is an effective way to target built-up dirt.
Here’s how to do it:
Combine one cup of isopropyl alcohol and two tablespoons of salt in a medium bowl.
Mix the solution, then add the coins to the dish, allowing them to soak for at least two hours or longer if they are particularly grimey.
When ready, rinse the coins in distilled water. It is important that you do that and avoid the use of tap water as there are chemicals in it that will erode the coins.
Finish off by letting the coins dry on a clean, soft cloth, gently dabbing them and turning them over to ensure both sides dry properly.
How to clean copper coins with olive oil
Olive oil can clean your coins as the oil is an effective way to penetrate and loosen the dirt on the surface. However, be warned, this is not a quick method by any means.
If you’re already set on cleaning your coins with olive oil, here’s how:
Grab a plastic container, place the coin inside and cover it completely with olive oil.
Let it sit like this for at least a month or more, changing the olive oil if it becomes discoloured.
When ready, remove the coin from the bowl and clean it with soap and distilled water. You can gently scour the coin with an old toothbrush to target any last remaining grit.
Did you know? Olive oil is also an effective way to clean brass. Just dab it on a clean cloth after you have removed the tarnish and rub the oil gently over the surface to enhance the shine and reduce the risk of tarnish over time.
How to clean coins with baking soda
Another popular option that you likely have laying around the house is baking soda. This is a popular homemade metal polishing solution or option for cleaning jewellery.
Take two tablespoons of baking soda and add water until you have a thick paste.
Massage the pass around the coin with your fingers in small circular motions.
Rinse the coin with distilled water when done and dry it with a clean, soft cloth.
Key takeaway
Restore your coins with the cleaning tips we’ve mentioned above and get that spare change looking shiny and new. This is particularly important for collectible, high-grade, uncirculated coins, but it is vital that you exercise caution. The incorrect cleaning of valuable and collectible coins may reduce their value, so if in doubt, leave these to cleaning professionals.
Frequently asked questions
How do professionals clean coins?
In professional coin collecting circles, the general rule for cleaning coins is not to clean them at all. Coins that look dirty or worn out are often still more valuable than those that are newly cleaned. Coins undergo a natural process over time, known as toning. This is where oxygen or sulphur reacts with the coin’s metal causing a reflective quality known as mint lustre.
Cleaning products remove the lustre and add tiny scratches that can render the coin worthless. For these reasons, many professional coin dealers steer people away from cleaning. Play it safe and have your coins assessed and valued if you think they are worth something before cleaning them.
How do you clean coins without damaging them?
There is a simple homemade solution that is a great way to clean older coins without damaging them. The process involves distilled water, a tablespoon of mild hand soap, clean cloths, and an old, soft-bristled toothbrush.
Fill a plastic container with distilled water and stir in the mild hand soap in which you will soak the dirty coins for 10 to 15 minutes. After this, take the coins out, lay them on a clean, soft cloth, and use the old, soft toothbrush to scrub each coin gently. Place them in the second container with clean distilled water, let them sit for five to ten minutes, then allow them to dry naturally on a clean cloth.
What liquid cleans coins the best?
A simple solution of warm, soapy water in a watertight jar with a small amount of sand is a great way to clean coins that you don’t mind might get damaged. Seal the coins in the jar with a tight lid, shake it, remove the coins, and rinse them under warm water then allow to air dry.
Another effective liquid option is soaking the coins in isopropyl alcohol and salt. These two ingredients are coarse and acidic, which is an effective way to target built-up dirt. Once again, you’ll want to leave these coins to air dry on a clean cloth once you have soaked them in the mixture.
Creating a DIY loft bed is actually quite easy, and you can have a lot of fun while doing it!
A loft bed can be the perfect addition to a kid’s or guest room as it saves space and can double as something else – like a workspace if you include a desk! Surprisingly, creating your own DIY loft bed really isn’t that hard. With the right tools and good planning, you’ll be able to nail this project (pun intended).
Loft beds should be able to accommodate a full mattress, and from cutting the lumber to assembling it, we have all the necessary steps and tips for creating a budget-friendly loft bed below.
Gathering the materials: DIY loft bed plans
The dimensions of every DIY loft bed will vary based on your available space, but the following list will at least give you a guide of what materials you’ll need. When building furniture, it is important to use a quality grade of lumber. Try to choose the straightest boards you can with the least knots. Steer clear of end cracks that extend far into the wood. Always buy extra to allow for any cutting mistakes.
For a DIY loft bed, grab the following lumber:
(10) 2′ x 6′ x 8′ boards
(1) 2′ x 6′ x 10′ boards
(2) 2′ x 2′ x 8′ boards
(1) 2′ x 2′ x 10′ boards
(3) 1′ x 6′ x 10′ boards
(6) 2′ x 4′ x 8′ boards
(3) 2′ x 4′ x 10′ boards
(1) 3/4-inch 4′ x 8′ MDF sheet
You’ll also need the following hardware (make sure all screws used are made for wood):
2 1/2-inch pocket hole screws
3-inch, #10 washer or wafer head screws
4-inch flat or trumpet head wood screws
5-inch zinc-plated tee hinges
1 1/2- x 72-inch continuous hinges cut to 56 inches in length
2-inch zinc-plated window bolt
120 and 220 grit sandpaper
For the tools you’ll need:
Circular saw
Drill
Pocket hole drill set
Heavy-duty clamps
Tape measure
Carpenter’s square
Wood glue
Putty
Paint (if painting)
Safety gear
Step #1: Cut the wood
Use a circular saw to cut your wood to size. Before you assemble the DIY loft bed, you’ll want to sand the rough edges to make them smooth. Start with 120 grit sandpaper moving up to 220 while making sure you d not round over the cut ends that join to other pieces.
A rough guide for your pieces and sizing is as follows (board inches refer to length):
Legs:
(4) 2 x 6 70 inch boards
(4) 2 x 4 70 inch boards
Ladder:
(8) 2 x 4 60 inch boards
Slats:
(6) 1 x 6 54 inch boards
Top Rail:
(2) 2 x 6 79 inch boards
(2) 2 x 6 54 inch boards
Inner Slat Rail:
(2) 2 x 2 54 inch boards
(2) 2 x 2 72 inch boards
Lower Frame and Top Rail:
(2) 2 x 6 79 inch boards
(2) 2 x 6 54 inch boards
Spacer Blocks:
(10) 2 x 4 6 inch boards
Step #2: Assemble the frame
Always begin with the lower frame and top rail by connecting the 79-inch 2 x 6 boards with wood glue to the 54-inch 2 x 6 boards. Place the 54-inch board to the 79-inch board to create a join on the inside. After you have done this, you can use the driver kit to screw each end creating butt joints with three 4-inch screws on either end.
Once assembled, the inside dimensions should be 54 x 76 inches with an overall dimension of 57 x 79 inches. This process will also be repeated for the top rail. As this will likely be quite heavy, assemble it on the floor of the room you are putting the bed in.
Step #3: Attach spacer blocks
Start by drilling two pocket holes into one end of the 6-inch 2 x 4 to attach to the lower frame. On the opposite end, drill two more pocket holes for the top rail. On the longer sides, draw a mark at 37 1/2 inches from each end for the middle spacer. The other two spacers will sit at 18 3/4 inches from each end.
On the short ends, mark 16 1/2 inches from each end, then attach the blocks using both wood glue and two 1 1/2-inch screws. The top rail frame should align with the lower frame, and you can attach the top rail to the spacer blocks also with wood glue and two 1 1/2-inch screws. For a quality finish, ensure everything is completely flush and spaced evenly.
Step #4: Rails, slats and legs
Follow these steps for the attachments:
Attach the 54-inch 2 x 2 boards to the inside of the lower frame using 3-inch screws and wood glue
Connect the 72-inch 2 x 2 boards with the 54-inch 2 x 2 board with the same method creating a butt joint
Space the 1 x 6 slat boards evenly on top of the frame
Attach all slats using wood glue and two 1 1/2-inch screws
Drill pilot holes for the legs, then add screws
Use 4-inch screws to make a butt joint in the shape of a capital letter “L” using one 70-inch 2 x 6 board and one of the 70-inch 2 x 4 boards
Drive screws at 12-inch intervals to make six in each leg.
Repeat for the remaining legs
Step #5: Attach braces and ladder
Flip the frame upside down to attach the legs with wood glue, then use four 3-inch screws on the 2 x 6 and two 3-inch screws on the 2 x 4. Once all of the legs are on, you can flip the loft bed upright, then add a ladder and brace.
Use wood glue for the 76-inch long 2 x 4, roughly three inches from the floor with three 3-inch screws to secure. Then attach the 60-inch 2 x 4’s spaced evenly with wood glue and use three 3-inch screws on each end of the ladder to secure it.
Step #6: Sand and paint
Give the entire loft bed a sand with medium-grade sandpaper or, if you have one handy, an orbital sander. The goal is to ensure all the edges are smooth to touch, so you avoid any surprise splinters.
Wipe everything down with a microfiber cloth to get rid of all the dust, then fill any holes or cracks with putty. For the finish, it is up to you if you want to paint or stain, whatever works best with the rest of the room’s aesthetics, really!
There are many variables when it comes to the cost of a DIY loft bed. The total cost will essentially come down to the raw materials you choose for the frame and connecting materials. Extra costs may include certain types of tools needed to construct the bed if you don’t already own them. Generally, prices can start from $200 all the way up to $1000 if you are using premium materials.
Can you build your own loft bed?
You sure can! A loft bed with or without a desk, depending on how skilled you are, is a great DIY addition to a kid’s or spare room. Building one yourself is a very achievable DIY project, so long as you have the right tools and materials. Good planning is the key, and your goal should be to make the bed large enough to accommodate a full mattress.
Is it cheaper to buy or build a loft bed?
Depending on the materials you choose and how long it takes you to build (time is money, after all), building your own DIY loft bed can be much cheaper. It can be quite simple to build an attractive, sturdy, safe loft bed yourself, which can also double as a fun family project. As long as you plan properly to avoid excess wastage and choose the right materials, you should be able to build your own loft bed for much less than buying a pre-made version.
Flex those DIY skills with your new loft bed
You have the steps above to help you create a simple DIY loft bed; the only thing to do next is to start gathering the materials. You’ll be well on the way to a fun and stylish kid or guest bed very soon. And it’s the coolest loft bed because you made it with your own two hands!
If the idea of a DIY loft bed is set, but after reading the instructions, you fear you might not have the time to do it yourself, search the range of skilled furniture and bed assembly Taskers that we have available to set up IKEA loft beds. You’ll save a stack of time and enjoy peace of mind in knowing the job has been done properly and the bed will stay up!
On the other hand, you may well have the DIY bug, and the bedroom is getting an overhaul. In that case, we have a stack of other articles that you will likely be interested in. Read on for some colour themed bedroom inspiration in options like purple and black, and use your new DIY skills to overhaul and improve your space.
The biggest problem with mice is that they don't contribute to the mortgage.
Let’s preface this article about how to get rid of mice by saying we don’t want to kill or hurt the little guys. They are, after all, merely trying to survive like the rest of us. Take it as a compliment that their thought your home was nice enough to call their own!
That being said, we understand that you probably don’t want them scurrying around your house. A single random mouse might seem cute, but one can quickly turn into an entire horde due to their spirited breeding habits. Once mice start nesting, it can become a lot harder to get them to leave.
Living with mice is also a health hazard as they use their urine as a communication method due to the lack of tiny smartphones being available on the market presently. Finally, mice love to gnaw on wires, which means no TV, and we all love TV. So read on for some friendly methods for how to get rid of mice from your home without hurting or killing them.
How to get rid of mice in your house
Method #1: Mouse-proofing
Prevention is always the best option as it is way easier not to deal with a rodent infestation than to deal with one. The cold winter months are the most popular times of the year for furry visitors as they seek shelter and warmth to nest, eat, and breed in.
Follow this checklist to rodent-proof your house so that come winter, the only mouse in your home is on the Disney channel:
Trim down the branches of any nearby trees that might act as bridges into your house. Mice enter through openings in your roof to get inside your walls.
Find any holes and gaps around the exterior of your home and seal them with something durable like sheet metal. The average mouse can fit through an opening slightly bigger than 1/4 of an inch.
Seal window frames and doors with stripping, door snakes, etc.
Keep your garbage bins as far away as possible from your home.
Soft things make for great nesting materials; this can include old storage boxes of clothes and your walls’ interior, so clean out the vulnerable areas.
If a small-to-medium-sized wooden horse rocks up at your front door one day, ignore it. Mice are well-versed in the strategies of the Trojans.
Method #2: Mouse repellent
Much like humans, there are some smells that mice absolutely hate – weirdly enough, they are some of the ones we love to cook with! Garlic, peppermint and spicy scents like cayenne pepper drive mice crazy, and they have a very sharp sense of smell.
For example, you could put some peppermint oil in cotton balls strategically where you suspect mouse activity as a natural repellent that is safe for household pets and children and helps your home smell good. It is important to note that mice are clever, and they will catch on to your plan and find a way to circumvent it, so couple this tactic with some of the others in this list.
While you should probably be doing this regardless of mice, rodents truly thrive in unsanitary conditions. Always clear the clutter around your house as it makes for a great mouse home, especially in the garage and never leave out any food scraps.
Where possible, keep food in airtight containers and switch to metal containers for your garbage. The average adult mouse only needs a few grams of food each day to survive, so generations of mice can happily thrive around your bin areas forever. The cleaner, the better, not only for keeping away mice but also for you and your family’s health.
Method #4: Non-lethal mouse traps
A slightly more aggressive but still humane alternative to get rid of mice naturally from your home is the use of non-lethal traps. These traps can catch mice without causing any harm. They are bait-based, luring the mouse into an enclosure that they cannot climb back out of. Anything sweet is a great piece of bait, so you can use cookie crumbs, some chocolate, or even peanut butter.
Place the traps wherever the mice frequent, and when you catch the mouse, release it a fair distance from your house to avoid it coming straight back in. This approach may take more effort, but it is much kinder, and you don’t have to deal with the horror of emptying a traditional trap that snaps the mouse’s neck.
Method #5: Aluminium Foil
While you don’t need to wear it as a hat and start studying government conspiracy theories, aluminium foil around the home is another effective deterrent for mice. They steer clear of it for some reason that we will possibly never know.
Lay the foil in the places with the highest concentration of mouse activity and wrap whichever foods you leave out to keep the little critters away from them. If you have some mouse entry points that are a little hard to patch, stuffing them with the foil acts as a double-whammy of prevention.
Knowing who you are up against
In’ The Art of War’, Sun Tzu said, “Know the enemy and know yourself,” and we can help you with the first part with some handy mouse facts!
Mice are very clever little creatures, and they have an acute sense of smell and excellent hearing. The trade-off is the fact that they have terrible eyesight. They are nocturnal, so most active at night and they love company which is why they have moved into your house. The fact that you haven’t invited them onto the couch for movie night profoundly offends them.
A female mouse can give birth to litters of up to 15 at a time, after only two months of pregnancy, and they can get pregnant after this again just 48 hours later. Mice can climb, swim, and even jump, and they like to eat around 25 meals a day to maintain their athletic abilities!
Mainly due to the fact that you are such a good host, mice will not leave on their own. If a family of mice have settled in your abode, you’ll need to take action to get rid of them, or the issue will likely amplify to ridiculous levels.
The sooner you catch the issue and can start implementing some strategies to get rid of the unwanted house guests, the better. One mouse is much easier to remove than fifty. Mice can breed at an alarming rate, so even the hint that you may have a mouse in the house (often due to droppings around the place) means it’s time to spring into action and help them to find somewhere else to live.
How does an exterminator get rid of mice?
A professional exterminator will usually survey your home to figure out all of the possible entry points for a mouse. They will start outside checking for holes and cracks, seal off these points then use a chemical-based poison to clear the mice that already exist in the home.
Some exterminators may offer less harmful methods, but generally, they work as quickly as possible, so you do not have to spend too much time away from your home while they work. Their methods may also be dictated by how severe your infestation problem is.
What’s the fastest way to get rid of mice?
A non-lethal catch-and-release trap is a very effective way to get rid of a mouse quickly. As these traps are bait-based, you can use anything sweet like cookie crumbs, some chocolate, or even peanut butter to lure the mouse in.
Place the traps wherever the mice frequent, and once caught, release the mouse a fair distance from your house to avoid it coming back. This is a quick and kind way to solve your mouse problem at home. Once dealt with, keep a clean home and seal off any exterior entry points to avoid having to rid your home of mice again.
Now you know how to get rid of mice, start your clean-up!
Begin your mouse-prevention techniques the second you finish this article! Check your home for entry points and do a spring clean regardless of what season it is. Remember, prevention is your best bet when it comes to mice in the home, and a clean, sealed house is the way to do it.
If it’s too late for that and you already have a rampant mouse problem, and if the steps above really aren’t your cup of tea, there is help available. Search the range of pest control expert Taskers that can pop on over and handle the issue on your behalf. You can even specify the type of solution you want in your task, i.e. no chemical use, etc.
However, once they have dealt with the issue, refer back to the beginning of this section and keep that home clean. You can even find a range of very skilled taskers that can help with that if need be as well!
If your clothes mostly live hung over the back or a chair, or worse, on the floor, read on.
Wardrobes can be magical places, and not just because some of them have lions and witches and stuff like that through the back of them, but also because they can make your life much simpler! We have some handy DIY wardrobe tips that can help you create, manage and enjoy a truly well-organised space.
You likely put a lot of time into looking your best, and your clothes need the correct care to ensure that is possible. You can also make life much easier with a well-laid-out wardrobe for outfit selection, free space around the bedroom and more.
Let’s look at how to build a simple DIY wardrobe, then touch on some other handy clothing storage tips to best organise your space!
How to create a DIY wardrobe
To create your DIY wardrobe storage, we recommend using Birch plywood for a simple design that can be tailored to your look later with a paint job or various organisation layouts.
In this case, we’ll build a dimension of 75in high by 41.5in wide by 19in deep, but you can go bigger or smaller to match your space.
Materials:
3 – 3/4 (4×8) Birch plywood for the primary structure
2 – Roll of edge band
1 – 1/4 (4×8) plywood for the back
Edge band trimmer
Step 1: Cutting down the plywood sheets
Use a circular saw to cut your plywood sheets to your preferred dimensions, be it the ones we’ve listed above or whatever size you have decided works for your space.
If you want to include a middle divider, use a pocket hole connection jig and drill all the locations that the pocket hole screws will sit. You can also use wood glue for added strength.
Build the frame with corner clamps to align the sides, then add the screws are added. If you are including dividers, add glue to the joint and work the divider into place.
Add the back, which is best cut slightly bigger to hide the plywood ends. Use wood glue on the surface of where the plywood backing will sit. Add brad nails to the top and bottom for a firmer grip.
Step 3: Add the edge and sand
Depending on how unique you want your DIY wardrobe shelves to look, you can add a finishing touch with an iron-on edge band. Find a colour you like and apply it to all of the visible ends.
Sand down the entire wardrobe and apply a white gloss to finish it off (also optional).
Step 4: Install the hardware
The hardware is another completely customisable section of your DIY wardrobe. Obviously, you need at least one clothes rod if you plan on hanging things. Alternatively, you can go a truly DIY look and just have the box frame with dividers to stack folded clothes in neatly (you’ll be surprised how great this can look.
While you can get even more creative if you have the skills with things like sliding wardrobe doors, DIY beginners may wish to keep things relatively simple.
DIY wardrobe solutions: Organisation tips
A big part of creating your DIY wardrobe is organisation. If you know some handy organisation tactics, it can influence how you design your wardrobe whilst also making your use of it much easier! Here we have a few handy tips to easily organise your wardrobe.
Tip 1: Declutter clothes by category
A fast way to declutter that tangled pile on the floor that may or may not be your clothes is to sort them by type. This will make inroads into that massive fabric mountain much simpler. Separate your clothes into a single category and make it easier to compare similar clothes because they are grouped together in front of you.
The theory here is that it is even easier to get rid of the things you have too many of or no longer want. Try to make a commitment only to keep the clothes you know you’ll wear with frequency. If you hesitate on an item, that’s reason enough to add it to the pile for donation.
Tip 2: Empty and clean
This tip is an ongoing one for when your new wardrobe is up and running. Every now and then, it’s a good idea to pull everything out of your wardrobe – like, everything – and give it a clean. Vacuum, wipe down and scrub and use it as an excuse to re-sort your clothing before putting it all back in. The goal here should be to ensure a healthy space for your clothing while preventing mini-messes from building up over time into one big mess.
Tip 3: Design your ideal space
Use your specific wardrobe’s best features to your advantage. For example, if you have a lot of vertical storage space or multiple hanging rods, design and organise your clothing with the ability to hang in mind.
For hard-to-reach upper shelves or the fact that you may not have any shelves, find a creative way to fix the problem.
This may require some out-of-the-box thinking; for example, a hanging shoe organiser can also be a great way to store bulk t-shirts, or you can use plastic tubs for underwear and socks. Add a small armoire if you have an open space wardrove for extra storage or if you have an abundance of shelves, remove some to create more hanging space.
Tip 4: Store by category
This may seem obvious, but you would be surprised how many people do not do this easy tip. If you already followed tip #1, then extend this idea to your storage. Not only does it look neater, but it also makes things simpler when you want to locate a particular sweater in a hurry.
Keeping like items with like items just make sense. All of your belts should live in the same spot, and workout shirts should be separate from your pyjamas. When you are trying to pick an outfit, you’ll benefit from having all of the options next to each other for easy choices.
The most common wardrove material is plywood as it is inexpensive and easy to work with. Wardrobe materials choices are completely subjective and will often depend on the look you already have or would like to have in your home.
The reason why so many people opt for plywood is due to it being a material that is quite solid layers while still being light and easy to work with. This makes plywood a versatile option for both simple and detailed wardrobe designs.
How deep should a DIY built-in wardrobe be?
The availability of space will often be a more determining factor for your wardrobe size than anything else, but 24 inches is the common depth for most wardrobes as a preferred minimum.
Wardrobe dimensions depend on the design and can be as narrow as 18 or even 12 inches if they need to be. The height will also depend on your available space but aim for no more than 72 inches.
Can I build my own built-in wardrobe?
Yes, you can! However, it is important to note that a built-in wardrobe will be a little more involved than just creating a freestanding wardrobe. Built-in wardrobes are, however, a great way to create an inexpensive form of additional storage space. They are still quite simple to build and are a good way to develop some DIY skills while also creating more storage space and organisation for your clothing.
Get organised and get those clothes off the floor!
You now have some handy tips for building your own wardrobe and bringing a little organisation into your clothing storage. The goal here is to make your life easier, which it will!
Every good shed starts with an even better foundation.
Everyone (with a garden) needs a good garden shed. This very useful space is great for extra storage or a place to craft other various projects, but every good shed starts with a solid foundation. You want to ensure that your garden shed offers stability and safety, and learning how to build a shed foundation is the path to achieving that.
It should also be noted that whether you are building your shed from scratch, or buying a pre-fabricated option, both methods require you to form the foundation. This makes learning how to build a shed foundation an unavoidable step for anyone who wants a new shed.
Read on for all of the essential steps to ensure the correct surface, along with the steps for how to build a shed foundation.
Start by levelling the surface
You have a few options for your foundation, be it concrete, a raised wooden deck or concrete slabs, but all will require that you start with a level surface. Your shed will probably warp over time, and the adverse effects of this will be lessened if you level the ground first. Remove the debris and place a weed-proof membrane down to prevent things from growing through the floor.
Grass and weeds growing under your shed can be a problem as the floor will not dry out properly after the rain. This can cause premature rot, mould and mildew.
Laying the base
There are many base options for your shed, but the most popular are cast concrete or concrete paving slabs. Both options provide a longer-lasting garden shed foundation, and will require these steps:
Use mason’s string and batter boards as a border around the area
Dig about 15 cm deep
Place a wooden framework for the concrete
Place a level layer of 7 cm deep gravel, then pour the mixture of cement and concrete
Spread out with a hand screed
Let it dry completely starting the shed
Make sure you have all the tools and materials before you start to make for a more efficient process. While this is a task that is made easier with two people, it most certainly can be done with just one.
Common mistakes to avoid
The first thing to avoid is laying paving slabs on irregularly spread gravel as this will create an unstable base that will warp and crack over the years. Your base will likely sink once the underlying material disintegrates.
If opting for a raised wooden deck, ensure you clear the ground first and use a weed-proof membrane. While ideally, you’ll find a spot that is already level, you can still learn how to build a shed foundation on uneven ground. This will require grading the soil and making sure you are not in a spot that will collect water.
If you want to ensure that your base area stays dry, remove all grass from the site and use a dirt tamper with 5-6 cm of gravel to help drain the water underneath. Knowing how to build a gravel foundation for a shed will help secure the longevity of your base when it is up against the elements.
Deck blocks are another option for your shed foundation. These pre-formed masses of concrete feature formations in the top to hold vertical posts or beams. Many people prefer this feature as a form of extra structure security.
While they are generally a more temporary foundation for freestanding or floating structures, many people use them as they have a more straightforward installation process. You should not consider the option, however, if you are in a high wind area. Your local building code office will usually have the final say on whether or not you can use them.
Deck blocks are quicker and cheaper to install and require minimal surface prep or digging. The number of blocks you need will depend on the weight, layout, and size of your shed. The bigger the shed, the bigger your blocks. You will likely need help moving larger ones into place as they can be weighty.
The steps for building a shed foundation with deck blocks
First, you’ll want to level your blocks and ensure you have the following tools on-hand:
Tape Measure
Mason Line
Level
Safety Glasses
Knee Pads
Laser Level
1: Calculate where your blocks will be located and prepare the area with level string lines
2: Place your blocks in position and continually check to ensure your structure is level
3: Measure diagonals to make sure all blocks are in the correct position.
While deck blocks can be a very stable base, they can be challenging to level if the ground settles once the shed is built. Try to avoid disturbing the environment too much while levelling the deck blocks.
What happens if I have no or inadequate foundation?
Apart from being unsafe, a shed that is not level won’t look very good or feel great to be inside of. Doors and windows may not close properly as your shed will settle over time, causing things to come out of alignment. Avoid this right from the start with a solid foundation.
You may also find that the centre of the floor may not be well supported, primarily if you use concrete blocks on an uneven base. If the centre of the floor is inadequately supported, it will result in a bouncy floor that sags over time. This is especially the case in a larger shed or garage that will be storing heavy vehicles or equipment.
You have a few options for your foundation, most commonly concrete, a raised wooden deck or concrete slabs. The most popular options can be cast concrete or concrete paving slabs. They will provide a longer-lasting garden shed foundation. Wooden decking is a popular option as it looks neater and easier to level. If you do opt for this, however, ensure that you lay a weed membrane beneath it to prevent various growth through your deck.
Ultimately, the decision will be based on whichever aesthetics you prefer, or the foundation that is within your budget.
Do you need a foundation for a shed?
Absolutely! Whether you are building your shed from scratch or buying a pre-fabricated option, both methods require you to form a foundation. This makes learning how to build a shed foundation an unavoidable step for anyone who wants to build a new shed. The foundation will help ensure your shed’s longevity as it battles the outdoor elements.
The quality of your foundation will also help you avoid other issues. Besides poor aesthetics, shed doors may not close properly on an unstable base. You may also have drainage issues, or problems with wet areas underneath your shed if the flooring has not been treated properly.
How do you prepare a foundation for a shed?
Once you have decided what your shed foundation will be (most commonly concrete, a raised wooden deck or concrete slabs), you’ll need to level a surface. This is a crucial step to ensuring the longevity of your base, so remove the debris and place a weed-proof membrane down. This will prevent things from growing through the floor.
If you have opted for a cast concrete or concrete paving slab base, use mason’s string and batter boards to form a border around the area. Dig about 15 cm down placing a wooden framework on the edge for the concrete to then be poured into. Add a level layer of 7 cm deep gravel, then pour the mixture of cement and concrete in, spreading it out with a hand screed. Allow it to dry completely before you start work on building the shed on top.
Enjoy the peace of mind in knowing your shed will stay up!
Now that you’ve learned how to build a shed foundation, you can push on with the rest of the shed knowing that it won’t collapse! We’re sure you’ll undoubtedly appreciate that peace of mind when standing inside of it. Safety first, always!
If, on the other hand, the successful laying of your shed foundation was understandably satisfying, have a read of our backyard ideas blog and proceed with building the shed yourself. These blogs will give you some other great DIY projects! It will not only increase the value of your home, but also the function and enjoyment of your outdoor areas. Grab the tools and get to work and make your backyard something you are proud of today!
What is a classic Australian backyard without a shed?
Does your DIY itch need a scratch? Have a space in the backyard that is just asking for a project? Learning how to build a shed is a great, simple project that not only increases your storage space at home, but it gives you a place to craft even more projects!
Every backyard (that has space) needs a shed, so we’ve detailed the steps, some tips and techniques for the perfect shed. Whether you build the shed from scratch or get a little help from a contractor, this info will come in very handy!
While the specifics of shed building will be very particular to the type of shed you build, read on for some higher-level steps that are crucial to any shed build then tailor as necessary for your chosen plan.
How to set up your shed foundation
Step 1: Clearance to Build
Firstly, it is very important before you build anything on your property that you apply for a building permit. This will ensure you can pop a shed up in that area of your home legally. Even though it is your property, your shed may affect someone else’s view, and the last thing you want to do is go to the trouble of building a shed, only to have to tear it down.
Get all the necessary approvals and permits first, which may require you to submit a set of shed plans to ensure your project adheres to building codes. If you want to lower the risk of possible rejection, call ahead and determine what is and isn’t allowed on your property.
The biggest restriction will likely be height. If you understand your parameters first, you can design your shed around them and ensure the approval of your plans.
Step 2: Picking your site
You’ll want to confirm the exact spot where your shed will sit on your property. This is a crucial step that isn’t as easy as it sounds. If you choose poorly, your shed won’t be standing for long.
Follow these simple rules to pick the best spot:
Avoid building at the bottom of a hill or in a spot where water collects
Don’t pick a spot where your shed will be entirely surrounded by trees and ground cover as this will restrict sunlight and airflow
Never violate code-required setback distances which determine how far away your shed must be from side, front, and rear property lines
Keep in mind that your location should allow for easy access when you need to carry heavy tools in and out of your shed. In some cases, your yard may not be that big, meaning the location is somewhat already picked for you. if so, keep access in mind when choosing the dimensions of your shed.
Step 3: Ensure you have all of the tools you’ll need
It’s always good to be prepared before you begin to save time (and frustration) when your project is underway. No matter how big your shed will be, you’ll need a range of carpentry hand tools and power tools, including:
The first thing you’ll need to create is a strong base. The most common foundations are solid concrete blocks or pressure-treated wood timbers that have been set directly on the ground. You’ll want to ensure that your base is perfectly level to support the shed’s floor frame.
Protect the foundation from soil erosion by setting them on a 4-in.-deep bed of compacted gravel. You’ll be fine to compact this by hand if you are building a small shed, but for larger areas, you’ll save time by renting a plate compactor. Ideally, your garden shed foundation will be set slightly off the ground to help with water drainage.
It is important to note that if you are buying a prefabricated shed, you’ll still need to perform this step to create the foundation.
Step 5: Build a floor frame
Your floor frame should feature a mudsill, floor joists and perimeter band joists. It is crucial to weather-proof your frame as it will sit close to the ground, making it prone to rot and wood-eating bugs. Build your floor frame out of pressure-treated lumber, and if you are buying a prefabricated shed, ensure it has a floor frame made with treated construction-grade lumber.
For the floor deck, you’ll need at least a ¾-in. exterior-grade plywood. The thicker, the better. This may raise the cost a little and be harder to install, but you’ll be glad you created a solid floor down the track. Pressure-treated plywood for the floor deck is always a good idea for longevity.
Step 6: Roof framing
The hardest step of the process is framing the roof, as you’ll need to make a lot of repetitive, angled cuts. Start by assembling the rafters and ceiling joists into roof trusses, then raise them and set them on top of the walls. This will be much easier than building the roof frame one board at a time.
You can essentially use your completed floor deck like a giant workbench for the creation of roof trusses. Ensure you take the necessary time to get this right.
Step 7: Door placement
You’ll either have a hinged or sliding door on your shed. Hinged doors take up less space and are more secure, sliding doors are easier to install but require additional wall space on either side.
The best positioning for your door is on one of the sidewalls. this will allow you to access items no matter where they sit in the shed. there is nothing worse than having to dig through everything to get the shovel hanging at the very back!
DIY Sched: Materials List
Most materials lists will vary greatly dependent on the type and size of shed you are building. To give you a rough guide, however, here is a standard list of materials required to build a typical shed:
Corner/fence posts 90x90mm x 2.4m (Quantity 4)
Cement 25kg (Quantity 1)
Sharp sand 25kg (Quantity 1)
Waterproof sheeting (Quantity 1)
CLS C16 timber 38x63mm x 2.4m (Quantity 60)
LogLap cladding 125mm x 22mm (224m total length)
3×2 C16 construction timber 45x70mm x 3m (Quantity 8)
3×2 C16 construction timber 45x70mm x 3.6m (Quantity 6)
It’s unlikely you are building a shed just for the aesthetic look. You probably have some functional ideas in mind for it as well, namely maximising the extra storage. If so, ensure you consider your storage requirements before building. Make an inventory of the things you plan to keep in your shed and account for a little room to move as well.
It is also important that you consider the climate. Some shed materials will not be able to handle the harsh weather. Steel seems like a durable choice for a shed, but in hot regions, a steel garden shed will be unbearable in summer.
Finally, ensure that price is not the most significant factor in the building of your shed. Cheap materials can become brittle in the heat, and you’ll spend more replacing sections or even the entire shed, far sooner than if you had opted for a more durable material.
Frequently asked questions
Can you build your own shed?
Absolutely! You’ll want to first get a permit to be able to build. Once you have that, you can often build your own shed for a lot cheaper than paying a builder. This even includes the slightly easier method of building your own shed with a flat-pack model.
The advantage of building your own shed is the ability to completely customise your design. You can fit to your space, or to the items you are hoping to store. So long as you have the tools required and the right quality materials you’ll be able to create your own custom garden shed.
It’s the DIY project that keeps on giving
You will get many uses out of your freshly built shed. It may even be a home that inspires plenty more DIY projects in the future! As long as you focus on sturdy construction with quality materials, you’ll be able to enjoy your garden shed for many years to come.
While you are at it, why not read our blog about a range of other backyard ideas that will boost the value of your home as well as the enjoyment of your outdoor areas? There are always new skills to learn and your home can benefit from some well-executed projects today.
It's easier than you think to tile a wall with these steps
So you want to learn how to tile a wall? Good on you for taking the first step and deciding it may not be as hard as some might think! You are also correct, as with some patience and the right preparation, learning how to tile a wall can be easy and even a little fun.
Wall tiles are a popular choice for wet areas of the home like the kitchen or bathroom, as they are not affected by moisture like wallpaper or paint can be. They are also a robust, stylish option that can increase the aesthetics and value of your home. Tiles also come in a lot of colour and pattern options, so you can really flex your design muscles!
To achieve a professional-looking tiling result, follow the steps for how to tile a wall below and take control of the look in your home. These instructions apply for large projects, full rooms and even just a small, feature splashback in the kitchen.
Everything you need to tile a wall
Source: Airtasker
It’s always a great idea to have everything you need ready to go before starting a project like this. Here are the tools and supplies you will need to tile a wall:
Tiles of your choosing
Grout
Adhesive
Protective coverings
A bucket
Clean sponges
Sugar soap
Pencil and tape measure
Spirit level
Gloves
Tile spacers
Grout float
Notched trowel
Tile cutter
Timber baton
Screws
Drill
Silicone sealant and caulking gun
Steps to tile a wall
Step 1: Preparing the area
When learning how to tile a wall, the first step is to lay some protective covering on the floor to keep it safe. Look for any cracks that need repair. The surface you are about to tile should be flat, so sand away any lumps and bumps at this stage.
Use a clean, damp cloth to wipe down the wall you will be tiling, and it’s a good idea to run some sugar soap over the space as well. Let the wall to dry completely before moving to the next step.
Step 2: Priming
Some tiles require you to prime the wall, and in wet areas, a specialist waterproofing product is a great idea.
Another element to consider is how much weight your wall can handle as tiles are quite heavy. If you need to strengthen the wall, you can use Hardiebacker boards to allow the wall to hold more weight.
Measure the wall height and width then multiply the two measurements to find the metre-squared value. This will give you an idea of how many tiles you’ll need (although it is always good to have extra to account for breakage).
Step 4: Marking the wall
Find your starting point by figuring out where the centre of the wall is. Mark it with a pencil, then use a tile as a measure to mark the width and length of the tiles to get an idea of where they will lay. Always aim to have at least half a tile at the very bottom of your wall, and rearrange your pattern if necessary to ensure this is the case.
Find the pencil mark that is closest to the floor and use a spirit level to draw a line horizontally across the wall. Fix a timber baton to the surface as a guide to tile up from.
Step 5: Preparing the adhesive
Your chosen adhesive will have instructions for how to mix it. If you are using small tiles, a pre-mixed adhesive will likely be ok. If you are using larger ones, a cement-based adhesive that you mix yourself will be needed.
Mix the adhesive in a bucket according to the packet instructions and once mixed, apply the adhesive with a notched trowel. Hold the trowel at a 45-degree angle and spread the adhesive over the wall. Ensure an even coverage then make grooves in the adhesive in the same direction.
Pro tip: Only cover enough of the area that you can tile before the adhesive hardens. Aim for one square metre at a time.
Step 6: Tiling the wall
Push the first tile gently onto the wall, twisting to ensure it sticks. Use a tile spacer on each edge and wipe away the excess adhesive with a cloth. Continue this action with the rest of the tiles until you’ve covered the whole area.
When you reach the edges, you’ll likely have to cut some tiles into the right shape. You can do this with:
A manual cutter for straight cuts
An electric cutter for thick tiles, right angles or curved edges
A tile scribe for thin tiles
Step 7: Drying time
Once you have secured the edge sections to the wall, wait for whatever amount of time the instructions for your adhesive state for drying times. When dry, remove the spacers and wipe away any excess adhesive.
Step 8: Prepare the grout
Mix some water and the grout powder in a bucket in a small amount as this will set quickly. Use a grout float to push the grout into the spaces between your tiles. Wipe away the excess grout with a damp sponge.
After about an hour, you’ll need to wipe the wall again to get rid of any residue. At this point, you can use a grout profiler to smoothen all of the grout lines. The key is to make sure the grout does not get to wet throughout these steps as it may weaken the finished grout.
Step 9: Sealing
The wall tiling process’s final step requires you to use a silicone sealant to seal the edges. This will ensure a watertight finish keeping your wall, tiles and grout safe.
Place the sealant in a caulking gun and squeeze it along the edges of the wall. You can also use a sealant profiler to take away any excess. If you just want to use your finger for this that is fine but make sure you are wearing gloves. Allow the sealant to dry for 24 hours before using the area or making it wet. At this point, you should be staring at a professionally tiled wall that you’ve done yourself!
You can find your starting point by figuring out where the centre of the wall is. Use a pencil to mark the spot then use one of the tiles you ware about to lay as a measure to mark the width and length of where they will lay.
Always aim to have at least half a tile at the very bottom of your wall, and rearrange your pattern if necessary to ensure this is the case.
Can you tile directly onto a painted wall?
Some tiles require you to prime the wall, and you will need to consider how much weight your wall can handle. Tiles are quite heavy, so if you need to strengthen the wall, you can use Hardiebacker boards to allow it to hold more weight.
You will also require adhesive which you will apply with a notched trowel. Hold the trowel at a 45-degree angle and spread the adhesive over the wall. Ensure an even coverage then make grooves in the adhesive in the same direction before sticking your tiles into place.
How do you prep a wall for tiling?
Start by looking for any cracks that need repair in the wall. The goal is to ensure the surface you are about to tile is flat, so sand away any lumps and bumps if necessary. Use a clean, damp cloth to wipe down the wall with sugar soap and let the wall dry completely before tiling. Make sure you have everything you need for tiling on hand before moving on with the next steps as well.
Are you ready to tile a wall?
You now have all of the information you need for how to tile a wall and are ready to get to work. We are sure you’ll be very happy and accomplished upon completion, and find your new skills to be very handy.
If you are a little less confident or have decided that the steps above are too complicated or time-consuming for your schedule, there are tilers who are ready to help out. You can find specialists in splashback tiling, porcelain tile installation, terracotta tiling and more.
If you have successfully completed the task yourself and are now hungry for more DIY tiling jobs to do around the home, move on to some of our other helpful blogs! You can find some inspiration for splashback ideas, step-by-step instructions for how to remove a tile floor and a range of bathroom tile ideas for your next project.
Tiles are a robust option that can be timeless when the right design and pattern is chosen. Consider the look you want and research which patterns and layouts are available for your tile choices. Learning how to add them to your home properly is a very worthwhile use of your time, so get ready and tiling today!
This is perhaps the easiest DIY to change up your bathroom instantly
Thanks to the modern marvels of commercial paint, you now have options when it comes to more manageable ways to re-design your bathroom. Learning how to paint bathroom tile allows you a more cost-efficient way to restore or re-do the look of your tile flooring, walls, and other bathroom surfaces.
That being said, there are some important elements about how to paint bathroom tile that you need to familiarise yourself with before you start. Read on to not only learn how to paint bathroom tile but a few other key tips that will ensure you do a great job.
Deciding on your new look
If your bathroom is starting to date or look a little damaged, learning how to paint bathroom tile is definitely a much cheaper option than having them replaced. The most popular bathroom tile materials are often ceramic, porcelain, natural stones, or quarry tiles, all of which are often sold in a variety of solid colours or patterns.
If you want something that differs from this to really take control of your bathroom design or make sure your space is updated to suit newer fashions, paint is the key. You can lighten the look, darken it, or apply a pattern to fit any bathroom aesthetic, and best of all, once you know how to paint bathroom tile, you can easily repaint as your tastes change.
When choosing your new colour, it is important to keep in mind that brighter paint colours suit space-limited bathrooms the best. Darker paint is well-suited to larger spaces as it absorbs light, making a small bathroom look more contracted.
Bathroom surfaces that shouldn’t be painted
You can paint the following types of tile:
Ceramic
Porcelain
Most natural stone
Unglazed quarry tile
You should not paint glazed quarry tile as it does not bond well with the paint. Your new paint job will last the longest on surfaces that have low exposure to moisture (which is hard in a bathroom), but the flooring, walls, and backsplashes are all suitable.
The less suitable spaces can be tiled countertops, tub surrounds, or shower surfaces as they are in contact with a lot of water, therefore may prematurely fade, peel, or blister. If this does occur, it’s not the end of the world. You can just touch-up or re-apply.
Matching the paint to the tile material and surface
If you are painting ceramic, porcelain, or unglazed quarry tile, your best bet is either latex or epoxy paint in the pre-mixed or ready-to-mix varieties. Latex paint is generally less toxic and does not have as intense a smell. You can also spend a little bit more money on a mildew-proof variety, which negates the effects of heavy moisture exposure somewhat.
If you are painting some of the wetter areas like backsplashes, countertops, tub surroundings, and shower surfaces, opt for epoxy paint. Epoxy cures into a harder coat that is more durable and resistant to moisture and everyday wear-and-tear. You can even find an epoxy that is specifically designed for tubs and tiles.
When painting natural stone tiles, an acrylic latex paint that has been specially formulated for interior masonry or stucco is the best play. You will be able to find this paint in a variety of sheens from flat to high-gloss. Just keep in mind that the glossier the finish, the more slippery the tile. Flat and matte sheens provide the most traction, while semi-gloss and high-gloss can create a slip-prone surface, so avoid them on shower floors for safety.
How to paint bathroom tile
There are four or five stages to consider when learning how to paint bathroom tile:
Surface preparation
Priming
Painting
Pattern application (if applicable)
Sealing
When planning for the time you will spend on the project and how long your bathroom will be out of commission, you need to consider the primers, paints, and sealers’ dry time. All of these will vary depending on the types used. If you are painting a pattern, its complexity will also determine your project time.
Step 1: Surface preparation
You will need to begin by sanding, vacuuming, and scrubbing the old tile and grout lines to prepare it for the new paint job. This action will remove dirt and grime, giving you a clean canvas to work with.
Step 2: Priming
This step is essential to ensure your tile is receptive to the paint. It will be best if you use an epoxy or urethane primer if you are painting ceramic or porcelain tiles or a masonry primer for natural stone or unglazed quarry tiles.
Follow the specific primer’s application instructions and pay careful attention to its dry time. Painting over sticky primer leads to disaster.
Step 3: Painting the bathroom tile
Once your primer is dry you can use either a roller or large brush to apply large swaths of paint to the tile. If you have more patience, you can brush individual tiles by “cutting in” around the edges. If you do this, however, you’ll need an angled brush to avoid painting the grout lines.
Your process will depend on whether or not you plan to paint the grout, a large area or just a few accent tiles. The paint can take anywhere around two or more days to dry, during which you’ll need to avoid touching it or using the bathroom – so keep that in mind before you begin.
Step 4: Applying a pattern (optional)
If you decide to paint a pattern, wait for the tiles to be fully-cured, then tape your pre-bought or homemade stencil to the area you want to pattern. Go over the stencil with a roller and wait out the full dry time before removing the stencil.
Step 5: Sealing
The final step involves the application of a sealer which protects the painted bathroom tile from grime, scuff marks, and scratches. Use a clear sealer of the following type:
Urethane for ceramic or porcelain
Masonry for natural stone or quarry tile
Once again, you’ll need to wait for the full required drying time before you begin to use the bathroom. All up, the project may take your bathroom out of commission anywhere from two days to several days. Make sure you clear everything you need from the bathroom before you start!
Painted bathroom tile maintenance
The best part about your finished painted bathroom tiles is that all they will need to keep clean is a bit of regular sweeping, vacuuming, and mopping. The sealer will help the tiles to retain their colouring and fend off abrasive dirt. You can also lay bathroom mats in high-traffic areas to prevent scuff marks and if some slight damage occurs, simply use a small artist’s paintbrush to re-apply some of the leftover paint and re-seal.
Yes, you can! You can paint ceramic, porcelain, most natural stone, and unglazed quarry tile. You should avoid painting glazed quarry tile as it does not bond well with the paint. Your new paint job will last the longest on surfaces that have low exposure to moisture, which is hard in a shower, but if you use an epoxy paint, it will cure into a harder coat that is more durable and resistant to moisture. You can find an epoxy that is specifically designed for shower tiles.
What kind of paint do you use on bathroom tiles?
If you are painting ceramic, porcelain, or unglazed quarry tile, use either a latex or epoxy paint. Latex paint is generally less toxic and does not have as intense a smell. You can also choose a mildew-proof variety for more protection. If you are painting some of the wetter areas, an epoxy cures into a harder coat that is more durable and resistant to moisture.
How long does tile paint last?
Your tile paint’s longevity will depend on the variety you use and how much traffic the painted area receives. If you get a scuff mark or damage to the paint for some reason, you can simply use a small artist’s paintbrush to re-apply some of the leftover paint to fix it.
Are you ready to give your bathroom a new look?
As you can see, painting your bathroom tile isn’t difficult, but it is time-consuming. This can be a fun and satisfying project to take on, you just need to account for the fact that your bathroom will be out of action for a few days.
If you think the task may take longer than you can afford to give, engage one of our skilled painting taskers, who specialise in bathroom painting. They can save you time and guarantee an excellent result. This may be best if you are considering an intricate pattern!